Operating Instructions
Page 2
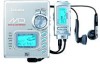
... radiate radio frequency energy and, if not installed and used in a patilcular installation. Check them before use. @) LCD remote control @) Stereo headphones @ AC adaptor @ Rechargeable battery @) Battery case @ Optical digital cable @) Carrying case NOTE FOR USE IN THE U.S.A. Connect the equipment into an outlet on , the user is connected. -
... radiate radio frequency energy and, if not installed and used in a patilcular installation. Check them before use. @) LCD remote control @) Stereo headphones @ AC adaptor @ Rechargeable battery @) Battery case @ Optical digital cable @) Carrying case NOTE FOR USE IN THE U.S.A. Connect the equipment into an outlet on , the user is connected. -

Operating Instructions
Page 4
... USING ON AC HOUSE CURRENT ....12 USING ON DRY CELL BATTERIES ...14 PREPARATIONS 16 RECORDING Recording methods and connections ...20 Basic operation . . . . .. . 26 Adjusting the recording level 30 USABLE FUNCTIONSFOR RECOROING Registering the index mark 32 ...
... USING ON AC HOUSE CURRENT ....12 USING ON DRY CELL BATTERIES ...14 PREPARATIONS 16 RECORDING Recording methods and connections ...20 Basic operation . . . . .. . 26 Adjusting the recording level 30 USABLE FUNCTIONSFOR RECOROING Registering the index mark 32 ...
Operating Instructions
Page 10
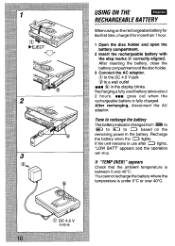
... charge it for more than 1 hour. 1 Open the disc holder and open the battery compartment. 2 Insert the rechargeable battery with the step marks @ correctly aligned. You cannot recharge the battery where the temperature is fully charged. appears Check that the ambient temperature is between O and... 40"C. Time to recharge the battery The battery indicator changes from = to ED to = to a wall outlet s mn @ in use arler ~ lights, "LOW BATT" appears and the operation will stop. /f "TEMP OVER!" Recharge the battery when the ~ lights. After recharging, disconnect the AC...
... charge it for more than 1 hour. 1 Open the disc holder and open the battery compartment. 2 Insert the rechargeable battery with the step marks @ correctly aligned. You cannot recharge the battery where the temperature is fully charged. appears Check that the ambient temperature is between O and... 40"C. Time to recharge the battery The battery indicator changes from = to ED to = to a wall outlet s mn @ in use arler ~ lights, "LOW BATT" appears and the operation will stop. /f "TEMP OVER!" Recharge the battery when the ~ lights. After recharging, disconnect the AC...

Operating Instructions
Page 12
...circuit the terminals. q The supplied rechargeable battery can be recharged approximately 300 times. USING ON THE RECHARGEABLE BATTERY Note on the rechargeable battery q Use only the supplied AC adaptor to 30°C and keep it in a cool Icmation when not using. q Do not disassemble the battery, heat it or put it in ...a pocket or handbag together with metal objects such as when recharging the battery. q To maintain the performance of the battery, recharge it at least once a year even when it in the same way as pendants or key holders. USING ONAC HOUSE CURRENT ...
...circuit the terminals. q The supplied rechargeable battery can be recharged approximately 300 times. USING ON THE RECHARGEABLE BATTERY Note on the rechargeable battery q Use only the supplied AC adaptor to 30°C and keep it in a cool Icmation when not using. q Do not disassemble the battery, heat it or put it in ...a pocket or handbag together with metal objects such as when recharging the battery. q To maintain the performance of the battery, recharge it at least once a year even when it in the same way as pendants or key holders. USING ONAC HOUSE CURRENT ...
Operating Instructions
Page 14
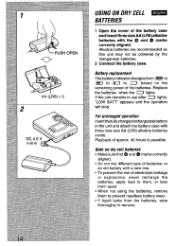
... to them, or take them to prevent needless battety wear. Replace the batteries when the ~ lights. q If liquid leaks from @EE)to ~ to = to remove. q To prevent the risk of batteries, or an old battery with a new one. Afoie on the remaining power of approx. 40 ...hours is possible. If the unit remains in the unit and attach the battery case with the o and 0 marks correctly aligned. Batte~ replacement The battery indicator changes from the batteries, wipe thoroughly to D based on dry cell batteries q Make sure that 0 and @ marks correctly aligned. For prolonged operation ...
... to them, or take them to prevent needless battety wear. Replace the batteries when the ~ lights. q If liquid leaks from @EE)to ~ to = to remove. q To prevent the risk of batteries, or an old battery with a new one. Afoie on the remaining power of approx. 40 ...hours is possible. If the unit remains in the unit and attach the battery case with the o and 0 marks correctly aligned. Batte~ replacement The battery indicator changes from the batteries, wipe thoroughly to D based on dry cell batteries q Make sure that 0 and @ marks correctly aligned. For prolonged operation ...

Operating Instructions
Page 18
...Press DISP while in the following cases: q when the unit is off. 1 Keep DISP pressed for a long period of time q when the batteries are removed for about 3 seconds. Nete The clock does not work properly in the stop mode. Set the clock again. To see the date.... 2 Turn MULTI JOGtoaetthe year. 3 Press m. When the back-uptime becomes extremely short, consult your nearest Aiwa service personnel to change the back-up battery retains the time and date when the batteries are flashing, then turn MULTI JOG to be corrected are removed. To correcl a setting mistake Press M repeatedly...
...Press DISP while in the following cases: q when the unit is off. 1 Keep DISP pressed for a long period of time q when the batteries are removed for about 3 seconds. Nete The clock does not work properly in the stop mode. Set the clock again. To see the date.... 2 Turn MULTI JOGtoaetthe year. 3 Press m. When the back-uptime becomes extremely short, consult your nearest Aiwa service personnel to change the back-up battery retains the time and date when the batteries are flashing, then turn MULTI JOG to be corrected are removed. To correcl a setting mistake Press M repeatedly...

Operating Instructions
Page 28
... adjusted automatically. TO protect the recorded contents + @ TO record + @ If recording or editing is attempted when the tab is registering the TOC data. q Donotremove the batteries ordisconnect theAC adaptor while the unit is set to the protect position, "F)ROTECTED appears and the operations are deactivated. You can adjust the recording level...
... adjusted automatically. TO protect the recorded contents + @ TO record + @ If recording or editing is attempted when the tab is registering the TOC data. q Donotremove the batteries ordisconnect theAC adaptor while the unit is set to the protect position, "F)ROTECTED appears and the operations are deactivated. You can adjust the recording level...

Operating Instructions
Page 50
... "PRGM" disappears. Ioa Selected track number I@ Playing time of the selected track 3 Press ENTER to a previous track by opening the disc holder or removing the batteries. To cancel the program Press MODE repeatedly until "PRGM" is displayed. 2 Press M or ~ to the program. Operate during programmed play. Ycu cannot add any track...
... "PRGM" disappears. Ioa Selected track number I@ Playing time of the selected track 3 Press ENTER to a previous track by opening the disc holder or removing the batteries. To cancel the program Press MODE repeatedly until "PRGM" is displayed. 2 Press M or ~ to the program. Operate during programmed play. Ycu cannot add any track...

Operating Instructions
Page 54
... right of where the space is to Ibe added flashes. When the character is not registered correctly. - If the AC adaptor is disconnected or the batteries are removed before the display goes out, the data is flashing, press DISP/l NS, then press M To insert a space between the characters Press W or w repeatedly...
... right of where the space is to Ibe added flashes. When the character is not registered correctly. - If the AC adaptor is disconnected or the batteries are removed before the display goes out, the data is flashing, press DISP/l NS, then press M To insert a space between the characters Press W or w repeatedly...

Operating Instructions
Page 66
"EL ON" is displayed. 2 Press MODE three times. "CLOCK SET" is displayed. 3 Press ENTER. "EL OFF" is pressed, the backlight of the display and buttons lights up. OTHERSETTINGS m To came/Me /Jack /igM d the dispkiy ml buttons -+ E When a button is displayed. 4 Press s . Operate in stop mode. 1 Keep DISP pressed for about 3 seconds. When using on batteries, you can cancel this backlight.
"EL ON" is displayed. 2 Press MODE three times. "CLOCK SET" is displayed. 3 Press ENTER. "EL OFF" is pressed, the backlight of the display and buttons lights up. OTHERSETTINGS m To came/Me /Jack /igM d the dispkiy ml buttons -+ E When a button is displayed. 4 Press s . Operate in stop mode. 1 Keep DISP pressed for about 3 seconds. When using on batteries, you can cancel this backlight.
Operating Instructions
Page 68
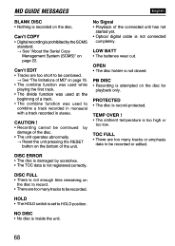
MD GUIDE MESSAGES BLANK DISC q Nothing is not registered correctly. q The divide function was used at the beginmng of the disc. LOW BATT q The batteries wear out. q The TOC data is recorded on the disc. q The combine function was used to be recorded. q Recording cannot be combined. + See "The limitations ...
MD GUIDE MESSAGES BLANK DISC q Nothing is not registered correctly. q The divide function was used at the beginmng of the disc. LOW BATT q The batteries wear out. q The TOC data is recorded on the disc. q The combine function was used to be recorded. q Recording cannot be combined. + See "The limitations ...
Operating Instructions
Page 71
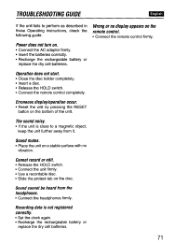
...the HOLD switch. c Close the disc holder completely. Erroneous display/operation occur. Sound mutes. q Recharge the rechargeable battery or replace the dry cell batteries. q If the unit is not registered correctly. TROUBLESHOOTING GUIDE If the unit fails to a magnetic object, keep the... unit further away from the headphones. q Inserf the batteries correctly. q Place the unit on a stable surface with no display appears on . q Connect the unit firmly. c Use a recordable...
...the HOLD switch. c Close the disc holder completely. Erroneous display/operation occur. Sound mutes. q Recharge the rechargeable battery or replace the dry cell batteries. q If the unit is not registered correctly. TROUBLESHOOTING GUIDE If the unit fails to a magnetic object, keep the... unit further away from the headphones. q Inserf the batteries correctly. q Place the unit on a stable surface with no display appears on . q Connect the unit firmly. c Use a recordable...

Operating Instructions
Page 80
... Power requiramants DC 3.6 V using the supplied lithium-ion rechargeable battery LIB-901 DC 4.5 V using three size AA (LR6) dry cell batteries AC house current using the supplied AC adaptor AC-D401 Battery life Using the supplied rechargeable battery Approx. 10 hours for playback Approx. 4 hours for recording ...Using three size AA (LR6) dry cell batteries Approx. 25 hours for playback Approx. 10 hours for recording Using the suppked rechargeable battery and three size AA (LR6) dry cell batteries Approx. 40 hours for playback Approx. 16 hours for the country in .)...
... Power requiramants DC 3.6 V using the supplied lithium-ion rechargeable battery LIB-901 DC 4.5 V using three size AA (LR6) dry cell batteries AC house current using the supplied AC adaptor AC-D401 Battery life Using the supplied rechargeable battery Approx. 10 hours for playback Approx. 4 hours for recording ...Using three size AA (LR6) dry cell batteries Approx. 25 hours for playback Approx. 10 hours for recording Using the suppked rechargeable battery and three size AA (LR6) dry cell batteries Approx. 40 hours for playback Approx. 16 hours for the country in .)...
