

Operating Instructions
Page 2
... you will find them on your AIWA dealer in ttie literature accompanying the appliance. CX-NV701CX-NV72 Serial No, Model No. SX-NV70 Serial (Lot) No. Zi?&Wf3& tzeA%%@ %s%v70/ V72 Congratulations on the rear of your system Your system NSX-V70/NSX-V72 is intended to alert the...the accessories @)-@ as follows. + u @ CX-NV70/CX-NV72 Compact disc stereo cassette receiver @ SX-NV70 (L,R) Front speakers @ Surround speakers SX-R220 @ Remote control @ FM antenna @AM antenna Q1 Operating Instructions, etc. For example, the "+ u " following "About this system, please take the time to read through...
... you will find them on your AIWA dealer in ttie literature accompanying the appliance. CX-NV701CX-NV72 Serial No, Model No. SX-NV70 Serial (Lot) No. Zi?&Wf3& tzeA%%@ %s%v70/ V72 Congratulations on the rear of your system Your system NSX-V70/NSX-V72 is intended to alert the...the accessories @)-@ as follows. + u @ CX-NV70/CX-NV72 Compact disc stereo cassette receiver @ SX-NV70 (L,R) Front speakers @ Surround speakers SX-R220 @ Remote control @ FM antenna @AM antenna Q1 Operating Instructions, etc. For example, the "+ u " following "About this system, please take the time to read through...

Operating Instructions
Page 12
POWER .I I..
POWER .I I..

Operating Instructions
Page 14
The minute stops flashing on the remote control and then press the W button within 4 seconds. To switch to be reset, If power is caused by a power interruption. The hour flashes. 2 Press the K ... than approximately 24 hours, all settings stored in memory after purchase need to 5 above. To display the current time Press the CLOCK button on the remote control. Set the time as follows while the power is connected for 4 seconds. The hour stops flashing and the minute starts flashing. 4 Press the M DOWN...
The minute stops flashing on the remote control and then press the W button within 4 seconds. To switch to be reset, If power is caused by a power interruption. The hour flashes. 2 Press the K ... than approximately 24 hours, all settings stored in memory after purchase need to 5 above. To display the current time Press the CLOCK button on the remote control. Set the time as follows while the power is connected for 4 seconds. The hour stops flashing and the minute starts flashing. 4 Press the M DOWN...
Operating Instructions
Page 16
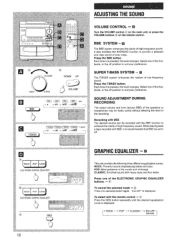
...and tone (except BBE) of the speakers or headphones may be set to enhance the clarity of your preference. CLASSIC: Enriched sound with the remote control + @ Press the GEQ button repeatedly until the desired equalization curve is displayed. ~ ROCK - T-BASS + 1111 + 111111 + ...oFF (cancel) 16 VOLUME CONTROL -+ El Turn the VOLUME control @ on the main unit, or press the VOLUME buttons @on the remote control. When playing back a tape recorded with the BBE function to off. 'EiEE1 ELECTRONIGCRAPHIGEQUALIZER "QEEiil ELECTRONIGCRAPHIGEQLIALIZER GRAPHIC EQUALIZER + u This unit ...
...and tone (except BBE) of the speakers or headphones may be set to enhance the clarity of your preference. CLASSIC: Enriched sound with the remote control + @ Press the GEQ button repeatedly until the desired equalization curve is displayed. ~ ROCK - T-BASS + 1111 + 111111 + ...oFF (cancel) 16 VOLUME CONTROL -+ El Turn the VOLUME control @ on the main unit, or press the VOLUME buttons @on the remote control. When playing back a tape recorded with the BBE function to off. 'EiEE1 ELECTRONIGCRAPHIGEQUALIZER "QEEiil ELECTRONIGCRAPHIGEQLIALIZER GRAPHIC EQUALIZER + u This unit ...

Operating Instructions
Page 22
..., even if stations 21 to be stored if a total of 32 preset stations. Then, press the 4> DIRECTION/PRESET button repeatedly. PRESET NUMBER TUNING + I= Use the remote control to select the preset number directly. 1 Press the TUNER/BAND button to select a band. 2 Press the numeric buttons to select a band. Each time the...
..., even if stations 21 to be stored if a total of 32 preset stations. Then, press the 4> DIRECTION/PRESET button repeatedly. PRESET NUMBER TUNING + I= Use the remote control to select the preset number directly. 1 Press the TUNER/BAND button to select a band. 2 Press the numeric buttons to select a band. Each time the...

Operating Instructions
Page 26
... +1O and O buttons. Press the RANDOM button on one disc is not possible. REPEAT PLAY All the tracks on the selected disc or on the remote control. q Do not place more than one of the DISC DIRECT PLAY buttonsto select a disc. 2 Press the numeric buttons and the +10 button to ...the end of that disc. q Do not tilt the unit with the remote control - Press the REPEAT button on all the discs can be skipped. 1 2 DISC 1 ~ DIRECT PLAY1 amm b 2 0000 0000 000 b BASIC OPERATIONS Selecting a track with ...
... +1O and O buttons. Press the RANDOM button on one disc is not possible. REPEAT PLAY All the tracks on the selected disc or on the remote control. q Do not place more than one of the DISC DIRECT PLAY buttonsto select a disc. 2 Press the numeric buttons and the +10 button to ...the end of that disc. q Do not tilt the unit with the remote control - Press the REPEAT button on all the discs can be skipped. 1 2 DISC 1 ~ DIRECT PLAY1 amm b 2 0000 0000 000 b BASIC OPERATIONS Selecting a track with ...

Operating Instructions
Page 28
Use the remote control. 1 Press the PRGM button twice in step 1, the unit enters the KARAOKE PROGRAM (page 50). 2 Press one of the DISC DIRECT PLAY buttons to ...
Use the remote control. 1 Press the PRGM button twice in step 1, the unit enters the KARAOKE PROGRAM (page 50). 2 Press one of the DISC DIRECT PLAY buttons to ...

Operating Instructions
Page 34
... start recording. Each time the button is pressed, a 4-second blank space is TUNER, VIDEO/AUX.) To resume recording, press again. Insert the tape with the remote control First press the ./0 REC/REC MUTE button, and then press the 4> button within 2 seconds. To pause recording, press the II button. (Applicable when the...
... start recording. Each time the button is pressed, a 4-second blank space is TUNER, VIDEO/AUX.) To resume recording, press again. Insert the tape with the remote control First press the ./0 REC/REC MUTE button, and then press the 4> button within 2 seconds. To pause recording, press the II button. (Applicable when the...
Operating Instructions
Page 40
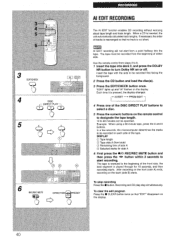
...Each time it is inserted, the unit automatically calculates track lengths. In a few seconds, the microcomputer determines the tracks to turn Dolby NR on the remote control to designate the tape length. 10 to 99 minutes can be recorded from steps 3 to 6. 1 Insert the tape into the tape. To... A (front side) @ Remaining time of the front side, the lead segment is cut short. When a CD is pressed, the display changes. Use the remote control from the beginning of the DISC DIRECT PLAY buttons to select a disc. 5 Press the numeric buttons on or off. m Al EDIT recording will not...
...Each time it is inserted, the unit automatically calculates track lengths. In a few seconds, the microcomputer determines the tracks to turn Dolby NR on the remote control to designate the tape length. 10 to 99 minutes can be recorded from steps 3 to 6. 1 Insert the tape into the tape. To... A (front side) @ Remaining time of the front side, the lead segment is cut short. When a CD is pressed, the display changes. Use the remote control from the beginning of the DISC DIRECT PLAY buttons to select a disc. 5 Press the numeric buttons on or off. m Al EDIT recording will not...
Operating Instructions
Page 42
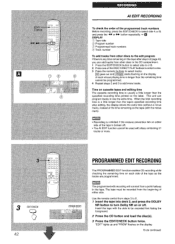
m q Recording is broken off . Use the remote control from stetx 3 to 8. 1 Insert the tape into deck 2, and press the DOLBY NR button to be recorded first facing the foreground. 2 Press the CD ...
m q Recording is broken off . Use the remote control from stetx 3 to 8. 1 Insert the tape into deck 2, and press the DOLBY NR button to be recorded first facing the foreground. 2 Press the CD ...

Operating Instructions
Page 50
... button to start play , you can be played after the current track. After playing a track, it finishes playing. By pressing the 4> button, play . Use the remote control. 1 Press the PRGM button once. 2 Press one of the last reservation Another To add the reservation during CD play with the next reserved track...
... button to start play , you can be played after the current track. After playing a track, it finishes playing. By pressing the 4> button, play . Use the remote control. 1 Press the PRGM button once. 2 Press one of the last reservation Another To add the reservation during CD play with the next reserved track...
Operating Instructions
Page 52
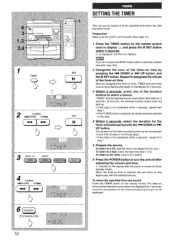
... period will not be displayed. 52 q If this step. 4 Within 4 seconds, select the duration for the timer-activated period can be played first on the remote control once to a tape, insert the tape into deck 1 or 2. When the timer-on at the specified time every day with the selected source. If... turned on time is not completed within 4 seconds, O is set between 10 and 240 minutes in this step is reached, the unit turns on the remote control. To check the specified time and source Press the TIMER button on and begins play with the built-in to a station. 6 Press the POWER...
... period will not be displayed. 52 q If this step. 4 Within 4 seconds, select the duration for the timer-activated period can be played first on the remote control once to a tape, insert the tape into deck 1 or 2. When the timer-on at the specified time every day with the selected source. If... turned on time is not completed within 4 seconds, O is set between 10 and 240 minutes in this step is reached, the unit turns on the remote control. To check the specified time and source Press the TIMER button on and begins play with the built-in to a station. 6 Press the POWER...
Operating Instructions
Page 54
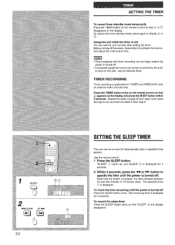
... and timer recording will not begin unless the power is turned off Press the SLEEP button once. Press the TIMER button twice on the remote control so that "SLEEP disappears. Use an external timer. TIMER RECORDING Timer recording is displayed. on the display SETTING THE SLEEP TIMER The... check the time remaining until the power is turned off. SETTING THE TIMER To cancel timer standby mode temporarily Press the TIMER button on the remote control so that @ or R~C disappears on the display. ~ restore the timer standby mode, press again to display 0 or REC Using the ...
... and timer recording will not begin unless the power is turned off Press the SLEEP button once. Press the TIMER button twice on the remote control so that "SLEEP disappears. Use an external timer. TIMER RECORDING Timer recording is displayed. on the display SETTING THE SLEEP TIMER The... check the time remaining until the power is turned off. SETTING THE TIMER To cancel timer standby mode temporarily Press the TIMER button on the remote control so that @ or R~C disappears on the display. ~ restore the timer standby mode, press again to display 0 or REC Using the ...
Operating Instructions
Page 67
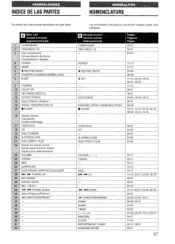
... DIRECT PLAY - 56-57 24-25 26-27 24-25 24-25 VOLUME (A, V) T-BASS - - CD t;$l DISC CHANGE ?D" $ OPENICLOSE ~1 DISC DIRECT PLAY 22.. ,,,, :, 23 Sensor for remote control Sensor para el control remoto Capteur pour telecommande VOLUME 224: T-BASS 2?, BBE :26 .g7"i ,. 28> .>. ' 29: SURROUND ELECTRONIC GRAPHIC 1%, * TUNING UP MIC MIXING EQUALIZER...
... DIRECT PLAY - 56-57 24-25 26-27 24-25 24-25 VOLUME (A, V) T-BASS - - CD t;$l DISC CHANGE ?D" $ OPENICLOSE ~1 DISC DIRECT PLAY 22.. ,,,, :, 23 Sensor for remote control Sensor para el control remoto Capteur pour telecommande VOLUME 224: T-BASS 2?, BBE :26 .g7"i ,. 28> .>. ' 29: SURROUND ELECTRONIC GRAPHIC 1%, * TUNING UP MIC MIXING EQUALIZER...


