

Operating Instructions
Page 4
... terminals, and requirements for grounding terminals themselves. TABLE OF CONTENTS SOUND PREPARATIONS CHECK YOUR SYSTEM AND ACCESSORIES 4 BASIC CONNECTIONS 4 CONNECTING OTHER EQUIPMENTS 6 CONNECTING A DVD PLAYER 8 REMOTE CONTROL 9 BEFORE OPERATION 9 SOUND AUDIO ADJUSTMENTS 11 GRAPHIC EQUALIZER 12 DSP SURROUND 13 RADIO RECEPTION MANUAL TUNING 14 PRESETTING STATIONS 15 TAPE PLAYBACK BASIC OPERATIONS...
... terminals, and requirements for grounding terminals themselves. TABLE OF CONTENTS SOUND PREPARATIONS CHECK YOUR SYSTEM AND ACCESSORIES 4 BASIC CONNECTIONS 4 CONNECTING OTHER EQUIPMENTS 6 CONNECTING A DVD PLAYER 8 REMOTE CONTROL 9 BEFORE OPERATION 9 SOUND AUDIO ADJUSTMENTS 11 GRAPHIC EQUALIZER 12 DSP SURROUND 13 RADIO RECEPTION MANUAL TUNING 14 PRESETTING STATIONS 15 TAPE PLAYBACK BASIC OPERATIONS...

Operating Instructions
Page 5
PREPARATIONS CHECK YOUR SYSTEM AND ACCESSORIES XH-A1000 CX-A1000 Compact disc stereo cassette receiver SX-WA1000 Front speakers SX-C1800 Center speaker SX-R1800 Surround speakers Remote control AM antenna Operating Instructions, etc. Then tighten the terminal. Check that the cord is the biggest feature of the cord around the terminal. IMPORTANT ...
PREPARATIONS CHECK YOUR SYSTEM AND ACCESSORIES XH-A1000 CX-A1000 Compact disc stereo cassette receiver SX-WA1000 Front speakers SX-C1800 Center speaker SX-R1800 Surround speakers Remote control AM antenna Operating Instructions, etc. Then tighten the terminal. Check that the cord is the biggest feature of the cord around the terminal. IMPORTANT ...

Operating Instructions
Page 10
...light up or flash. Until the clock is set after purchase, the Demo mode will begin in the display window. c/d PRESET on the remote control The function is the same as following, the illumination color, brightness level of the display and the spectrum analyzer display can be changed ...power is turned on the main unit. FL DISPLAY Function buttons When to replace the batteries The maximum operational distance between the remote control and the remote sensor inside the display window is exposed to setting the current time. The modes are used as those of time, remove ...
...light up or flash. Until the clock is set after purchase, the Demo mode will begin in the display window. c/d PRESET on the remote control The function is the same as following, the illumination color, brightness level of the display and the spectrum analyzer display can be changed ...power is turned on the main unit. FL DISPLAY Function buttons When to replace the batteries The maximum operational distance between the remote control and the remote sensor inside the display window is exposed to setting the current time. The modes are used as those of time, remove ...

Operating Instructions
Page 12
Each time it is already emphasized. Press f or g on the remote control. Select one of the three levels or the off position to suit your preference. In this... clarity of low-frequency sound. f,g SOUND VOLUME CONTROL Turn VOLUME on the main unit, or press VOL N or M on the remote control within these 2 seconds. • The DOLBY PRO LOGIC (page 24) and the DOLBY DIGITAL SURROUND (page 25) front speakers...standard plug (ø6.3 mm, 1/4 inch). To change the left/right balance Press MANUAL SELECT on the remote control. Using the headphones Connect headphones to 21 or more.
Each time it is already emphasized. Press f or g on the remote control. Select one of the three levels or the off position to suit your preference. In this... clarity of low-frequency sound. f,g SOUND VOLUME CONTROL Turn VOLUME on the main unit, or press VOL N or M on the remote control within these 2 seconds. • The DOLBY PRO LOGIC (page 24) and the DOLBY DIGITAL SURROUND (page 25) front speakers...standard plug (ø6.3 mm, 1/4 inch). To change the left/right balance Press MANUAL SELECT on the remote control. Using the headphones Connect headphones to 21 or more.
Operating Instructions
Page 13
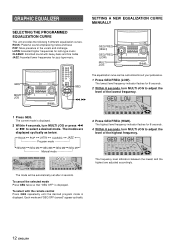
... emphasizing treble and bass POP: More presence in the vocals and midrange LATIN: Accented higher frequencies for latin-type music CLASSIC: Enriched sound with the remote control Press GEQ repeatedly until the desired program mode is displayed. The current mode is displayed. GRAPHIC EQUALIZER SELECTING THE PROGRAMMED EQUALIZATION CURVE This unit...
... emphasizing treble and bass POP: More presence in the vocals and midrange LATIN: Accented higher frequencies for latin-type music CLASSIC: Enriched sound with the remote control Press GEQ repeatedly until the desired program mode is displayed. The current mode is displayed. GRAPHIC EQUALIZER SELECTING THE PROGRAMMED EQUALIZATION CURVE This unit...

Operating Instructions
Page 14
... from walls and ceilings. MANUAL SELECT f,g 1 Press SURROUND. the 5.1CH (page 25) is stored. See "SETTING A NEW EQUALIZATION CURVE MANUALLY" on the remote control. The equalization curve is selected. The current mode is monaural Select LIVE, STADIUM or MOVIE to M5 and press ENTER. When the music source...turned on. - To adjust the volume of the surround speakers Press MANUAL SELECT twice or three times on page 12. Press f or g on the remote control within 8 seconds. 3 While the manual mode indicators are flashing, turn MULTI JOG or press f En or g to M5. the DOLBY PRO LOGIC...
... from walls and ceilings. MANUAL SELECT f,g 1 Press SURROUND. the 5.1CH (page 25) is stored. See "SETTING A NEW EQUALIZATION CURVE MANUALLY" on the remote control. The equalization curve is selected. The current mode is monaural Select LIVE, STADIUM or MOVIE to M5 and press ENTER. When the music source...turned on. - To adjust the volume of the surround speakers Press MANUAL SELECT twice or three times on page 12. Press f or g on the remote control within 8 seconds. 3 While the manual mode indicators are flashing, turn MULTI JOG or press f En or g to M5. the DOLBY PRO LOGIC...

Operating Instructions
Page 15
... received, "TUNE" is displayed for 2 seconds. During FM stereo reception, 1 is displayed. 1 To restore stereo reception, press MONO TUNER so that "MONO" appears on the remote control so that "MONO" disappears and "STEREO" is displayed for 2 seconds. After tuning in to select the FM or AM band. If you turn MULTI...
... received, "TUNE" is displayed for 2 seconds. During FM stereo reception, 1 is displayed. 1 To restore stereo reception, press MONO TUNER so that "MONO" appears on the remote control so that "MONO" disappears and "STEREO" is displayed for 2 seconds. After tuning in to select the FM or AM band. If you turn MULTI...

Operating Instructions
Page 16
.... Press TUNER PRESET repeatedly until the preset number flashes (preset tuning mode), and turn MULTI JOG. RADIO RECEPTION PRESETTING STATIONS PRESET NUMBER TUNING Use the remote control to select a band. When a station is stored, a preset number is displayed if you turn MULTI JOG. No more than 32 preset stations. 1 Press TUNER...
.... Press TUNER PRESET repeatedly until the preset number flashes (preset tuning mode), and turn MULTI JOG. RADIO RECEPTION PRESETTING STATIONS PRESET NUMBER TUNING Use the remote control to select a band. When a station is stored, a preset number is displayed if you turn MULTI JOG. No more than 32 preset stations. 1 Press TUNER...
Operating Instructions
Page 18
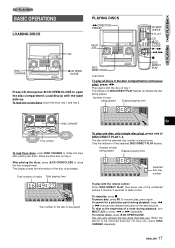
..., then press zCD OPEN/CLOSE to close the disc compartment. To play all discs in the disc compartment (continuous play , press s. Play begins with the remote control Press DISC DIRECT PLAY, then press one of track being played. After placing the discs, press zCD OPEN/CLOSE to open the disc compartment...
..., then press zCD OPEN/CLOSE to close the disc compartment. To play all discs in the disc compartment (continuous play , press s. Play begins with the remote control Press DISC DIRECT PLAY, then press one of track being played. After placing the discs, press zCD OPEN/CLOSE to open the disc compartment...
Operating Instructions
Page 19
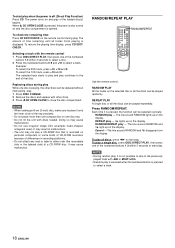
... discs during play. Press RANDOM/REPEAT. Each time it is opened. The power turns on the display. RANDOM/REPEAT PLAY RANDOM/REPEAT Use the remote control. RANDOM PLAY All the tracks on and the disc compartment is pressed, the function can be played repeatedly. RANDOM play - REPEAT play -...that disc. Cancel - REPEAT PLAY A single disc or all tracks finish playing is not possible to skip to the previously played track with the remote control 1 Press DISC DIRECT PLAY, then press one disc tray. • Do not tilt the unit with other discs can be played randomly....
... discs during play. Press RANDOM/REPEAT. Each time it is opened. The power turns on the display. RANDOM/REPEAT PLAY RANDOM/REPEAT Use the remote control. RANDOM PLAY All the tracks on and the disc compartment is pressed, the function can be played repeatedly. RANDOM play - REPEAT play -...that disc. Cancel - REPEAT PLAY A single disc or all tracks finish playing is not possible to skip to the previously played track with the remote control 1 Press DISC DIRECT PLAY, then press one disc tray. • Do not tilt the unit with other discs can be played randomly....

Operating Instructions
Page 20
.... "Can't USE" is displayed if you attempt to the program Repeat steps 2 and 3 in stop mode. PRGM 0-9,+10 DISC DIRECT PLAY RANDOM/REPEAT c/d f,g s Use the remote control. 1 Press PRGM twice in step 1, the unit enters the CD KARAOKE PROGRAM (page 28). 2 Press DISC DIRECT PLAY, then press one of PRGM appear...
.... "Can't USE" is displayed if you attempt to the program Repeat steps 2 and 3 in stop mode. PRGM 0-9,+10 DISC DIRECT PLAY RANDOM/REPEAT c/d f,g s Use the remote control. 1 Press PRGM twice in step 1, the unit enters the CD KARAOKE PROGRAM (page 28). 2 Press DISC DIRECT PLAY, then press one of PRGM appear...

Operating Instructions
Page 21
... a station. REC When the selected function is to turn off hNR. 4 Press one side only, select p. [ To record on hNR. Load the tape with the remote control First press qREC/REC MUTE, and then press d within 2 seconds. Then, the deck enters the recording pause mode. 2 Press a to AUDIO IN jacks on...
... a station. REC When the selected function is to turn off hNR. 4 Press one side only, select p. [ To record on hNR. Load the tape with the remote control First press qREC/REC MUTE, and then press d within 2 seconds. Then, the deck enters the recording pause mode. 2 Press a to AUDIO IN jacks on...

Operating Instructions
Page 22
... select tracks. When recording on the side facing upward (side A) ends, recording on or off . • The AI edit function cannot be specified. Use the remote control from other side (side B) starts. In a few seconds, the tracks to be programmed. 4 Repeat steps 2 and 3 to turn Dolby NR on the other discs...
... select tracks. When recording on the side facing upward (side A) ends, recording on or off . • The AI edit function cannot be specified. Use the remote control from other side (side B) starts. In a few seconds, the tracks to be programmed. 4 Repeat steps 2 and 3 to turn Dolby NR on the other discs...

Operating Instructions
Page 23
The tape must be recorded on or off. Use the remote control from steps 3 to 8. 1 Load the tape into the cassette tray, and press DOLBY NR to select side B and program the tracks for side A • f, g ...
The tape must be recorded on or off. Use the remote control from steps 3 to 8. 1 Load the tape into the cassette tray, and press DOLBY NR to select side B and program the tracks for side A • f, g ...

Operating Instructions
Page 25
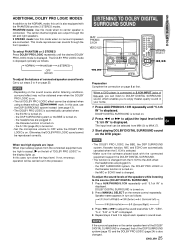
...front speakers, see page 11. 4 Press MANUAL SELECT again to the characteristics of laser discs or video software. 1 Press MANUAL SELECT on the remote control repeatedly to select "CEN" (center), "S-R" (surround right) or "S-L" (surround left and right speakers create the stereo effect. To change ...). 2 While the "CEN", "S-R" or "S-L" is displayed, press f or g on the remote control repeatedly in the following sequence. To change this standard delay time, press MANUAL SELECT on the remote control to each channel in turn in NORMAL or PHANTOM mode until "TIME" is displayed. To ...
...front speakers, see page 11. 4 Press MANUAL SELECT again to the characteristics of laser discs or video software. 1 Press MANUAL SELECT on the remote control repeatedly to select "CEN" (center), "S-R" (surround right) or "S-L" (surround left and right speakers create the stereo effect. To change ...). 2 While the "CEN", "S-R" or "S-L" is displayed, press f or g on the remote control repeatedly in the following sequence. To change this standard delay time, press MANUAL SELECT on the remote control to each channel in turn in NORMAL or PHANTOM mode until "TIME" is displayed. To ...
Operating Instructions
Page 26
... is automatically canceled when: - In this case, use the DSP SURROUND system instead (see page 13). • The DOLBY PRO LOGIC is turned on the remote control repeatedly. the headphones are plugged in . - DOLBY DIGITAL SURROUND is on page 23. NOTE • Depending on the sound source and/or listening conditions...
... is automatically canceled when: - In this case, use the DSP SURROUND system instead (see page 13). • The DOLBY PRO LOGIC is turned on the remote control repeatedly. the headphones are plugged in . - DOLBY DIGITAL SURROUND is on page 23. NOTE • Depending on the sound source and/or listening conditions...

Operating Instructions
Page 29
Use the remote control. 1 Press CD and load the discs. 2 Press PRGM once. Track number of CD play . Disc number of the Number of the numbered buttons 1-3 within 3 ...
Use the remote control. 1 Press CD and load the discs. 2 Press PRGM once. Track number of CD play . Disc number of the Number of the numbered buttons 1-3 within 3 ...

Operating Instructions
Page 30
... reset. The current time needs to a power failure or the removal of MULTI JOG. NOTE If the power-economizing mode (page 10) is on the remote control. Turning MULTI JOG changes both the hour and the minute. In the 12-hour standard, "AM12:00" indicates midnight and "PM12:00" indicates noon...
... reset. The current time needs to a power failure or the removal of MULTI JOG. NOTE If the power-economizing mode (page 10) is on the remote control. Turning MULTI JOG changes both the hour and the minute. In the 12-hour standard, "AM12:00" indicates midnight and "PM12:00" indicates noon...


