
2217V Manual
Page 1
... Please link www.aoc.com, select your computer system. The sections are used as follows: Safety Instructions: lists safety information. Setup: describes the initial setup process. Using the Monitor: gives an overview of how to use of the monitor. Warranty... cautions, and warnings, and they are as follows: NOTE: A NOTE indicates important information that helps you make better use the monitor. Drivers: provides driver installation instructions for Windows. Technical Support : provides tips and solutions for bodily harm and tells...
... Please link www.aoc.com, select your computer system. The sections are used as follows: Safety Instructions: lists safety information. Setup: describes the initial setup process. Using the Monitor: gives an overview of how to use of the monitor. Warranty... cautions, and warnings, and they are as follows: NOTE: A NOTE indicates important information that helps you make better use the monitor. Drivers: provides driver installation instructions for Windows. Technical Support : provides tips and solutions for bodily harm and tells...
2217V Manual
Page 6
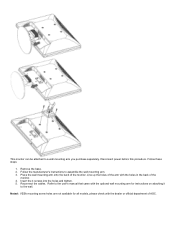
...onto the back of AOC. Refer to the wall. Disconnect power before this procedure. Follow these steps: 1. Line up the holes of the arm with the optional wall mounting arm for all models, please check with the dealer or official department of the monitor. Insert the 4 ...tighten. 5. Noted : VESA mounting screw holes are not available for instructions on attaching it to the user's manual that came with the holes in the back of the monitor. 4. This monitor can be attached to assemble the wall mounting arm. 3. Follow the manufacturer's instructions to a wall mounting arm...
...onto the back of AOC. Refer to the wall. Disconnect power before this procedure. Follow these steps: 1. Line up the holes of the arm with the optional wall mounting arm for all models, please check with the dealer or official department of the monitor. Insert the 4 ...tighten. 5. Noted : VESA mounting screw holes are not available for instructions on attaching it to the user's manual that came with the holes in the back of the monitor. 4. This monitor can be attached to assemble the wall mounting arm. 3. Follow the manufacturer's instructions to a wall mounting arm...


