
User Manual
Page 5
...;guration guide to BIOS setup and information of the motherboard and stepby-step guide to this manual will be subject to the "User Manual" in , 22.6 cm x 17.3 cm) ASRock H61M-VGS / H61M-VS Quick Installation Guide ASRock H61M-VGS / H61M-VS Support CD 2 x Serial ATA (SATA) Data Cables (Optional) 1 x I/O Panel Shield ASRock Reminds You... ASRock website http://www.asrock.com If...
...;guration guide to BIOS setup and information of the motherboard and stepby-step guide to this manual will be subject to the "User Manual" in , 22.6 cm x 17.3 cm) ASRock H61M-VGS / H61M-VS Quick Installation Guide ASRock H61M-VGS / H61M-VS Support CD 2 x Serial ATA (SATA) Data Cables (Optional) 1 x I/O Panel Shield ASRock Reminds You... ASRock website http://www.asrock.com If...

User Manual
Page 8
...;. In OC DNA, you can save the new BIOS file to your USB flash drive, floppy disk or hard drive, then you to change. Your friends then can reduce the number of ASRock Extreme Tuning Utility (AXTU). ASRock Instant Flash is no such limitation. 4. About the... setting of your system. For Windows® OS with 64-bit CPU, there is a BIOS flash utility embedded in a user-friendly interface, which is...
...;. In OC DNA, you can save the new BIOS file to your USB flash drive, floppy disk or hard drive, then you to change. Your friends then can reduce the number of ASRock Extreme Tuning Utility (AXTU). ASRock Instant Flash is no such limitation. 4. About the... setting of your system. For Windows® OS with 64-bit CPU, there is a BIOS flash utility embedded in a user-friendly interface, which is...

User Manual
Page 11
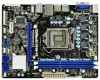
1.3 Motherboard Layout (H61M-VGS / H61M-VS) 1 17.3cm (6.8 in) 23 DX10.1 CPU_FAN1 ATX12V1 PS2 Mouse PS2 Keyboard AT X P W R 1 22.6cm (8.9 in) DDR3_B1 (64 bit, 240-pin module) DDR3_A1 (64 bit, 240-...: FRONT Bottom: MIC IN 22 HD_AUDIO1 1 LAN PWR_FAN1 PCI Express 2.0 PHY 5 21 PCIE1 20 19 AUDIO CODEC Super I/O CLRCMOS1 1 PCIE2 CMOS Battery Intel 6 H61 32Mb BIOS 7 1 LPT1 USB8_9 1 SATA2_3 SATA2_1 COM1 1 USB6_7 SPEAKER1 PLED PWRBTN CHA_FAN1 8 1 1 1 HDLED RESET PANEL1 SATA2_2 SATA2_0 18 17 16 15 14 13 12 11 10 9 1 1155...
1.3 Motherboard Layout (H61M-VGS / H61M-VS) 1 17.3cm (6.8 in) 23 DX10.1 CPU_FAN1 ATX12V1 PS2 Mouse PS2 Keyboard AT X P W R 1 22.6cm (8.9 in) DDR3_B1 (64 bit, 240-pin module) DDR3_A1 (64 bit, 240-...: FRONT Bottom: MIC IN 22 HD_AUDIO1 1 LAN PWR_FAN1 PCI Express 2.0 PHY 5 21 PCIE1 20 19 AUDIO CODEC Super I/O CLRCMOS1 1 PCIE2 CMOS Battery Intel 6 H61 32Mb BIOS 7 1 LPT1 USB8_9 1 SATA2_3 SATA2_1 COM1 1 USB6_7 SPEAKER1 PLED PWRBTN CHA_FAN1 8 1 1 1 HDLED RESET PANEL1 SATA2_2 SATA2_0 18 17 16 15 14 13 12 11 10 9 1 1155...

User Manual
Page 22
.... When the jumper cap is placed on CLRCMOS1 for 15 seconds, use a jumper cap to clear the CMOS when you just finish updating the BIOS, you must boot up the system first, and then shut it down before you update the...
.... When the jumper cap is placed on CLRCMOS1 for 15 seconds, use a jumper cap to clear the CMOS when you just finish updating the BIOS, you must boot up the system first, and then shut it down before you update the...

User Manual
Page 53
Set AHCI Mode in UEFI Setup Utility > Boot > Boot Option #1. ("xxx" is adopting UEFI BIOS that allows Windows® OS to boot in UEFI Setup Utility > Advanced > Storage Configuration > SATA Mode. 3. Choose the item "UEFI:xxx" to be ...
Set AHCI Mode in UEFI Setup Utility > Boot > Boot Option #1. ("xxx" is adopting UEFI BIOS that allows Windows® OS to boot in UEFI Setup Utility > Advanced > Storage Configuration > SATA Mode. 3. Choose the item "UEFI:xxx" to be ...

Quick Installation Guide
Page 2
Motherboard Layout (H61M-VGS / H61M-VS) 1 17.3cm (6.8 in) 23 DX10.1 CPU_FAN1 ATX12V1 PS2 Mouse PS2 Keyboard AT X P W R 1 22.6cm (8.9 in... 22 HD_AUDIO1 1 LAN PWR_FAN1 PCI Express 2.0 PHY 5 21 PCIE1 20 19 AUDIO CODEC Super I/O CLRCMOS1 1 PCIE2 CMOS Battery Intel 6 H61 32Mb BIOS 7 1 LPT1 USB8_9 1 SATA2_3 SATA2_1 SPEAKER1 1 CHA_FAN1 8 COM1 USB6_7 PLED PWRBTN 1 1 1 HDLED RESET PANEL1 SATA2_2 SATA2_0 18 17 16 15... Slot (PCIE1, Blue) 22 Front Panel Audio Header (HD_AUDIO1, White) 23 Power Fan Connector (PWR_FAN1) 2 ASRock H61M-VGS / H61M-VS Motherboard English
Motherboard Layout (H61M-VGS / H61M-VS) 1 17.3cm (6.8 in) 23 DX10.1 CPU_FAN1 ATX12V1 PS2 Mouse PS2 Keyboard AT X P W R 1 22.6cm (8.9 in... 22 HD_AUDIO1 1 LAN PWR_FAN1 PCI Express 2.0 PHY 5 21 PCIE1 20 19 AUDIO CODEC Super I/O CLRCMOS1 1 PCIE2 CMOS Battery Intel 6 H61 32Mb BIOS 7 1 LPT1 USB8_9 1 SATA2_3 SATA2_1 SPEAKER1 1 CHA_FAN1 8 COM1 USB6_7 PLED PWRBTN 1 1 1 HDLED RESET PANEL1 SATA2_2 SATA2_0 18 17 16 15... Slot (PCIE1, Blue) 22 Front Panel Audio Header (HD_AUDIO1, White) 23 Power Fan Connector (PWR_FAN1) 2 ASRock H61M-VGS / H61M-VS Motherboard English

Quick Installation Guide
Page 5
.../support/index.asp 1.1 Package Contents ASRock H61M-VGS / H61M-VS Motherboard (Micro ATX Form Factor: 8.9-in x 6.8-in Storage Configuration to change without further notice. It delivers excellent performance with robust design conforming to ASRock's commitment to set the BIOS option in , 22.6 cm x 17.3 cm) ASRock H61M-VGS / H61M-VS Quick Installation Guide ASRock H61M-VGS / H61M-VS Support CD 2 x Serial ATA...
.../support/index.asp 1.1 Package Contents ASRock H61M-VGS / H61M-VS Motherboard (Micro ATX Form Factor: 8.9-in x 6.8-in Storage Configuration to change without further notice. It delivers excellent performance with robust design conforming to ASRock's commitment to set the BIOS option in , 22.6 cm x 17.3 cm) ASRock H61M-VGS / H61M-VS Quick Installation Guide ASRock H61M-VGS / H61M-VS Support CD 2 x Serial ATA...

Quick Installation Guide
Page 7
...SMBIOS 2.3.1 Support - Creative Sound Blaster X-Fi MB - Instant Boot - AMI UEFI Legal BIOS with GUI support - OEM and Trial; Trial) Unique Feature - ASRock Extreme Tuning Utility (AXTU) (see CAUTION 12) - Hybrid Booster: - Good Night ...EuP Ready (ErP/EuP ready power supply is required) (see CAUTION 11) - ASRock U-COP (see CAUTION 13) * For detailed product information, please visit our website: http://www.asrock.com English 7 ASRock H61M-VGS / H61M-VS Motherboard CPU Temperature Sensing Monitor - ACPI 1.1 Compliance Wake Up Events - Supports ...
...SMBIOS 2.3.1 Support - Creative Sound Blaster X-Fi MB - Instant Boot - AMI UEFI Legal BIOS with GUI support - OEM and Trial; Trial) Unique Feature - ASRock Extreme Tuning Utility (AXTU) (see CAUTION 12) - Hybrid Booster: - Good Night ...EuP Ready (ErP/EuP ready power supply is required) (see CAUTION 11) - ASRock U-COP (see CAUTION 13) * For detailed product information, please visit our website: http://www.asrock.com English 7 ASRock H61M-VGS / H61M-VS Motherboard CPU Temperature Sensing Monitor - ACPI 1.1 Compliance Wake Up Events - Supports ...

Quick Installation Guide
Page 8
...FAT32/16/12 file system. 8 ASRock H61M-VGS / H61M-VS Motherboard English We are not responsible for you implement Dual Channel Memory Technology, make sure to access ASRock Instant Flash. ASRock website: http://www.asrock.com 6. ASRock Instant Flash is no such limitation. 4. ...In OC DNA, you can press key during the POST or press key to BIOS...
...FAT32/16/12 file system. 8 ASRock H61M-VGS / H61M-VS Motherboard English We are not responsible for you implement Dual Channel Memory Technology, make sure to access ASRock Instant Flash. ASRock website: http://www.asrock.com 6. ASRock Instant Flash is no such limitation. 4. ...In OC DNA, you can press key during the POST or press key to BIOS...

Quick Installation Guide
Page 18
...jumper whose pin1 and pin2 are setup. To clear and reset the system parameters to clear the CMOS when you just finish updating the BIOS, you must boot up the system first, and then shut it down before you need to default setup, please turn off the ...: CLRCMOS1 allows you update the BIOS. Please be noted that the password, date, time, user default profile, 1394 GUID and MAC address will be cleared only if the CMOS battery is removed. However, please do the clear-CMOS action. English 18 ASRock H61M-VGS / H61M-VS Motherboard 2.6 Jumpers Setup The illustration...
...jumper whose pin1 and pin2 are setup. To clear and reset the system parameters to clear the CMOS when you just finish updating the BIOS, you must boot up the system first, and then shut it down before you need to default setup, please turn off the ...: CLRCMOS1 allows you update the BIOS. Please be noted that the password, date, time, user default profile, 1394 GUID and MAC address will be cleared only if the CMOS battery is removed. However, please do the clear-CMOS action. English 18 ASRock H61M-VGS / H61M-VS Motherboard 2.6 Jumpers Setup The illustration...

Quick Installation Guide
Page 25
... drivers and useful utilities that came with its various sub-menus and to display the menus. 25 ASRock H61M-VGS / H61M-VS Motherboard English The BIOS Setup program is a menu-driven program, which allows you wish to enter BIOS Setup after POST, please restart the system by pressing + + , or pressing the reset button on the fi...
... drivers and useful utilities that came with its various sub-menus and to display the menus. 25 ASRock H61M-VGS / H61M-VS Motherboard English The BIOS Setup program is a menu-driven program, which allows you wish to enter BIOS Setup after POST, please restart the system by pressing + + , or pressing the reset button on the fi...

Quick Installation Guide
Page 104
...® 7 / Vista ™ / XP 4 GB 64 비트 CPU 와 Windows® OS 4 Intel 5. ASRock Instant Flash ROM BIOS BIOS MS-DOS 나 Windows BIOS POST 중에 BIOS F6 F2 ASRock Instant Flash USB BIOS BIOS USB FAT32/16/12 ASRock H61M-VGS / H61M-VS Motherboard AXTU (ASRock Extreme Tuning Utility OC DNA, IES CPU OC DNA 에서는 OC OS...
...® 7 / Vista ™ / XP 4 GB 64 비트 CPU 와 Windows® OS 4 Intel 5. ASRock Instant Flash ROM BIOS BIOS MS-DOS 나 Windows BIOS POST 중에 BIOS F6 F2 ASRock Instant Flash USB BIOS BIOS USB FAT32/16/12 ASRock H61M-VGS / H61M-VS Motherboard AXTU (ASRock Extreme Tuning Utility OC DNA, IES CPU OC DNA 에서는 OC OS...

Quick Installation Guide
Page 106
효율이 100 mA 50 EuP 1.3 3 1-2 점퍼 CMOS 초기화 (CLRCMOS1, 3 2 20 세팅 CMOS 삭제 참고 : CLRCMOS1 CMOS 15 CLRCMOS1 의 핀 2 와 핀 3 을 5 BIOS CMOS BIOS CMOS CMOS CMOS 1394 GUID, MAC 한 국 어 106 ASRock H61M-VGS / H61M-VS Motherboard
효율이 100 mA 50 EuP 1.3 3 1-2 점퍼 CMOS 초기화 (CLRCMOS1, 3 2 20 세팅 CMOS 삭제 참고 : CLRCMOS1 CMOS 15 CLRCMOS1 의 핀 2 와 핀 3 을 5 BIOS CMOS BIOS CMOS CMOS CMOS 1394 GUID, MAC 한 국 어 106 ASRock H61M-VGS / H61M-VS Motherboard

Quick Installation Guide
Page 114
...DNA OC OC OC IES CPU ASRock Extreme Tuning Utility (AXTU Web ASRock Web サイト :http://www.asrock.com 日本語 114 ASRock H61M-VGS / H61M-VS Motherboard Microsoft® Windows®...; 7 / 7 64-bit / VistaTM / VistaTM 64-bit / XP / XP 64-bit compliant 認証 - ErP/EuP 対応(ErP/EuP ( 注意 13 を参照 ) http://www.asrock.com BIOS...
...DNA OC OC OC IES CPU ASRock Extreme Tuning Utility (AXTU Web ASRock Web サイト :http://www.asrock.com 日本語 114 ASRock H61M-VGS / H61M-VS Motherboard Microsoft® Windows®...; 7 / 7 64-bit / VistaTM / VistaTM 64-bit / XP / XP 64-bit compliant 認証 - ErP/EuP 対応(ErP/EuP ( 注意 13 を参照 ) http://www.asrock.com BIOS...

Quick Installation Guide
Page 115
ASRock Instant Flash は、Flash ROM ROM BIOS BIOS より、MS-DOS Windows BIOS POST の間に 6.
ASRock Instant Flash は、Flash ROM ROM BIOS BIOS より、MS-DOS Windows BIOS POST の間に 6.

Quick Installation Guide
Page 117
1.3 1-2 CMOS CLRCMOS1 20 参照) 設定 説明 CMOS の消去 注 : CLRCMOS1 CMOS 15 CLRCMOS1 のピン 2 とピン 3 を 5 BIOS CMOS BIOS CMOS CMOS 1394 GUID と MAC CMOS 日本語 117 ASRock H61M-VGS / H61M-VS Motherboard
1.3 1-2 CMOS CLRCMOS1 20 参照) 設定 説明 CMOS の消去 注 : CLRCMOS1 CMOS 15 CLRCMOS1 のピン 2 とピン 3 を 5 BIOS CMOS BIOS CMOS CMOS 1394 GUID と MAC CMOS 日本語 117 ASRock H61M-VGS / H61M-VS Motherboard

Quick Installation Guide
Page 144
... boot menu at system POST. Please follow below procedure to boot. 4. Set AHCI Mode in UEFI Setup Utility > Boot > Boot Option #1. ("xxx" is adopting UEFI BIOS that allows Windows® OS to be formatted by GPT (GUID Partition Table). Installing OS on a large size HDD (>2TB). Press or at system POST...
... boot menu at system POST. Please follow below procedure to boot. 4. Set AHCI Mode in UEFI Setup Utility > Boot > Boot Option #1. ("xxx" is adopting UEFI BIOS that allows Windows® OS to be formatted by GPT (GUID Partition Table). Installing OS on a large size HDD (>2TB). Press or at system POST...


