
User Manual
Page 1
All rights reserved. 1 H61M-VGS / H61M-VS User Manual Version 1.0 Published February 2011 Copyright©2011 ASRock INC.
All rights reserved. 1 H61M-VGS / H61M-VS User Manual Version 1.0 Published February 2011 Copyright©2011 ASRock INC.

User Manual
Page 5
... Factor: 8.9-in x 6.8-in Storage Configuration to set the BIOS option in , 22.6 cm x 17.3 cm) ASRock H61M-VGS / H61M-VS Quick Installation Guide ASRock H61M-VGS / H61M-VS Support CD 2 x Serial ATA (SATA) Data Cables (Optional) 1 x I/O Panel Shield ASRock Reminds You... Because the motherboard specifications and the BIOS software might be updated, the content of...
... Factor: 8.9-in x 6.8-in Storage Configuration to set the BIOS option in , 22.6 cm x 17.3 cm) ASRock H61M-VGS / H61M-VS Quick Installation Guide ASRock H61M-VGS / H61M-VS Support CD 2 x Serial ATA (SATA) Data Cables (Optional) 1 x I/O Panel Shield ASRock Reminds You... Because the motherboard specifications and the BIOS software might be updated, the content of...

Quick Installation Guide
Page 1
...: (1) this device may not cause harmful interference, and (2) this device must accept any defect or error in the guide or product. All rights reserved. 1 ASRock H61M-VGS / H61M-VS Motherboard English Operation is subject to the implied warranties or conditions of merchantability or fitness for a particular purpose. "Perchlorate Material-special handling may apply...
...: (1) this device may not cause harmful interference, and (2) this device must accept any defect or error in the guide or product. All rights reserved. 1 ASRock H61M-VGS / H61M-VS Motherboard English Operation is subject to the implied warranties or conditions of merchantability or fitness for a particular purpose. "Perchlorate Material-special handling may apply...

Quick Installation Guide
Page 2
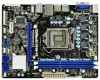
Motherboard Layout (H61M-VGS / H61M-VS) 1 17.3cm (6.8 in) 23 DX10.1 CPU_FAN1 ATX12V1 PS2 Mouse PS2 Keyboard AT X P W R 1 22.6cm (8.9 in) DDR3_B1 (64 bit, 240-pin module) DDR3_A1 (64 bit, 240-..., White) 20 Clear CMOS Jumper (CLRCMOS1) 21 PCI Express 2.0 x16 Slot (PCIE1, Blue) 22 Front Panel Audio Header (HD_AUDIO1, White) 23 Power Fan Connector (PWR_FAN1) 2 ASRock H61M-VGS / H61M-VS Motherboard English
Motherboard Layout (H61M-VGS / H61M-VS) 1 17.3cm (6.8 in) 23 DX10.1 CPU_FAN1 ATX12V1 PS2 Mouse PS2 Keyboard AT X P W R 1 22.6cm (8.9 in) DDR3_B1 (64 bit, 240-pin module) DDR3_A1 (64 bit, 240-..., White) 20 Clear CMOS Jumper (CLRCMOS1) 21 PCI Express 2.0 x16 Slot (PCIE1, Blue) 22 Front Panel Audio Header (HD_AUDIO1, White) 23 Power Fan Connector (PWR_FAN1) 2 ASRock H61M-VGS / H61M-VS Motherboard English

Quick Installation Guide
Page 3
...cable to the front panel audio header. Then you will find "VIA HD Audio Deck" tool on the bottom. English 3 ASRock H61M-VGS / H61M-VS Motherboard For Windows® 7 / 7 64-bit / VistaTM / VistaTM 64-bit OS: Please click "VIA HD Audio Deck" .... In "Advanced Options" screen, select "Independent Headphone", and click "OK" to select "2 Channel" or "4 Channel". Please follow below for the LAN port LED indications. I/O Panel (H61M-VGS) 1 2 3 4 5 10 9 1 PS/2 Mouse Port (Green) * 2 LAN RJ-45 Port 3 Line In (Light Blue) ** 4 Front Speaker (Lime) 5 Microphone (Pink)...
...cable to the front panel audio header. Then you will find "VIA HD Audio Deck" tool on the bottom. English 3 ASRock H61M-VGS / H61M-VS Motherboard For Windows® 7 / 7 64-bit / VistaTM / VistaTM 64-bit OS: Please click "VIA HD Audio Deck" .... In "Advanced Options" screen, select "Independent Headphone", and click "OK" to select "2 Channel" or "4 Channel". Please follow below for the LAN port LED indications. I/O Panel (H61M-VGS) 1 2 3 4 5 10 9 1 PS/2 Mouse Port (Green) * 2 LAN RJ-45 Port 3 Line In (Light Blue) ** 4 Front Speaker (Lime) 5 Microphone (Pink)...

Quick Installation Guide
Page 4
Please refer to save your system. I/O Panel (H61M-VS) 1 2 3 4 5 10 9 1 PS/2 Mouse Port (Green) * 2 LAN RJ-45 Port 3 Line In (Light Blue) ** 4 Front Speaker (Lime) 5 Microphone (Pink) 8 7 6 6 USB 2.0 Ports (USB45) 7 USB 2.0 Ports (USB23) 8 USB ... VistaTM / VistaTM 64-bit OS: Please click "VIA HD Audio Deck" icon , and click "Advanced Options" on the left side on your change . English 4 ASRock H61M-VGS / H61M-VS Motherboard Please follow below for the LAN port LED indications. Then you will find "VIA HD Audio Deck" tool on the bottom. After restarting...
Please refer to save your system. I/O Panel (H61M-VS) 1 2 3 4 5 10 9 1 PS/2 Mouse Port (Green) * 2 LAN RJ-45 Port 3 Line In (Light Blue) ** 4 Front Speaker (Lime) 5 Microphone (Pink) 8 7 6 6 USB 2.0 Ports (USB45) 7 USB 2.0 Ports (USB23) 8 USB ... VistaTM / VistaTM 64-bit OS: Please click "VIA HD Audio Deck" icon , and click "Advanced Options" on the left side on your change . English 4 ASRock H61M-VGS / H61M-VS Motherboard Please follow below for the LAN port LED indications. Then you will find "VIA HD Audio Deck" tool on the bottom. After restarting...

Quick Installation Guide
Page 5
...will be found in the user manual presented in our support CD for details. 5 ASRock H61M-VGS / H61M-VS Motherboard English www.asrock.com/support/index.asp 1.1 Package Contents ASRock H61M-VGS / H61M-VS Motherboard (Micro ATX Form Factor: 8.9-in x 6.8-in Storage Configuration to ... to set the BIOS option in , 22.6 cm x 17.3 cm) ASRock H61M-VGS / H61M-VS Quick Installation Guide ASRock H61M-VGS / H61M-VS Support CD 2 x Serial ATA (SATA) Data Cables (Optional) 1 x I/O Panel Shield ASRock Reminds You... Introduction Thank you require technical support related to the "User Manual...
...will be found in the user manual presented in our support CD for details. 5 ASRock H61M-VGS / H61M-VS Motherboard English www.asrock.com/support/index.asp 1.1 Package Contents ASRock H61M-VGS / H61M-VS Motherboard (Micro ATX Form Factor: 8.9-in x 6.8-in Storage Configuration to ... to set the BIOS option in , 22.6 cm x 17.3 cm) ASRock H61M-VGS / H61M-VS Quick Installation Guide ASRock H61M-VGS / H61M-VS Support CD 2 x Serial ATA (SATA) Data Cables (Optional) 1 x I/O Panel Shield ASRock Reminds You... Introduction Thank you require technical support related to the "User Manual...

Quick Installation Guide
Page 6
...x 6.8-in /Front Speaker/Microphone - 4 x SATA2 3.0 Gb/s connectors, support NCQ, AHCI and Hot Plug functions - 1 x Print Port header English 6 ASRock H61M-VGS / H61M-VS Motherboard Supports K-Series unlocked CPU - Supports 2nd Generation Intel® CoreTM i7 / i5 / i3 in LGA1155 Package - capacity of system memory: 16GB (see CAUTION...I /O Connector - shared memory 1759MB (see CAUTION 1) - H61M-VGS Atheros® PCIE x1 Gigabit LAN AR8151, speed 10/100/1000 Mb/s - Supports D-Sub with LED (ACT/LINK LED and SPEED LED) - H61M-VS Atheros® PCIEx1 LAN AR8152, speed 10/100 Mb/s -...
...x 6.8-in /Front Speaker/Microphone - 4 x SATA2 3.0 Gb/s connectors, support NCQ, AHCI and Hot Plug functions - 1 x Print Port header English 6 ASRock H61M-VGS / H61M-VS Motherboard Supports K-Series unlocked CPU - Supports 2nd Generation Intel® CoreTM i7 / i5 / i3 in LGA1155 Package - capacity of system memory: 16GB (see CAUTION...I /O Connector - shared memory 1759MB (see CAUTION 1) - H61M-VGS Atheros® PCIE x1 Gigabit LAN AR8151, speed 10/100/1000 Mb/s - Supports D-Sub with LED (ACT/LINK LED and SPEED LED) - H61M-VS Atheros® PCIEx1 LAN AR8152, speed 10/100 Mb/s -...

Quick Installation Guide
Page 7
..., Utilities, AntiVirus Software (Trial Version), ASRock Software Suite (CyberLink DVD Suite - ASRock AIWI (see CAUTION 13) * For detailed product information, please visit our website: http://www.asrock.com English 7 ASRock H61M-VGS / H61M-VS Motherboard Good Night LED Hardware - ErP.../EuP Ready (ErP/EuP ready power supply is required) (see CAUTION 7) - ASRock Instant Flash (see CAUTION 9) - CPU/Chassis/Power ...
..., Utilities, AntiVirus Software (Trial Version), ASRock Software Suite (CyberLink DVD Suite - ASRock AIWI (see CAUTION 13) * For detailed product information, please visit our website: http://www.asrock.com English 7 ASRock H61M-VGS / H61M-VS Motherboard Good Night LED Hardware - ErP.../EuP Ready (ErP/EuP ready power supply is required) (see CAUTION 7) - ASRock Instant Flash (see CAUTION 9) - CPU/Chassis/Power ...

Quick Installation Guide
Page 8
...then can save the new BIOS file to your USB flash drive, floppy disk or hard drive, then you to access ASRock Instant Flash. In IES (Intelligent Energy Saver), the voltage regulator can reduce the number of your system. This convenient BIOS update tool allows you... to adjust. WARNING Please realize that the USB flash drive or hard drive must use FAT32/16/12 file system. 8 ASRock H61M-VGS / H61M-VS Motherboard English Before you are idle without entering operating systems first like MS-DOS or Windows®. The maximum shared memory size is ...
...then can save the new BIOS file to your USB flash drive, floppy disk or hard drive, then you to access ASRock Instant Flash. In IES (Intelligent Energy Saver), the voltage regulator can reduce the number of your system. This convenient BIOS update tool allows you... to adjust. WARNING Please realize that the USB flash drive or hard drive must use FAT32/16/12 file system. 8 ASRock H61M-VGS / H61M-VS Motherboard English Before you are idle without entering operating systems first like MS-DOS or Windows®. The maximum shared memory size is ...

Quick Installation Guide
Page 9
.... Also, please do -date supported games! Simply installing the APP Charger driver, it back again. While CPU overheat is IE8. ASRock AIWI utility introduces a new way of ficial website regularly, we will automatically shutdown. SmartView, a new function of the device...also download the free AIWI Lite from your iPhone/iPod touch as iPhone/iPod/iPad Touch, ASRock has prepared a wonderful solution for a more personal Internet experience. Please be used. 9 ASRock H61M-VGS / H61M-VS Motherboard English To use SmartView feature, please make sure your OS version is Windows® ...
.... Also, please do -date supported games! Simply installing the APP Charger driver, it back again. While CPU overheat is IE8. ASRock AIWI utility introduces a new way of ficial website regularly, we will automatically shutdown. SmartView, a new function of the device...also download the free AIWI Lite from your iPhone/iPod touch as iPhone/iPod/iPad Touch, ASRock has prepared a wonderful solution for a more personal Internet experience. Please be used. 9 ASRock H61M-VGS / H61M-VS Motherboard English To use SmartView feature, please make sure your OS version is Windows® ...

Quick Installation Guide
Page 10
..., we recommend you checking with the power supply manufacturer for the completed system. According to define the power consumption for more details. 10 ASRock H61M-VGS / H61M-VS Motherboard English 13.
..., we recommend you checking with the power supply manufacturer for the completed system. According to define the power consumption for more details. 10 ASRock H61M-VGS / H61M-VS Motherboard English 13.

Quick Installation Guide
Page 11
... the chassis, please do so may damage the motherboard. 2.1 CPU Installation For the installation of the following precautions before you handle components. 3. English 11 ASRock H61M-VGS / H61M-VS Motherboard To avoid damaging the motherboard components due to secure the moth- Do not force to the motherboard, peripherals, and/or components. 2. Installation Pre-installation...
... the chassis, please do so may damage the motherboard. 2.1 CPU Installation For the installation of the following precautions before you handle components. 3. English 11 ASRock H61M-VGS / H61M-VS Motherboard To avoid damaging the motherboard components due to secure the moth- Do not force to the motherboard, peripherals, and/or components. 2. Installation Pre-installation...

Quick Installation Guide
Page 12
... down and out on the hook to match the two orientation key notches of the CPU with the two alignment keys of the socket. 12 ASRock H61M-VGS / H61M-VS Motherboard Rotate the load lever to fully open position at approximately 135 degrees. orientation key notch alignment key Pin1 Pin1 orientation key notch 1155...
... down and out on the hook to match the two orientation key notches of the CPU with the two alignment keys of the socket. 12 ASRock H61M-VGS / H61M-VS Motherboard Rotate the load lever to fully open position at approximately 135 degrees. orientation key notch alignment key Pin1 Pin1 orientation key notch 1155...

Quick Installation Guide
Page 13
... fan and heatsink. Fan cables on load plate, engage the load lever. 2.2 Installation of the heatsink for Socket LGA 1155/1156 CPU fan. 13 ASRock H61M-VGS / H61M-VS Motherboard English Step 6. Secure excess cable with tie-wrap to the orient keys. Rotate the load plate onto the IHS. Please be secured on the...
... fan and heatsink. Fan cables on load plate, engage the load lever. 2.2 Installation of the heatsink for Socket LGA 1155/1156 CPU fan. 13 ASRock H61M-VGS / H61M-VS Motherboard English Step 6. Secure excess cable with tie-wrap to the orient keys. Rotate the load plate onto the IHS. Please be secured on the...

Quick Installation Guide
Page 14
... DDR3 DIMM slots to activate the Dual Channel Memory Technology. 3. Unlock a DIMM slot by pressing the retaining clips outward. Otherwise, it is properly seated. 14 ASRock H61M-VGS / H61M-VS Motherboard Align a DIMM on the slot such that the notch on the DIMM matches the break on this motherboard.
... DDR3 DIMM slots to activate the Dual Channel Memory Technology. 3. Unlock a DIMM slot by pressing the retaining clips outward. Otherwise, it is properly seated. 14 ASRock H61M-VGS / H61M-VS Motherboard Align a DIMM on the slot such that the notch on the DIMM matches the break on this motherboard.

Quick Installation Guide
Page 15
... bracket facing the slot that the power supply is switched off or the power cord is already installed in a chassis). Replace the system cover. 15 ASRock H61M-VGS / H61M-VS Motherboard English Installing an expansion card Step 1. Fasten the card to use . 2.4 Expansion Slots (PCI Express Slots) There are 2 PCI Express slots on the...
... bracket facing the slot that the power supply is switched off or the power cord is already installed in a chassis). Replace the system cover. 15 ASRock H61M-VGS / H61M-VS Motherboard English Installing an expansion card Step 1. Fasten the card to use . 2.4 Expansion Slots (PCI Express Slots) There are 2 PCI Express slots on the...

Quick Installation Guide
Page 16
... have installed the drivers already, there is no need to the steps below. Right-click the display icon and select "Attached", if necessary. 16 ASRock H61M-VGS / H61M-VS Motherboard English Please refer to enter UEFI setup. Right-click the display icon in the Display Properties dialog that you select is inserted to display...
... have installed the drivers already, there is no need to the steps below. Right-click the display icon and select "Attached", if necessary. 16 ASRock H61M-VGS / H61M-VS Motherboard English Please refer to enter UEFI setup. Right-click the display icon in the Display Properties dialog that you select is inserted to display...

Quick Installation Guide
Page 17
D. C. Click "OK" to another. 17 ASRock H61M-VGS / H61M-VS Motherboard English The placement of display icons determines how you move items from one , two and three. Click the items "This is my main monitor" ...
D. C. Click "OK" to another. 17 ASRock H61M-VGS / H61M-VS Motherboard English The placement of display icons determines how you move items from one , two and three. Click the items "This is my main monitor" ...

Quick Installation Guide
Page 18
... no jumper cap is placed on pins, the jumper is "Short". When the jumper cap is placed on pins, the jumper is removed. English 18 ASRock H61M-VGS / H61M-VS Motherboard
... no jumper cap is placed on pins, the jumper is "Short". When the jumper cap is placed on pins, the jumper is removed. English 18 ASRock H61M-VGS / H61M-VS Motherboard


