
RAID Installation Guide
Page 1
NVIDIA BIOS RAID Installation Guide 2 1.1 Introduction to RAID 2 1.2 RAID Configurations Precautions 3 1.3 Installing Windows 7 / 7 64-bit / Vista / Vista 64-bit / XP / XP 64-bit With RAID Functions 5 1.3.1 Installing ...
NVIDIA BIOS RAID Installation Guide 2 1.1 Introduction to RAID 2 1.2 RAID Configurations Precautions 3 1.3 Installing Windows 7 / 7 64-bit / Vista / Vista 64-bit / XP / XP 64-bit With RAID Functions 5 1.3.1 Installing ...

RAID Installation Guide
Page 2
...It provides data protection and increases fault tolerance to RAID The term "RAID" stands for "Redundant Array of using NVIDIA RAID Utility under BIOS environment. This section includes examples of Independent Disks", which is an instruction for creating RAID arrays. RAID 1 (Data Mirroring) RAID ...1 is equipped with two SATA / SATAII ports, you to a second drive. NVIDIA BIOS RAID Installation Guide NVIDIA BIOS RAID Installation Guide is a method combining two or more hard disk drives into one drive fails. 2 WARNING!! If your motherboard ...
...It provides data protection and increases fault tolerance to RAID The term "RAID" stands for "Redundant Array of using NVIDIA RAID Utility under BIOS environment. This section includes examples of Independent Disks", which is an instruction for creating RAID arrays. RAID 1 (Data Mirroring) RAID ...1 is equipped with two SATA / SATAII ports, you to a second drive. NVIDIA BIOS RAID Installation Guide NVIDIA BIOS RAID Installation Guide is a method combining two or more hard disk drives into one drive fails. 2 WARNING!! If your motherboard ...

RAID Installation Guide
Page 5
... key, and then a window for proper configuration. B. B. E. STEP 3: Set Up BIOS. Enter BIOS SETUP UTILITY Advanced screen Configuration. STEP 2: Make a SATA / SATAII driver diskette. C. STEP 1: Set Up BIOS. Then you will start to configure RAID function, you need to install Windows® XP... / XP 64-bit on the screen, "Generate Serial ATA driver diskette [YN]?", press . Please refer to boot your system. Storage A. D. Insert the ASRock Support CD into...
... key, and then a window for proper configuration. B. B. E. STEP 3: Set Up BIOS. Enter BIOS SETUP UTILITY Advanced screen Configuration. STEP 2: Make a SATA / SATAII driver diskette. C. STEP 1: Set Up BIOS. Then you will start to configure RAID function, you need to install Windows® XP... / XP 64-bit on the screen, "Generate Serial ATA driver diskette [YN]?", press . Please refer to boot your system. Storage A. D. Insert the ASRock Support CD into...

RAID Installation Guide
Page 6
... the driver to install according to [RAID] in the Support CD: .. \ RAID Installation Guide 6 At the beginning of the document in the following path in BIOS first. NOTE. Then, please set up "SATA Operation Mode" to the mode you choose and the OS you install. STEP 5: Install Windows® XP / XP...
... the driver to install according to [RAID] in the Support CD: .. \ RAID Installation Guide 6 At the beginning of the document in the following path in BIOS first. NOTE. Then, please set up "SATA Operation Mode" to the mode you choose and the OS you install. STEP 5: Install Windows® XP / XP...
RAID Installation Guide
Page 7
page, please insert the ASRock Support CD into your optical drive, and click the "Load Driver" button on the left on your system. Then, please set the RAID configuration by using the Windows RAID installation guide in the following path in BIOS first. For Windows® 7 / 7 64-bit ... system, and follow below steps. B. STEP 2: Use "RAID Installation Guide" to install Windows® 7 / 7 64-bit OS, and then install ASRock All-in the Support CD: .. \ RAID Installation Guide NOTE. Before you start to configure RAID function, you need to check the RAID installation guide in...
page, please insert the ASRock Support CD into your optical drive, and click the "Load Driver" button on the left on your system. Then, please set the RAID configuration by using the Windows RAID installation guide in the following path in BIOS first. For Windows® 7 / 7 64-bit ... system, and follow below steps. B. STEP 2: Use "RAID Installation Guide" to install Windows® 7 / 7 64-bit OS, and then install ASRock All-in the Support CD: .. \ RAID Installation Guide NOTE. Before you start to configure RAID function, you need to check the RAID installation guide in...

RAID Installation Guide
Page 8
After adjusting the system BIOS to press . Define a New Array window appears. We take RAID 0 for example to show you how to use NVRAID RAID Utility to create other RAID ...
After adjusting the system BIOS to press . Define a New Array window appears. We take RAID 0 for example to show you how to use NVRAID RAID Utility to create other RAID ...

RAID Installation Guide
Page 9
... at the default Optimal, which is selected. Tab to the Array Disks block by pressing the right-arrow key. Move it from the RAID Config BIOS setup page appear in the list is 64KB, but the values can be between 8KB and 128KB (8, 16, 32, 64, and 128KB). These are the...
... at the default Optimal, which is selected. Tab to the Array Disks block by pressing the right-arrow key. Move it from the RAID Config BIOS setup page appear in the list is 64KB, but the values can be between 8KB and 128KB (8, 16, 32, 64, and 128KB). These are the...

RAID Installation Guide
Page 13
Please do the following screen shot will appear. C. B. Boot to the steps of creating RAID 0. Create Array and the following screen will appear. 13 Click Next and the following : A. Go to the system BIOS and make sure that the drives that you want to use are similar to Windows and launch the NVRAIDMAN application. the operation procedures are RAID enabled. D.
Please do the following screen shot will appear. C. B. Boot to the steps of creating RAID 0. Create Array and the following screen will appear. 13 Click Next and the following : A. Go to the system BIOS and make sure that the drives that you want to use are similar to Windows and launch the NVRAIDMAN application. the operation procedures are RAID enabled. D.

User Manual
Page 3
... UTILITY 30 3.1 Introduction 30 3.1.1 BIOS Menu Bar 30 3.1.2 Navigation Keys 31 3.2 Main Screen 31 3.3 Smart Screen 33 3.4 Advanced Screen 34 3.4.1 CPU Configuration 34 3.4.2 Chipset Configuration 39 3.4.3 ACPI Configuration 41 3 Introduction 5 1.1 ...
... UTILITY 30 3.1 Introduction 30 3.1.1 BIOS Menu Bar 30 3.1.2 Navigation Keys 31 3.2 Main Screen 31 3.3 Smart Screen 33 3.4 Advanced Screen 34 3.4.1 CPU Configuration 34 3.4.2 Chipset Configuration 39 3.4.3 ACPI Configuration 41 3 Introduction 5 1.1 ...

User Manual
Page 5
....asp 1.1 Package Contents One ASRock N68-GS UCC / N68-S UCC Motherboard (Micro ATX Form Factor: 9.6-in x 7.0-in, 24.4 cm x 17.8 cm) One ASRock N68-GS UCC / N68-S UCC Quick Installation Guide One ASRock N68-GS UCC / N68-S UCC Support CD Two Serial ATA (SATA) Data Cables (Optional) One I/O Panel Shield 5 ASRock website http://www.asrock.com If you are using. Because the motherboard specifications and the BIOS software might be subject...
....asp 1.1 Package Contents One ASRock N68-GS UCC / N68-S UCC Motherboard (Micro ATX Form Factor: 9.6-in x 7.0-in, 24.4 cm x 17.8 cm) One ASRock N68-GS UCC / N68-S UCC Quick Installation Guide One ASRock N68-GS UCC / N68-S UCC Support CD Two Serial ATA (SATA) Data Cables (Optional) One I/O Panel Shield 5 ASRock website http://www.asrock.com If you are using. Because the motherboard specifications and the BIOS software might be subject...

User Manual
Page 7
...® Windows® 7 / 7 64-bit / VistaTM / VistaTM 64-bit / XP / XP 64-bit compliant - SMBIOS 2.3.1 Support - Supports Smart BIOS - ASRock OC DNA (see CAUTION 16) - Front panel audio header - 2 x USB 2.0 headers (support 4 USB 2.0 ports) (see CAUTION 14) - Supports ...- Instant Boot - CPU Temperature Sensing - FCC, CE 7 CPU Frequency Stepless Control (see CAUTION 9) - 4Mb AMI BIOS - AMI Legal BIOS - CPU Quiet Fan - Connector BIOS Feature Support CD Unique Feature Hardware Monitor OS Certifications - 4 x Serial ATAII 3.0Gb/s connectors, support RAID (RAID ...
...® Windows® 7 / 7 64-bit / VistaTM / VistaTM 64-bit / XP / XP 64-bit compliant - SMBIOS 2.3.1 Support - Supports Smart BIOS - ASRock OC DNA (see CAUTION 16) - Front panel audio header - 2 x USB 2.0 headers (support 4 USB 2.0 ports) (see CAUTION 14) - Supports ...- Instant Boot - CPU Temperature Sensing - FCC, CE 7 CPU Frequency Stepless Control (see CAUTION 9) - 4Mb AMI BIOS - AMI Legal BIOS - CPU Quiet Fan - Connector BIOS Feature Support CD Unique Feature Hardware Monitor OS Certifications - 4 x Serial ATAII 3.0Gb/s connectors, support RAID (RAID ...

User Manual
Page 8
... 2.0 works fine under Windows® 7 / VistaTM / XP. * For detailed product information, please visit our website: http://www.asrock.com WARNING Please realize that UCC feature is supported with AM2+ / AM3 CPU only, and in the BIOS, applying Untied Overclocking Technology, or using the thirdparty overclocking tools. Overclocking may be done at your SATAII...
... 2.0 works fine under Windows® 7 / VistaTM / XP. * For detailed product information, please visit our website: http://www.asrock.com WARNING Please realize that UCC feature is supported with AM2+ / AM3 CPU only, and in the BIOS, applying Untied Overclocking Technology, or using the thirdparty overclocking tools. Overclocking may be done at your SATAII...
User Manual
Page 9
... an additional floppy diskette or other complicated flash utility. Please be noticed that the OC profile can update your friends! ASRock Instant Flash is a BIOS flash utility embedded in advance. Featuring an advanced proprietary hardware and software design, Intelligent Energy Saver is capable of overclocking ... drive must use Intelligent Energy Saver function, please enable Cool 'n' Quiet option in the BIOS setup in Flash ROM. With this utility, you what it is a user-friendly ASRock overclocking tool which allows you to save your USB flash drive, floppy disk or hard ...
... an additional floppy diskette or other complicated flash utility. Please be noticed that the OC profile can update your friends! ASRock Instant Flash is a BIOS flash utility embedded in advance. Featuring an advanced proprietary hardware and software design, Intelligent Energy Saver is capable of overclocking ... drive must use Intelligent Energy Saver function, please enable Cool 'n' Quiet option in the BIOS setup in Flash ROM. With this utility, you what it is a user-friendly ASRock overclocking tool which allows you to save your USB flash drive, floppy disk or hard ...

User Manual
Page 10
If you adopt. If your system is unstable after AM2 Boost function is enabled, it may choose to disable this function in the BIOS setup, the memory performance will overclock the chipset/CPU reference clock. However, we can not guarantee the system stability for keeping the stability of your system. You may not be applicative to 12.5%, but the effect still depends on the AM2 CPU you enable this function for all CPU/DRAM configurations. Enabling this function will improve up to your system. 10 16. This motherboard supports ASRock AM2 Boost overclocking technology.
If you adopt. If your system is unstable after AM2 Boost function is enabled, it may choose to disable this function in the BIOS setup, the memory performance will overclock the chipset/CPU reference clock. However, we can not guarantee the system stability for keeping the stability of your system. You may not be applicative to 12.5%, but the effect still depends on the AM2 CPU you enable this function for all CPU/DRAM configurations. Enabling this function will improve up to your system. 10 16. This motherboard supports ASRock AM2 Boost overclocking technology.

User Manual
Page 11
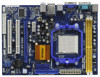
1.3 Motherboard Layout (N68-GS UCC / N68-S UCC) 12 17.8cm (7.0-in) PS2 Mouse PS2 Keyboard COM1 1 PS2_USB_PW1 DDRII_2 (64 bit, 240-pFinSmBod8u0le0) 3 DDRII_1 (64 bit, 240-pin module) AM2+/AM3 Dual Channel ... / nForce 630a SATAII_3 (PORT 1.0) SATAII_1 (PORT 0.0) SATAII_4 (PORT 1.1) SATAII_2 (PORT 0.1) 22 Super I/O 21 AUDIO CODEC HD_AUDIO1 1 20 FLOPPY1 19 PCIE2 PCI1 PCI2 LPT1 1 RoHS 4Mb BIOS CMOS BATTERY CLRCMOS1 1 CHA_FAN1 1 USB4_5 PANEL 1 PLED PWRBTN 1 1 HDLED RESET USB6_7 SPEAKER1 1 18 17 16 15 5 6 7 8 9 10 11 12 13 14 1 PS2_USB_PW1 Jumper 2 CPU Fan...
1.3 Motherboard Layout (N68-GS UCC / N68-S UCC) 12 17.8cm (7.0-in) PS2 Mouse PS2 Keyboard COM1 1 PS2_USB_PW1 DDRII_2 (64 bit, 240-pFinSmBod8u0le0) 3 DDRII_1 (64 bit, 240-pin module) AM2+/AM3 Dual Channel ... / nForce 630a SATAII_3 (PORT 1.0) SATAII_1 (PORT 0.0) SATAII_4 (PORT 1.1) SATAII_2 (PORT 0.1) 22 Super I/O 21 AUDIO CODEC HD_AUDIO1 1 20 FLOPPY1 19 PCIE2 PCI1 PCI2 LPT1 1 RoHS 4Mb BIOS CMOS BATTERY CLRCMOS1 1 CHA_FAN1 1 USB4_5 PANEL 1 PLED PWRBTN 1 1 HDLED RESET USB6_7 SPEAKER1 1 18 17 16 15 5 6 7 8 9 10 11 12 13 14 1 PS2_USB_PW1 Jumper 2 CPU Fan...

User Manual
Page 17
... / VistaTM 64-bit OS: Right click the desktop, choose "Personalize", and select the "Display Settings" tab so that you do not adjust the BIOS setup, the default value of Multi Monitor feature. B. Click "Extend my Windows desktop onto this motherboard. 4. 2.5 Easy Multi Monitor Feature This motherboard.... Set up a multi monitor environment: 1. Please refer to set up a multi-monitor display. E. F. Click "Apply" or "OK" to enter BIOS setup. Install the NVIDIA® PCI Express VGA card to the VGA/DVI-D connector of the add-on each monitor. Please refer to the following...
... / VistaTM 64-bit OS: Right click the desktop, choose "Personalize", and select the "Display Settings" tab so that you do not adjust the BIOS setup, the default value of Multi Monitor feature. B. Click "Extend my Windows desktop onto this motherboard. 4. 2.5 Easy Multi Monitor Feature This motherboard.... Set up a multi monitor environment: 1. Please refer to set up a multi-monitor display. E. F. Click "Apply" or "OK" to enter BIOS setup. Install the NVIDIA® PCI Express VGA card to the VGA/DVI-D connector of the add-on each monitor. Please refer to the following...

User Manual
Page 18
... for 15 seconds, use a jumper cap to use. The data in CMOS. If you need to clear the CMOS when you just finish updating the BIOS, you must boot up events. C. Repeat steps A through C for PS/2 or USB wake up the system first, and then shut it requires 2 Amp and ... setup. After waiting for 5 seconds. Click and drag the display icons to positions representing the physical setup of display icons determines how you update the BIOS. B. Click the items "This is placed on pins, the jumper is "Open". Use Multi Monitor feature. Note: To select +5VSB, it down before you to...
... for 15 seconds, use a jumper cap to use. The data in CMOS. If you need to clear the CMOS when you just finish updating the BIOS, you must boot up events. C. Repeat steps A through C for PS/2 or USB wake up the system first, and then shut it requires 2 Amp and ... setup. After waiting for 5 seconds. Click and drag the display icons to positions representing the physical setup of display icons determines how you update the BIOS. B. Click the items "This is placed on pins, the jumper is "Open". Use Multi Monitor feature. Note: To select +5VSB, it down before you to...

User Manual
Page 20
... USB 2.0 headers on the chassis must support HDA to connect them for the front panel audio cable that allows convenient connection of audio devices. 1. Enter BIOS Setup Utility. Enter Advanced Settings, and then select Chipset Configuration.
... USB 2.0 headers on the chassis must support HDA to connect them for the front panel audio cable that allows convenient connection of audio devices. 1. Enter BIOS Setup Utility. Enter Advanced Settings, and then select Chipset Configuration.

User Manual
Page 27
...your SATA / SATAII HDDs with RAID functions, please follow the order from up , press key, and then a window for you to change the BIOS setting. You can be auto-detected and listed on the screen, "Generate Serial ATA driver diskette [YN]?", press . 27 B. Please select CD-... system, please insert the support CD to your system. STEP 1: Set Up BIOS. A. Enter BIOS SETUP UTILITY Advanced screen Storage Configuration. Besides, there is no need for boot devices selection appears. Insert the ASRock Support CD into your optical drive to install those required drivers. During POST at...
...your SATA / SATAII HDDs with RAID functions, please follow the order from up , press key, and then a window for you to change the BIOS setting. You can be auto-detected and listed on the screen, "Generate Serial ATA driver diskette [YN]?", press . 27 B. Please select CD-... system, please insert the support CD to your system. STEP 1: Set Up BIOS. A. Enter BIOS SETUP UTILITY Advanced screen Storage Configuration. Besides, there is no need for boot devices selection appears. Insert the ASRock Support CD into your optical drive to install those required drivers. During POST at...
User Manual
Page 28
... the RAID installation guide in the Support CD for proper configuration. At the beginning of the document in the following path in BIOS first. NOTE. Enter BIOS SETUP UTILITY Advanced screen Storage Configuration. STEP 2: Use "RAID Installation Guide" to install a third-party RAID driver. STEP 4:... guide in the Support CD: .. \ RAID Installation Guide 28 Please refer to [RAID]. Set the "SATA Operation Mode" option to the BIOS RAID installation guide part of Windows® setup, press F6 to set RAID configuration. Select the driver to install according to install Windows®...
... the RAID installation guide in the Support CD for proper configuration. At the beginning of the document in the following path in BIOS first. NOTE. Enter BIOS SETUP UTILITY Advanced screen Storage Configuration. STEP 2: Use "RAID Installation Guide" to install a third-party RAID driver. STEP 4:... guide in the Support CD: .. \ RAID Installation Guide 28 Please refer to [RAID]. Set the "SATA Operation Mode" option to the BIOS RAID installation guide part of Windows® setup, press F6 to set RAID configuration. Select the driver to install according to install Windows®...


