
User Guide
Page 2
... liability with the furnishing, performance, or use of ATI hardware, software or other intellectual property rights. ATI Technologies Inc. ATI, the ATI logo, and ATI product and product-feature names are trademarks and/or registered trademarks of this manual, or parts thereof, in diagrams. Reproduction of this document, ATI Technologies Inc. Product may not be authorized by...
... liability with the furnishing, performance, or use of ATI hardware, software or other intellectual property rights. ATI Technologies Inc. ATI, the ATI logo, and ATI product and product-feature names are trademarks and/or registered trademarks of this manual, or parts thereof, in diagrams. Reproduction of this document, ATI Technologies Inc. Product may not be authorized by...

User Guide
Page 6
...32 Attributes 33 Avivo™ Color 35 HDTV Support 36 3D 39 Standard Settings 40 Anti-aliasing 42 Set the Anti-Aliasing preference manually 42 Adaptive Anti-aliasing 44 Anisotropic Filtering 44 Catalyst™ A.I. 46 Mipmap Detail Level 48 All Settings 50 API Specific 53 ...Color 55 Color Desktop 56 Color - FullScreen 3D 59 Avivo™ Video for Radeon® Series starting from 9500 60 Standard Settings 61 Adjustments 62 Video Overlay Theater Mode 64 Deinterlacing 65 VPU Recover 70 Using TV ...
...32 Attributes 33 Avivo™ Color 35 HDTV Support 36 3D 39 Standard Settings 40 Anti-aliasing 42 Set the Anti-Aliasing preference manually 42 Adaptive Anti-aliasing 44 Anisotropic Filtering 44 Catalyst™ A.I. 46 Mipmap Detail Level 48 All Settings 50 API Specific 53 ...Color 55 Color Desktop 56 Color - FullScreen 3D 59 Avivo™ Video for Radeon® Series starting from 9500 60 Standard Settings 61 Adjustments 62 Video Overlay Theater Mode 64 Deinterlacing 65 VPU Recover 70 Using TV ...

User Guide
Page 12
Consult your computer system manual to ensure the power supply is required: • A CrossFire™ certified motherboard with Service Pack 2 (SP2). • Windows® XP Professional x64 Edition. • Windows&#... a high-end graphics card with a peak dissipation above 75 watts. • Windows® XP with two (2) PCI Express® X16 slots and correct PCIe™ chipset driver. (See ati.com/crossfire for each of CrossFire™ certified motherboards.) • a CrossFire™ Edition graphics card from the same product series that works as...
Consult your computer system manual to ensure the power supply is required: • A CrossFire™ certified motherboard with Service Pack 2 (SP2). • Windows® XP Professional x64 Edition. • Windows&#... a high-end graphics card with a peak dissipation above 75 watts. • Windows® XP with two (2) PCI Express® X16 slots and correct PCIe™ chipset driver. (See ati.com/crossfire for each of CrossFire™ certified motherboards.) • a CrossFire™ Edition graphics card from the same product series that works as...

User Guide
Page 23
... to be included in the Dashboard. 2 Select Profiles Manager. Display Profiles Manager 1 Click Profiles in your own personal video settings that can be quickly activated manually, through a hot key, or by key combination. 2 Clicking the respective button toggles ascending/descending sort order. Apply a hot key • Press and hold down the...
... to be included in the Dashboard. 2 Select Profiles Manager. Display Profiles Manager 1 Click Profiles in your own personal video settings that can be quickly activated manually, through a hot key, or by key combination. 2 Clicking the respective button toggles ascending/descending sort order. Apply a hot key • Press and hold down the...

User Guide
Page 24
... on the file name, then click Open to the file you want associated with your desktop. • If you wish to apply to activate manually: • Click Manually by then select your preferred method for all graphics adapters. • the following application, file or shortcut. 4 Click the browse ("...") button and browse to...
... on the file name, then click Open to the file you want associated with your desktop. • If you wish to apply to activate manually: • Click Manually by then select your preferred method for all graphics adapters. • the following application, file or shortcut. 4 Click the browse ("...") button and browse to...
User Guide
Page 30
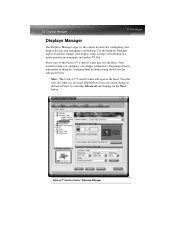
... your desktop in a multi-monitor environment, and enable TV Out. Catalyst™ Control Center: Displays Manager Note: The Catalyst™ Control Center will open to manually configure their desktop setting should use the Basic View wizard to Advanced View by selecting Advanced and clicking on the Next button. Use the Displays...
... your desktop in a multi-monitor environment, and enable TV Out. Catalyst™ Control Center: Displays Manager Note: The Catalyst™ Control Center will open to manually configure their desktop setting should use the Basic View wizard to Advanced View by selecting Advanced and clicking on the Next button. Use the Displays...
User Guide
Page 34
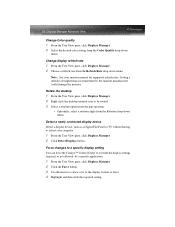
... could damage the monitor. Detect a newly connected display device Detect a display device, such as a Digital Flat Panel or TV without having to restart your monitor manual for supported refresh rates. Setting a refresh rate higher than recommended by a specific application. 1 From the Tree View pane, click Displays Manager. 2 Click the Force button...
... could damage the monitor. Detect a newly connected display device Detect a display device, such as a Digital Flat Panel or TV without having to restart your monitor manual for supported refresh rates. Setting a refresh rate higher than recommended by a specific application. 1 From the Tree View pane, click Displays Manager. 2 Click the Force button...

User Guide
Page 37
...Control Center detects display devices connected to automatically detect all displays • Only allow panning on the Displays Manager page. or • Use manual detection only (I must click Detect Displays button). Displays Manager Advanced View 29 Determine how display devices are required. 1 From the Tree View ... inputs. Note: If Force TV detection is not automatically detected by all connected display devices when it is opened or you can manually detect connected devices when they are detected Use this feature. Note: This option is opened. You can set the Catalyst™ ...
...Control Center detects display devices connected to automatically detect all displays • Only allow panning on the Displays Manager page. or • Use manual detection only (I must click Detect Displays button). Displays Manager Advanced View 29 Determine how display devices are required. 1 From the Tree View ... inputs. Note: If Force TV detection is not automatically detected by all connected display devices when it is opened or you can manually detect connected devices when they are detected Use this feature. Note: This option is opened. You can set the Catalyst™ ...

User Guide
Page 50
... is the primary concern. • If you are unsure of threedimensional curved objects or objects with diagonal edges. Set the Anti-Aliasing preference manually Set the Anti-Aliasing preference manually 1 From the Tree View pane, expand 3D. 2 Click Anti-aliasing. 3 Ensure the application override is cleared. To do so, make sure the...
... is the primary concern. • If you are unsure of threedimensional curved objects or objects with diagonal edges. Set the Anti-Aliasing preference manually Set the Anti-Aliasing preference manually 1 From the Tree View pane, expand 3D. 2 Click Anti-aliasing. 3 Ensure the application override is cleared. To do so, make sure the...

User Guide
Page 51
... the motherboard. Preview your changes • The preview image automatically displays your settings • Click Discard to the desired setting. Set the Anti-Aliasing preference manually 43 Set the level of adaptive anti-aliasing 1 From the Tree View pane, expand 3D. 2 Click Adaptive Anti-Aliasing. 3 Adjust the Adaptive Anti-Aliasing control...
... the motherboard. Preview your changes • The preview image automatically displays your settings • Click Discard to the desired setting. Set the Anti-Aliasing preference manually 43 Set the level of adaptive anti-aliasing 1 From the Tree View pane, expand 3D. 2 Click Adaptive Anti-Aliasing. 3 Adjust the Adaptive Anti-Aliasing control...

User Guide
Page 52
... display objects with smooth, simple surfaces, such as those seen in CAD applications. • Setting for the current view only. Set the Anisotropic Filtering preference manually 1 From the Tree View pane, expand 3D. 2 Click Anisotropic Filtering. Previous settings are unsure how to improve edge smoothness and fine detail. 44 Adaptive Anti...
... display objects with smooth, simple surfaces, such as those seen in CAD applications. • Setting for the current view only. Set the Anisotropic Filtering preference manually 1 From the Tree View pane, expand 3D. 2 Click Anisotropic Filtering. Previous settings are unsure how to improve edge smoothness and fine detail. 44 Adaptive Anti...

User Guide
Page 59
... the slider to the right. To do so, make sure the Let the Application Decide check box is selected. Set the Anti-aliasing preference manually 1 From the Tree View pane, expand 3D. 2 Click All Settings. 3 Ensure the application override is enabled. The slider control will become..., expand 3D. 2 Click Adaptive Anti-Aliasing. 3 Adjust the Adaptive Anti-Aliasing control slider to the desired setting. Set the Anisotropic Filtering preference manually 1 From the Tree View pane, expand 3D. 2 Click All Settings. 3 Ensure the application override is already known or understood. To do so...
... the slider to the right. To do so, make sure the Let the Application Decide check box is selected. Set the Anti-aliasing preference manually 1 From the Tree View pane, expand 3D. 2 Click All Settings. 3 Ensure the application override is enabled. The slider control will become..., expand 3D. 2 Click Adaptive Anti-Aliasing. 3 Adjust the Adaptive Anti-Aliasing control slider to the desired setting. Set the Anisotropic Filtering preference manually 1 From the Tree View pane, expand 3D. 2 Click All Settings. 3 Ensure the application override is already known or understood. To do so...

User Guide
Page 70
Restore default settings 1 Move the mouse to manually set Gamma, Brightness, Contrast, Saturation, and Hue. Discard your changes and exit the Catalyst™ Control Center. Discard does not close the Catalyst™ Control ...
Restore default settings 1 Move the mouse to manually set Gamma, Brightness, Contrast, Saturation, and Hue. Discard your changes and exit the Catalyst™ Control Center. Discard does not close the Catalyst™ Control ...

User Guide
Page 83
... your settings • Click Discard to the desired setting. Refer to the motherboard's manual for information to save your changes and leave the Catalyst™ Control Center open. 2 Click OK to enable dual PCIe™ slot support. settings 1 From the Tree View pane, expand 3D. 2 Click... Catalyst™ A.I. 3 If necessary, clear the check mark from Disable Catalyst™ A.I . For more information see the CrossFire™ Web page at: ati.com/crossfire Discard your ...
... your settings • Click Discard to the desired setting. Refer to the motherboard's manual for information to save your changes and leave the Catalyst™ Control Center open. 2 Click OK to enable dual PCIe™ slot support. settings 1 From the Tree View pane, expand 3D. 2 Click... Catalyst™ A.I. 3 If necessary, clear the check mark from Disable Catalyst™ A.I . For more information see the CrossFire™ Web page at: ati.com/crossfire Discard your ...

User Guide
Page 85
... correctly detect your settings. For more information see the CrossFire™ Web page at : ati.com/crossfire See your motherboard's manual to start CrossFire™ if a 3D application, game, or video playback, such as a DVD movie, is the primary PCIe™ slot. Close all your graphics hardware or their is a problem with your...
... correctly detect your settings. For more information see the CrossFire™ Web page at : ati.com/crossfire See your motherboard's manual to start CrossFire™ if a 3D application, game, or video playback, such as a DVD movie, is the primary PCIe™ slot. Close all your graphics hardware or their is a problem with your...

User Guide
Page 98
... Set a higher quality Anisotropic Filtering 45 Set color correction for 56, 57 Set the Anisotropic Filtering preference manually 44 Set the Anisotropic Filtering to automated preference 45, 51 Set the Anti-Aliasing preference manually 42, 55 Set the Anti-Aliasing to automated preference 42 Sort Hotkeys 14 Splash Screen 18 Splinter Cell...
... Set a higher quality Anisotropic Filtering 45 Set color correction for 56, 57 Set the Anisotropic Filtering preference manually 44 Set the Anisotropic Filtering to automated preference 45, 51 Set the Anti-Aliasing preference manually 42, 55 Set the Anti-Aliasing to automated preference 42 Sort Hotkeys 14 Splash Screen 18 Splinter Cell...