
User Manual
Page 2
... 29 Port Forwarding 30 Applications 31 DMZ Hosting 32 IPv6 DMZ Hosting 33 UPnP 34 Configuring Advanced Setup 35 Accessing Advanced Setup 35 Services Blocking 37 Website Blocking 38 Scheduling Access 39 DSL Bonding Settings (T2200H only) 40 WAN IP Addressing 41 IPv6 LAN Settings 42 DHCP Reservation 43 LAN IP and DHCP...
... 29 Port Forwarding 30 Applications 31 DMZ Hosting 32 IPv6 DMZ Hosting 33 UPnP 34 Configuring Advanced Setup 35 Accessing Advanced Setup 35 Services Blocking 37 Website Blocking 38 Scheduling Access 39 DSL Bonding Settings (T2200H only) 40 WAN IP Addressing 41 IPv6 LAN Settings 42 DHCP Reservation 43 LAN IP and DHCP...

User Manual
Page 8
... LEDs flashes, data traffic is not currently operational, but may be enabled in a future firmware update. WPS Button The WPS button activates WPS (WiFi Protected Setup) on a device you wish to connect to another device via one of its HPNA port. HPNA The HPNA LED illuminates when the Gateway is passing...
... LEDs flashes, data traffic is not currently operational, but may be enabled in a future firmware update. WPS Button The WPS button activates WPS (WiFi Protected Setup) on a device you wish to connect to another device via one of its HPNA port. HPNA The HPNA LED illuminates when the Gateway is passing...

User Manual
Page 13
Wireless Setup (see chapter 3 for more details), Firewall (see chapter 4 for more details). Here, you can now access all of the Home screen's options. and Advanced Setup (see chapter 6 for more details); You can quickly access the other firmware screen generates the Home screen. 9 Icon Bar At the top of the Gateway's firmware by clicking on the appropriate icon: Status (see chapter 5 for more details); Clicking Home in any other four main sections of the Home screen is the Icon Bar. Chapter 2 Home Screen 4.
Wireless Setup (see chapter 3 for more details), Firewall (see chapter 4 for more details). Here, you can now access all of the Home screen's options. and Advanced Setup (see chapter 6 for more details); You can quickly access the other firmware screen generates the Home screen. 9 Icon Bar At the top of the Gateway's firmware by clicking on the appropriate icon: Status (see chapter 5 for more details); Clicking Home in any other four main sections of the Home screen is the Icon Bar. Chapter 2 Home Screen 4.
User Manual
Page 19
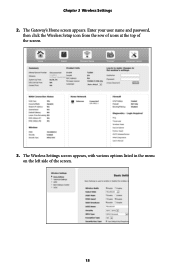
The Wireless Settings screen appears, with various options listed in the menu on the left side of the screen. 3. Enter your user name and password, then click the Wireless Setup icon from the row of icons at the top of the screen. 15 Chapter 3 Wireless Settings 2. The Gateway's Home screen appears.
The Wireless Settings screen appears, with various options listed in the menu on the left side of the screen. 3. Enter your user name and password, then click the Wireless Setup icon from the row of icons at the top of the screen. 15 Chapter 3 Wireless Settings 2. The Gateway's Home screen appears.

User Manual
Page 25
... Gateway's wireless network operates. Chapter 3 Wireless Settings Channel Select the channel at which allows devices on the network to generate the WPS (Wi-Fi Protected Setup) screen. Wireless Power Level Adjust the power of setting up a wireless network by selecting a percentage from 10% to 100% from the drop-down list WPS...
... Gateway's wireless network operates. Chapter 3 Wireless Settings Channel Select the channel at which allows devices on the network to generate the WPS (Wi-Fi Protected Setup) screen. Wireless Power Level Adjust the power of setting up a wireless network by selecting a percentage from 10% to 100% from the drop-down list WPS...
User Manual
Page 39
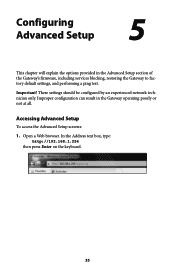
...Gateway's firmware, including services blocking, restoring the Gateway to factory default settings, and performing a ping test. Accessing Advanced Setup To access the Advanced Setup screens: 1. These settings should be configured by an experienced network technician only. In the Address text box, type: http...://192.168.1.254 then press Enter on the keyboard. 35 Important! Configuring Advanced Setup 5 This chapter will explain the ...
...Gateway's firmware, including services blocking, restoring the Gateway to factory default settings, and performing a ping test. Accessing Advanced Setup To access the Advanced Setup screens: 1. These settings should be configured by an experienced network technician only. In the Address text box, type: http...://192.168.1.254 then press Enter on the keyboard. 35 Important! Configuring Advanced Setup 5 This chapter will explain the ...
User Manual
Page 40
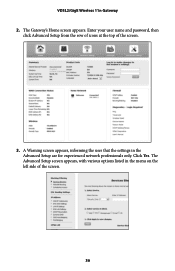
A Warning screen appears, informing the user that the settings in the menu on the left side of the screen. 3. Enter your user name and password, then click Advanced Setup from the row of icons at the top of the screen. 36 Click Yes. VDSL2/GigE Wireless 11n Gateway 2. The Gateway's Home screen appears. The Advanced Setup screen appears, with various options listed in the Advanced Setup are for experienced network professionals only.
A Warning screen appears, informing the user that the settings in the menu on the left side of the screen. 3. Enter your user name and password, then click Advanced Setup from the row of icons at the top of the screen. 36 Click Yes. VDSL2/GigE Wireless 11n Gateway 2. The Gateway's Home screen appears. The Advanced Setup screen appears, with various options listed in the Advanced Setup are for experienced network professionals only.
User Manual
Page 41
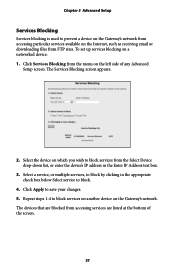
... Select the device on the Gateway's network. The devices that are blocked from accessing services are listed at the bottom of any Advanced Setup screen. Click Services Blocking from the menu on the Internet, such as receiving email or downloading files from FTP sites. Select a service... multiple services, to block by clicking in the Enter IP Address text box. 3. Click Apply to save your changes. 5. Chapter 5 Advanced Setup Services Blocking Services blocking is used to prevent a device on the Gateway's network from accessing particular services available on the left side of the...
... Select the device on the Gateway's network. The devices that are blocked from accessing services are listed at the bottom of any Advanced Setup screen. Click Services Blocking from the menu on the Internet, such as receiving email or downloading files from FTP sites. Select a service... multiple services, to block by clicking in the Enter IP Address text box. 3. Click Apply to save your changes. 5. Chapter 5 Advanced Setup Services Blocking Services blocking is used to prevent a device on the Gateway's network from accessing particular services available on the left side of the...
User Manual
Page 42
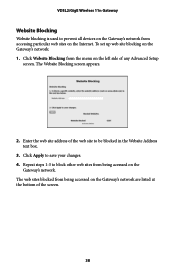
... the left side of the screen. 38 Click Website Blocking from being accessed on the Gateway's network are listed at the bottom of any Advanced Setup screen. Click Apply to be blocked in the Website Address text box. 3. The Website Blocking screen appears. 2. The web sites blocked from accessing particular web...
... the left side of the screen. 38 Click Website Blocking from being accessed on the Gateway's network are listed at the bottom of any Advanced Setup screen. Click Apply to be blocked in the Website Address text box. 3. The Website Blocking screen appears. 2. The web sites blocked from accessing particular web...
User Manual
Page 43
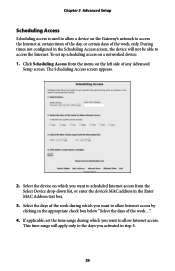
... want to allow Internet access. The Scheduling Access screen appears. 2. This time range will not be able to access the Internet. Chapter 5 Advanced Setup Scheduling Access Scheduling access is used to allow Internet access by clicking in the appropriate check box below "Select the days of the week...". 4. To... set the time range during which you want to access the Internet at certain times of the day, or certain days of any Advanced Setup screen. Select the device on which you want to allow a device on the Gateway's network to scheduled Internet access from the menu on a ...
... want to allow Internet access. The Scheduling Access screen appears. 2. This time range will not be able to access the Internet. Chapter 5 Advanced Setup Scheduling Access Scheduling access is used to allow Internet access by clicking in the appropriate check box below "Select the days of the week...". 4. To... set the time range during which you want to access the Internet at certain times of the day, or certain days of any Advanced Setup screen. Select the device on which you want to allow a device on the Gateway's network to scheduled Internet access from the menu on a ...

User Manual
Page 45
... unsure which connection is present, check with an end user. The WAN IP Address screen appears. 2. Other types of connection the ISP uses. Chapter 5 Advanced Setup WAN IP Addressing The WAN IP Address screen allows you to establish communication with Telus before continuing. 3. To do this: 1. Click WAN IP Address from...
... unsure which connection is present, check with an end user. The WAN IP Address screen appears. 2. Other types of connection the ISP uses. Chapter 5 Advanced Setup WAN IP Addressing The WAN IP Address screen allows you to establish communication with Telus before continuing. 3. To do this: 1. Click WAN IP Address from...

User Manual
Page 46
... receive a DHCP LAN side private IP address. 5. When finished in concert with unnumbered mode and allows computers not assigned a static IP to activate any Advanced Setup screen. Select the LAN connection type from the menu on the Gateway.
... receive a DHCP LAN side private IP address. 5. When finished in concert with unnumbered mode and allows computers not assigned a static IP to activate any Advanced Setup screen. Select the LAN connection type from the menu on the Gateway.

User Manual
Page 47
... 2 from the Select MAC Address drop-down list, or enter an IP address in the appropriate text boxes. 4. Select the MAC address of any Advanced Setup screen. DHCP Reservation DHCP reservation allows devices on a networked device: 1. Chapter 5 Advanced...
... 2 from the Select MAC Address drop-down list, or enter an IP address in the appropriate text boxes. 4. Select the MAC address of any Advanced Setup screen. DHCP Reservation DHCP reservation allows devices on a networked device: 1. Chapter 5 Advanced...
User Manual
Page 49
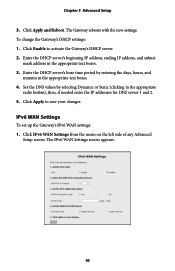
...entering the days, hours, and minutes in the appropriate text boxes. 4. Click IPv6 WAN Settings from the menu on the left side of any Advanced Setup screen. Enter the DHCP server's beginning IP address, ending IP address, and subnet mask address in the appropriate radio button), then, if needed enter ... Settings screen appears. 45 Enter the DHCP server's lease time period by selecting Dynamic or Static (clicking in the appropriate text boxes. 3. Chapter 5 Advanced Setup 3. Click Apply and Reboot. To change the Gateway's DHCP settings: 1. The Gateway reboots with the new settings.
...entering the days, hours, and minutes in the appropriate text boxes. 4. Click IPv6 WAN Settings from the menu on the left side of any Advanced Setup screen. Enter the DHCP server's beginning IP address, ending IP address, and subnet mask address in the appropriate radio button), then, if needed enter ... Settings screen appears. 45 Enter the DHCP server's lease time period by selecting Dynamic or Static (clicking in the appropriate text boxes. 3. Chapter 5 Advanced Setup 3. Click Apply and Reboot. To change the Gateway's DHCP settings: 1. The Gateway reboots with the new settings.

User Manual
Page 51
Select the Gateway's Dynamic DNS account provider from the drop-down list. 3. Enter the full Dynamic DNS domain in the appropriate text boxes. 4. Enter the Dynamic DNS username and password in Dynamic DNS provider text box, or select one from the drop-down list. 5. Click Apply. 47 Click Dynamic DNS from the menu on the left side of any Advanced Configuration screen. Chapter 5 Advanced Setup To configure Dynamic DNS: 1. The Dynamic DNS screen appears. 2.
Select the Gateway's Dynamic DNS account provider from the drop-down list. 3. Enter the full Dynamic DNS domain in the appropriate text boxes. 4. Enter the Dynamic DNS username and password in Dynamic DNS provider text box, or select one from the drop-down list. 5. Click Apply. 47 Click Dynamic DNS from the menu on the left side of any Advanced Configuration screen. Chapter 5 Advanced Setup To configure Dynamic DNS: 1. The Dynamic DNS screen appears. 2.
User Manual
Page 52
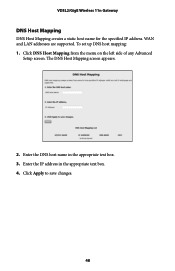
VDSL2/GigE Wireless 11n Gateway DNS Host Mapping DNS Host Mapping creates a static host name for the specified IP address. Enter the DNS host name in the appropriate text box. 4. Click Apply to save changes. 48 Click DNS Host Mapping from the menu on the left side of any Advanced Setup screen. WAN and LAN addresses are supported. The DNS Host Mapping screen appears. 2. To set up DNS host mapping: 1. Enter the IP address in the appropriate text box. 3.
VDSL2/GigE Wireless 11n Gateway DNS Host Mapping DNS Host Mapping creates a static host name for the specified IP address. Enter the DNS host name in the appropriate text box. 4. Click Apply to save changes. 48 Click DNS Host Mapping from the menu on the left side of any Advanced Setup screen. WAN and LAN addresses are supported. The DNS Host Mapping screen appears. 2. To set up DNS host mapping: 1. Enter the IP address in the appropriate text box. 3.
User Manual
Page 53
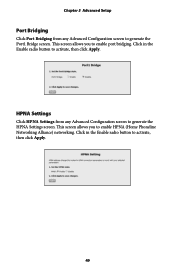
HPNA Settings Click HPNA Settings from any Advanced Configuration screen to generate the HPNA Settings screen. This screen allows you to activate, then click Apply. Click in the Enable radio button to enable port bridging. Chapter 5 Advanced Setup Port Bridging Click Port Bridging from any Advanced Configuration screen to generate the Port1 Bridge screen. This screen allows you to activate, then click Apply. 49 Click in the Enable radio button to enable HPNA (Home Phoneline Networking Alliance) networking.
HPNA Settings Click HPNA Settings from any Advanced Configuration screen to generate the HPNA Settings screen. This screen allows you to activate, then click Apply. Click in the Enable radio button to enable port bridging. Chapter 5 Advanced Setup Port Bridging Click Port Bridging from any Advanced Configuration screen to generate the Port1 Bridge screen. This screen allows you to activate, then click Apply. 49 Click in the Enable radio button to enable HPNA (Home Phoneline Networking Alliance) networking.

User Manual
Page 54
The Admin Password screen appears. 2. Enter the old password in the Admin Password text box. 4. VDSL2/GigE Wireless 11n Gateway Admin Password To change the password that allow access to save your changes. 50 Enter a new password in the Old Password text box. 3. Click Apply to the Gateway's firmware screens: 1. Reenter the new password in the Confirm Your Password text box. 5. Click Admin Password from the menu on the left side of any Advanced Setup screen.
The Admin Password screen appears. 2. Enter the old password in the Admin Password text box. 4. VDSL2/GigE Wireless 11n Gateway Admin Password To change the password that allow access to save your changes. 50 Enter a new password in the Old Password text box. 3. Click Apply to the Gateway's firmware screens: 1. Reenter the new password in the Confirm Your Password text box. 5. Click Admin Password from the menu on the left side of any Advanced Setup screen.
User Manual
Page 55
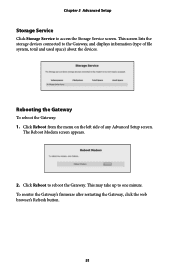
... after restarting the Gateway, click the web browser's Refresh button. 51 This may take up to the Gateway, and displays information (type of any Advanced Setup screen. The Reboot Modem screen appears. 2. Rebooting the Gateway To reboot the Gateway: 1. Click Reboot to access the Storage Service screen. Chapter 5 Advanced...
... after restarting the Gateway, click the web browser's Refresh button. 51 This may take up to the Gateway, and displays information (type of any Advanced Setup screen. The Reboot Modem screen appears. 2. Rebooting the Gateway To reboot the Gateway: 1. Click Reboot to access the Storage Service screen. Chapter 5 Advanced...

User Manual
Page 56
... wireless and firwall settings) will be restored to their default values after performing the Restore Factory Default procedure. 52 Click Restore Defaults in any Advanced Setup screen. The Restore Defaults screen appears. 2. The Gateway's current WAN port settings will be deleted, and the factory default settings restored. If you want to...
... wireless and firwall settings) will be restored to their default values after performing the Restore Factory Default procedure. 52 Click Restore Defaults in any Advanced Setup screen. The Restore Defaults screen appears. 2. The Gateway's current WAN port settings will be deleted, and the factory default settings restored. If you want to...