User Manual
Page 5
...-circuit vide camera, you can link to this camera with 5V power by unauthorized person when the video is transmitted over the air is connected to Internet, you don't have to the length of video-surveillance purposes, like home/office safety, kid/pet monitoring, and remote video ...new cable from anywhere in the world where Internet access is available. If you for all kinds of cable! This network camera AIC600W is installed to setup wireless security in next section! Worry about the content will be intercepted by the camera, expect yourself. If you're not familiar with...
...-circuit vide camera, you can link to this camera with 5V power by unauthorized person when the video is transmitted over the air is connected to Internet, you don't have to the length of video-surveillance purposes, like home/office safety, kid/pet monitoring, and remote video ...new cable from anywhere in the world where Internet access is available. If you for all kinds of cable! This network camera AIC600W is installed to setup wireless security in next section! Worry about the content will be intercepted by the camera, expect yourself. If you're not familiar with...
User Manual
Page 6
.... • Supports two video compression format (MJPEG and MPEG4). • Wired and wireless network (802.11b / 802.11g / 802.11n) support. • Wireless data encryption (WEP / WPA). • WPS (Wi-Fi Protected Setup), the easiest way to setup a secure wireless connection. • Supports DHCP and you can also assign a fixed IP address to the...
.... • Supports two video compression format (MJPEG and MPEG4). • Wired and wireless network (802.11b / 802.11g / 802.11n) support. • Wireless data encryption (WEP / WPA). • WPS (Wi-Fi Protected Setup), the easiest way to setup a secure wireless connection. • Supports DHCP and you can also assign a fixed IP address to the...
User Manual
Page 8
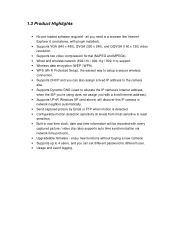
Power connector, connects to any standard tripod / camera wall holder. Back Panel Item Name Description Antenna 2.4GHz Wireless Network Antenna Tripod Connector Connects to A/C power adapter. LAN Power Connects to factory default. press and Reset / WPS hold this button to activate WPS mode; Press and release this button for 10 seconds to go back to LAN by Ethernet cable.
Power connector, connects to any standard tripod / camera wall holder. Back Panel Item Name Description Antenna 2.4GHz Wireless Network Antenna Tripod Connector Connects to A/C power adapter. LAN Power Connects to factory default. press and Reset / WPS hold this button to activate WPS mode; Press and release this button for 10 seconds to go back to LAN by Ethernet cable.
User Manual
Page 9
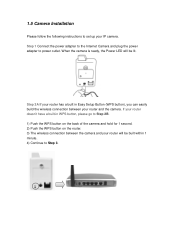
If your router doesn't have a built-in Easy Setup Button (WPS button), you can easily build the wireless connection between the camera and your IP camera. Step 1 Connect the power adapter to the Internet Camera and plug the power adapter to Step 3. When the camera is ready, the Power... 1) Push the WPS button on the back of the camera and hold for 1 second. 2) Push the WPS button on the router. 3) The wireless connection between your router and the camera. 1.5 Camera Installation Please follow the following instructions to set up your router will be built within 1 minute. 4) ...
If your router doesn't have a built-in Easy Setup Button (WPS button), you can easily build the wireless connection between the camera and your IP camera. Step 1 Connect the power adapter to the Internet Camera and plug the power adapter to Step 3. When the camera is ready, the Power... 1) Push the WPS button on the back of the camera and hold for 1 second. 2) Push the WPS button on the router. 3) The wireless connection between your router and the camera. 1.5 Camera Installation Please follow the following instructions to set up your router will be built within 1 minute. 4) ...

User Manual
Page 14
... to configure the wireless settings. Step 13 Click on WLAN on the top menu bar to the desired location. If you did Step 2A, your camera has connected to you wireless network already, and you wish to connect to 2) enter the wireless Key below : 1) Select the wireless network you do ...not need any further configuration to start using your wireless network is now complete.
... to configure the wireless settings. Step 13 Click on WLAN on the top menu bar to the desired location. If you did Step 2A, your camera has connected to you wireless network already, and you wish to connect to 2) enter the wireless Key below : 1) Select the wireless network you do ...not need any further configuration to start using your wireless network is now complete.

User Manual
Page 25
2.3 WLAN If you have to set wireless LAN parameters here. You can access this menu by clicking 'WLAN' on the top of wired network connection, you wish to use wireless network instead of web management interface.
2.3 WLAN If you have to set wireless LAN parameters here. You can access this menu by clicking 'WLAN' on the top of wired network connection, you wish to use wireless network instead of web management interface.
User Manual
Page 26
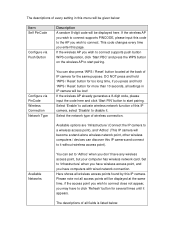
...PIN' button to start pairing. Select the network type of wireless connection. Here shows all fields is listed below : Item Self PinCode Configure via PinCode Wireless Connection Network Type You can set to 'Adhoc' when you wish to connect supports push button WPS configuration, click 'Start PBC' and ...press the WPS button on the wireless AP to start pairing. Please note not all ...
...PIN' button to start pairing. Select the network type of wireless connection. Here shows all fields is listed below : Item Self PinCode Configure via PinCode Wireless Connection Network Type You can set to 'Adhoc' when you wish to connect supports push button WPS configuration, click 'Start PBC' and ...press the WPS button on the wireless AP to start pairing. Please note not all ...

User Manual
Page 27
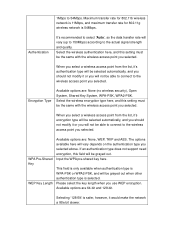
... encryption type if you wish to identify them . Select the maximum wireless data transfer rate here, from However, if the SSID is auto-selected according to connect it 's SSID, you there are many wireless access points in percent. You must use encryption, 'Disabled' will... alphanumerical characters. It should be displayed here. Channel: Shows the radio channel of a certain wireless access point (Infrastructure or Adhoc). Select the radio channel you wish to connect to distinguish them by this field automatically. Signal: Shows the radio signal strength in proximity or...
... encryption type if you wish to identify them . Select the maximum wireless data transfer rate here, from However, if the SSID is auto-selected according to connect it 's SSID, you there are many wireless access points in percent. You must use encryption, 'Disabled' will... alphanumerical characters. It should be displayed here. Channel: Shows the radio channel of a certain wireless access point (Infrastructure or Adhoc). Select the radio channel you wish to connect to distinguish them by this field automatically. Signal: Shows the radio signal strength in proximity or...
User Manual
Page 28
...on the authentication type you selected above. Select the wireless encryption type here, and this setting must be able to connect to the wireless access point you will be grayed out. Encryption Type Available options are: None (no wireless security), Open System, Shared Key System, WPA-...you selected. If an authentication type does not support need encryption, this setting must be able to connect to the wireless access point you selected. When you select a wireless access point from the list, it's encryption type will be selected automatically, and you should not ...
...on the authentication type you selected above. Select the wireless encryption type here, and this setting must be able to connect to the wireless access point you will be grayed out. Encryption Type Available options are: None (no wireless security), Open System, Shared Key System, WPA-...you selected. If an authentication type does not support need encryption, this setting must be able to connect to the wireless access point you selected. When you select a wireless access point from the list, it's encryption type will be selected automatically, and you should not ...

User Manual
Page 79
...to adjust 'MTU' setting if you 're connecting this camera from wall socket and plug it in again after 10 seconds, then try to connect to get best reception, and the distance between IP camera and computer / wireless access point should use alcohol or other chemical solution.... Ask your ISP or network administrator for help). Is the network cable or wireless connection disconnected? Adjust the antenna if you should not be caused by camera....
...to adjust 'MTU' setting if you 're connecting this camera from wall socket and plug it in again after 10 seconds, then try to connect to get best reception, and the distance between IP camera and computer / wireless access point should use alcohol or other chemical solution.... Ask your ISP or network administrator for help). Is the network cable or wireless connection disconnected? Adjust the antenna if you should not be caused by camera....

Quick Installation Guide
Page 3
... Camera and plug the power adapter to Step 3. If your router doesn't have a built-in Easy Setup Button (WPS button), you can easily build the wireless connection between the camera and your router and the camera. When the camera is ready, the Power LED will be lit. Step 2A If your router... to Step 2B. 1) Push the WPS button on the back of the camera and hold for 1 second. 2) Push the WPS button on the router. 3) The wireless connection between your router will be built within 1 minute. 4) Continue to power outlet.
... Camera and plug the power adapter to Step 3. If your router doesn't have a built-in Easy Setup Button (WPS button), you can easily build the wireless connection between the camera and your router and the camera. When the camera is ready, the Power LED will be lit. Step 2A If your router... to Step 2B. 1) Push the WPS button on the back of the camera and hold for 1 second. 2) Push the WPS button on the router. 3) The wireless connection between your router will be built within 1 minute. 4) Continue to power outlet.

Quick Installation Guide
Page 8
Step 11 Click on the white box to install ActiveX control in order to view the image. If you do not need any further configuration to configure the wireless settings. If you did Step 2B, please continue the following steps to start using your camera has connected to you wireless network already, and you did Step 2A, your camera. Step 12 You should now be able to view the camera image.
Step 11 Click on the white box to install ActiveX control in order to view the image. If you do not need any further configuration to configure the wireless settings. If you did Step 2B, please continue the following steps to start using your camera has connected to you wireless network already, and you did Step 2A, your camera. Step 12 You should now be able to view the camera image.

Quick Installation Guide
Page 9
Step 14 Follow the steps below: 1) Select the wireless network you wish to connect to enter the Wireless LAN page. Step 13 Click on WLAN on the top menu bar to 2) enter the wireless Key below if your wireless network is encrypted 3) click Apply. 3 1 2
Step 14 Follow the steps below: 1) Select the wireless network you wish to connect to enter the Wireless LAN page. Step 13 Click on WLAN on the top menu bar to 2) enter the wireless Key below if your wireless network is encrypted 3) click Apply. 3 1 2

