
User Manual
Page 4
The driver is installed along with the utility. Step 2.1 Insert the USB adapter into an available USB port of your computer. Step 2.2 Click Cancel when you see the Found New Hardware Wizard. Install Wireless USB Adapter This section provides instructions on how to install the Golden 150 Wireless Mini USB Adapter. Windows XP/2000 Users: Windows Vista Users: 3 2.
The driver is installed along with the utility. Step 2.1 Insert the USB adapter into an available USB port of your computer. Step 2.2 Click Cancel when you see the Found New Hardware Wizard. Install Wireless USB Adapter This section provides instructions on how to install the Golden 150 Wireless Mini USB Adapter. Windows XP/2000 Users: Windows Vista Users: 3 2.

User Manual
Page 6
Note: If the Autorun screen doesn't appear automatically go to Start, Run, and type D:\Utility\Setup.exe (where D is the letter of the driver software. Step 2.5 Click Install to continue with the installation of your CD drive) and click OK. Windows Vista Users: When you get warning message(s), make sure that you give permission to begin the installation. 5 Step 2.4 The Airlink101 WLAN Monitor screen will popup. Click Next at the screen.
Note: If the Autorun screen doesn't appear automatically go to Start, Run, and type D:\Utility\Setup.exe (where D is the letter of the driver software. Step 2.5 Click Install to continue with the installation of your CD drive) and click OK. Windows Vista Users: When you get warning message(s), make sure that you give permission to begin the installation. 5 Step 2.4 The Airlink101 WLAN Monitor screen will popup. Click Next at the screen.
User Manual
Page 7
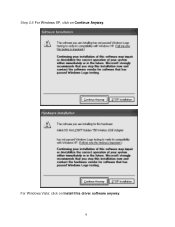
Step 2.6 For Windows XP, click on Install this driver software anyway. 6 For Windows Vista: click on Continue Anyway.
Step 2.6 For Windows XP, click on Install this driver software anyway. 6 For Windows Vista: click on Continue Anyway.
User Manual
Page 8
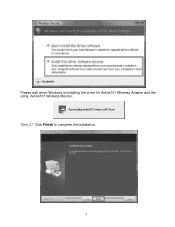
Please wait when Windows is installing the driver for Airlink101 Wireless Adapter and the utility, Airlink101 Wireless Monitor. Step 2.7 Click Finish to complete the installation. 7
Please wait when Windows is installing the driver for Airlink101 Wireless Adapter and the utility, Airlink101 Wireless Monitor. Step 2.7 Click Finish to complete the installation. 7
User Manual
Page 11
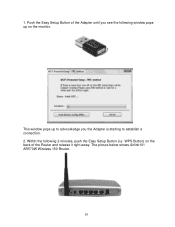
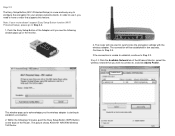
1. Push the Easy Setup Button of the Router and release it right away. Within the following window pops up on the monitor. WPS Button) on the back of the Adapter until you the Adapter is starting to establish a connection. 2. This window pops up to acknowledge you see the following 2 minutes, push the Easy Setup Button (i.e. The picture below shows Airlink101 AR570W Wireless 150 Router. 10
1. Push the Easy Setup Button of the Router and release it right away. Within the following window pops up on the monitor. WPS Button) on the back of the Adapter until you the Adapter is starting to establish a connection. 2. This window pops up to acknowledge you see the following 2 minutes, push the Easy Setup Button (i.e. The picture below shows Airlink101 AR570W Wireless 150 Router. 10
User Manual
Page 16
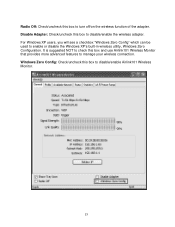
... Config: Check/uncheck this box and use Airlink101 Wireless Monitor that provides more advanced features to manage your wireless connection. For Windows XP users, you will see a checkbox "Windows Zero Config" which can be used to turn off/on the wireless function of the adapter. Radio Off: Check/uncheck this box to...
... Config: Check/uncheck this box and use Airlink101 Wireless Monitor that provides more advanced features to manage your wireless connection. For Windows XP users, you will see a checkbox "Windows Zero Config" which can be used to turn off/on the wireless function of the adapter. Radio Off: Check/uncheck this box to...
User Manual
Page 23
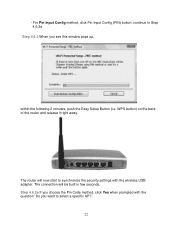
- WPS button) on the back of the router and release it right away. The router will be built in few seconds. The connection will now start to select a specific AP?". 22 Step 4.6.3a If you choose the Pin Code method, click Yes when prompted with the wireless USB adapter. For Pin Input Config method, click Pin Input Config (PIN) button, continue to Step 4.6.3a Step 4.6.2 When you want to synchronize the security settings with the question "Do you see this window pops up, within the following 2 minutes, push the Easy Setup Button (i.e.
- WPS button) on the back of the router and release it right away. The router will be built in few seconds. The connection will now start to select a specific AP?". 22 Step 4.6.3a If you choose the Pin Code method, click Yes when prompted with the wireless USB adapter. For Pin Input Config method, click Pin Input Config (PIN) button, continue to Step 4.6.3a Step 4.6.2 When you want to synchronize the security settings with the question "Do you see this window pops up, within the following 2 minutes, push the Easy Setup Button (i.e.
User Manual
Page 30
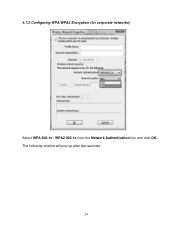
The following window will pop up after few seconds. 29 4.7.3 Configuring WPA/WPA2 Encryption (for corporate networks) Select WPA 802.1x / WPA2 802.1x from the Network Authentication box and click OK.
The following window will pop up after few seconds. 29 4.7.3 Configuring WPA/WPA2 Encryption (for corporate networks) Select WPA 802.1x / WPA2 802.1x from the Network Authentication box and click OK.
User Manual
Page 36
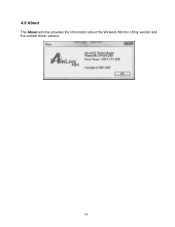
4.9 About The About window provides the information about the Wireless Monitor Utility version and the current driver version. 35
4.9 About The About window provides the information about the Wireless Monitor Utility version and the current driver version. 35
User Manual
Page 39
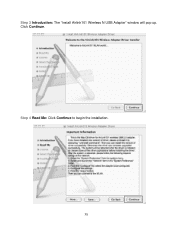
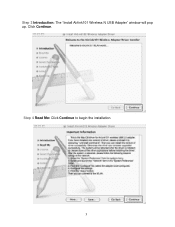
Step 4 Read Me: Click Continue to begin the installation. 38 Click Continue. Step 3 Introduction: The "Install Airlink101 Wireless N USB Adapter" window will pop up.
Step 4 Read Me: Click Continue to begin the installation. 38 Click Continue. Step 3 Introduction: The "Install Airlink101 Wireless N USB Adapter" window will pop up.

User Manual
Page 49
...-in 1 chip antennas Security • WPA2/WPA-PSK (TKIP, AES) • WEP 64, 128-bit • 802.1x (supported in Windows only) LED • Link/Power QoS • WMM System requirement • Windows 7, Vista, XP, 2000 • MAC OS 10.4, 10.5 • Available USB slot Weight • 6g Dimensions • 34 x 16...
...-in 1 chip antennas Security • WPA2/WPA-PSK (TKIP, AES) • WEP 64, 128-bit • 802.1x (supported in Windows only) LED • Link/Power QoS • WMM System requirement • Windows 7, Vista, XP, 2000 • MAC OS 10.4, 10.5 • Available USB slot Weight • 6g Dimensions • 34 x 16...
Quick Installation Guide
Page 1
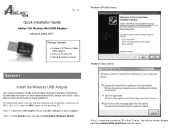
.... Select Install Utility and Driver from the menu. Step 1.2 Click Cancel when you can be found on the provided CD. Windows XP/2000 Users: Windows Vista Users: Step 1.3 Insert the Installation CD in the CD drive. For detailed instructions of your computer. Ver. 1.0 Quick... Installation Guide Golden 150 Wireless Mini USB Adapter Model # AWLL5077 Package Contents: • Golden 150 Wireless Mini USB Adapter • Driver & Utility CD •...
.... Select Install Utility and Driver from the menu. Step 1.2 Click Cancel when you can be found on the provided CD. Windows XP/2000 Users: Windows Vista Users: Step 1.3 Insert the Installation CD in the CD drive. For detailed instructions of your computer. Ver. 1.0 Quick... Installation Guide Golden 150 Wireless Mini USB Adapter Model # AWLL5077 Package Contents: • Golden 150 Wireless Mini USB Adapter • Driver & Utility CD •...
Quick Installation Guide
Page 2
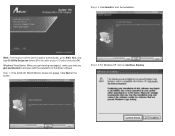
Step 1.4 The Airlink101 WLAN Monitor screen will popup. Step 1.6 For Windows XP, click on Continue Anyway. Note: If the Autorun screen doesn't appear automatically, go to continue with the installation of your CD drive) and click OK. Windows Vista Users: When you get warning message(s), make sure that you give permission to Start, Run, and type D:\Utility\Setup.exe (where D is the letter of the driver software. Click Next at the screen. Step 1.5 Click Install to start the installation.
Step 1.4 The Airlink101 WLAN Monitor screen will popup. Step 1.6 For Windows XP, click on Continue Anyway. Note: If the Autorun screen doesn't appear automatically, go to continue with the installation of your CD drive) and click OK. Windows Vista Users: When you get warning message(s), make sure that you give permission to Start, Run, and type D:\Utility\Setup.exe (where D is the letter of the driver software. Click Next at the screen. Step 1.5 Click Install to start the installation.
Quick Installation Guide
Page 3
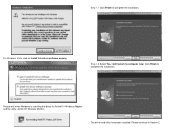
The driver and utility have been installed. Step 1.7 Click Finish to Section 2. Step 1.8 Select Yes, I will restart my computer now. Please wait when Windows is installing the driver for Airlink101 Wireless Adapter and the utility, Airlink101 Wireless Monitor. For Windows Vista: click on Install this driver software anyway. Please continue to complete the installation. Click Finish to complete the installation.
The driver and utility have been installed. Step 1.7 Click Finish to Section 2. Step 1.8 Select Yes, I will restart my computer now. Please wait when Windows is installing the driver for Airlink101 Wireless Adapter and the utility, Airlink101 Wireless Monitor. For Windows Vista: click on Install this driver software anyway. Please continue to complete the installation. Click Finish to complete the installation.
Quick Installation Guide
Page 4
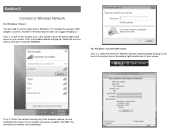
... the one you are attempting to connect to has wireless encryption enabled. Section 2 Connect to Wireless Network For Windows 7 Users: You will pop up. The connection should be now established. Step 2.1 Click on the icon in the system tray at the bottom right-hand ...
... the one you are attempting to connect to has wireless encryption enabled. Section 2 Connect to Wireless Network For Windows 7 Users: You will pop up. The connection should be now established. Step 2.1 Click on the icon in the system tray at the bottom right-hand ...
Quick Installation Guide
Page 5
... a connection. 2. The connection will now start to synchronize the encryption settings with the wireless adapter. Continue to Step 2.3. Within the following window pops up to acknowledge you see the following 2 minutes, push the Easy Setup Button (WPS Button) on the monitor. 3. If the ...connection is unable to establish, continue to Step 2.5. Step 2.3 Click the Available Network tab of the Router. This window pops up on the back of the Wireless Monitor, select the wireless network that you need to have a router that supports this feature....
... a connection. 2. The connection will now start to synchronize the encryption settings with the wireless adapter. Continue to Step 2.3. Within the following window pops up to acknowledge you see the following 2 minutes, push the Easy Setup Button (WPS Button) on the monitor. 3. If the ...connection is unable to establish, continue to Step 2.5. Step 2.3 Click the Available Network tab of the Router. This window pops up on the back of the Wireless Monitor, select the wireless network that you need to have a router that supports this feature....
Installation Guide (MAC OS)
Page 3
Step 4 Read Me: Click Continue to begin the installation. 3 Step 3 Introduction: The "Install Airlink101 Wireless N USB Adapter" window will pop up. Click Continue.
Step 4 Read Me: Click Continue to begin the installation. 3 Step 3 Introduction: The "Install Airlink101 Wireless N USB Adapter" window will pop up. Click Continue.


