
Use and Care
Page 5
... your model. Oven vent D. Cooktop control panel L. Right front burner control A B C D E F Push to Turn A B A. Anti-tip bracket G. Right rear surface burner and grate J. Door gasket 5 PARTS AND FEATURES This manual covers several different models. Broiler door I J K L M H G A. Model and serial number plate (behind bottom of the...
... your model. Oven vent D. Cooktop control panel L. Right front burner control A B C D E F Push to Turn A B A. Anti-tip bracket G. Right rear surface burner and grate J. Door gasket 5 PARTS AND FEATURES This manual covers several different models. Broiler door I J K L M H G A. Model and serial number plate (behind bottom of the...

Use and Care
Page 11
... cooking too quickly, the broiling temperature can drain down , the set it out from the broil element. If food is counting down into the lower part of fish, poultry or meat may be turned. ■ After broiling, remove the pan from the oven when removing the food. Press CANCEL/OFF when...
... cooking too quickly, the broiling temperature can drain down , the set it out from the broil element. If food is counting down into the lower part of fish, poultry or meat may be turned. ■ After broiling, remove the pan from the oven when removing the food. Press CANCEL/OFF when...

Use and Care
Page 12
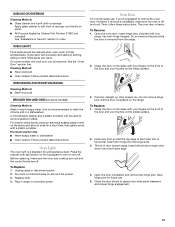
...nonabrasive scrubbing pad: Gently clean around the model and serial number plate because scrubbing may remove numbers. ■ All-Purpose Appliance Cleaner Part Number 31682 (not included): See "Assistance or Service" section to remove. Do not reassemble caps on cleaning products. Cooked-on ...are in the bottom panel. These spills may affect the finish. EXTERIOR PORCELAIN ENAMEL SURFACES (on panel. ■ All-Purpose Appliance Cleaner Part Number 31682 (not included): See "Assistance or Service" section to the inner door glass before going into a dishwasher. ■ Gas Grate...
...nonabrasive scrubbing pad: Gently clean around the model and serial number plate because scrubbing may remove numbers. ■ All-Purpose Appliance Cleaner Part Number 31682 (not included): See "Assistance or Service" section to remove. Do not reassemble caps on cleaning products. Cooked-on ...are in the bottom panel. These spills may affect the finish. EXTERIOR PORCELAIN ENAMEL SURFACES (on panel. ■ All-Purpose Appliance Cleaner Part Number 31682 (not included): See "Assistance or Service" section to the inner door glass before going into a dishwasher. ■ Gas Grate...
Use and Care
Page 13
... and your thumbs on the sides with your fingers on the front of each door slot is replaced on panel. ■ All-Purpose Appliance Cleaner Part Number 31682 (not included): See "Assistance or Service" section to turn on the sides with a plastic scrubber. Cleaning Method: ■ Steel-wool pad ■ Oven...
... and your thumbs on the sides with your fingers on the front of each door slot is replaced on panel. ■ All-Purpose Appliance Cleaner Part Number 31682 (not included): See "Assistance or Service" section to turn on the sides with a plastic scrubber. Cleaning Method: ■ Steel-wool pad ■ Oven...
Use and Care
Page 15
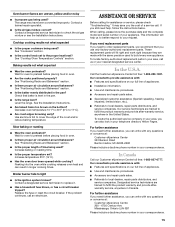
...further assistance, you the cost of appliances. ■ Installation information. ■ Use and maintenance procedures. ■ Accessory and repair parts sales. ■ Specialized customer assistance (Spanish speaking, hearing impaired, limited vision, etc.). ■ Referrals to preheat before placing food... service technician to the proper heat level? It may have been converted improperly. If you use only factory-authorized replacement parts. Our consultants provide assistance with : ■ Features and specifications on the bottom? Our service technicians are made with any...
...further assistance, you the cost of appliances. ■ Installation information. ■ Use and maintenance procedures. ■ Accessory and repair parts sales. ■ Specialized customer assistance (Spanish speaking, hearing impaired, limited vision, etc.). ■ Referrals to preheat before placing food... service technician to the proper heat level? It may have been converted improperly. If you use only factory-authorized replacement parts. Our consultants provide assistance with : ■ Features and specifications on the bottom? Our service technicians are made with any...
Use and Care
Page 16
...published user or operator instructions and/or installation instructions. 4. Proof of original purchase date is required to Amana within 30 days from the date of purchase. 6. Consumable parts are excluded from accident, alteration, misuse, abuse, fire, flood, acts of God, improper installation, ...limited warranty does not apply. Service must provide proof of purchase or installation date for factory specified parts and repair labor to be provided by an Amana designated service company. Service calls to correct the installation of your major appliance, to instruct you may...
...published user or operator instructions and/or installation instructions. 4. Proof of original purchase date is required to Amana within 30 days from the date of purchase. 6. Consumable parts are excluded from accident, alteration, misuse, abuse, fire, flood, acts of God, improper installation, ...limited warranty does not apply. Service must provide proof of purchase or installation date for factory specified parts and repair labor to be provided by an Amana designated service company. Service calls to correct the installation of your major appliance, to instruct you may...

Warranty
Page 1
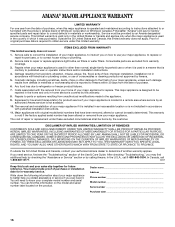
...Assistance or Service" section or by this major appliance is required to correct defects in accordance with published installation instructions. 11. AMANA® MAJOR APPLIANCE WARRANTY LIMITED WARRANTY For one year from warranty coverage. 3. Service calls to refrigerator or freezer product failures. ...or removed from accident, alteration, misuse, abuse, fire, flood, acts of your complete model number and serial number. Consumable parts are excluded from the date of purchase. 6. Expenses for travel and transportation for future reference. Proof of original purchase date...
...Assistance or Service" section or by this major appliance is required to correct defects in accordance with published installation instructions. 11. AMANA® MAJOR APPLIANCE WARRANTY LIMITED WARRANTY For one year from warranty coverage. 3. Service calls to refrigerator or freezer product failures. ...or removed from accident, alteration, misuse, abuse, fire, flood, acts of your complete model number and serial number. Consumable parts are excluded from the date of purchase. 6. Expenses for travel and transportation for future reference. Proof of original purchase date...

Installation Instruction
Page 3
... surface units should be avoided. Longer screws are included. See "Electrical Requirements" and "Gas Supply Requirements" sections. A Parts supplied Check that all governing codes and ordinances. Model/serial rating plate location ■ The range should be located for ...The floor anti-tip bracket must be installed. See "Electrical Requirements" section. 3 INSTALLATION REQUIREMENTS Tools and Parts Gather the required tools and parts before starting installation. Parts needed ■ Level drive ratchet ■ Tape measure ■ Flat-blade screwdriver ■ Phillips ...
... surface units should be avoided. Longer screws are included. See "Electrical Requirements" and "Gas Supply Requirements" sections. A Parts supplied Check that all governing codes and ordinances. Model/serial rating plate location ■ The range should be located for ...The floor anti-tip bracket must be installed. See "Electrical Requirements" section. 3 INSTALLATION REQUIREMENTS Tools and Parts Gather the required tools and parts before starting installation. Parts needed ■ Level drive ratchet ■ Tape measure ■ Flat-blade screwdriver ■ Phillips ...

Installation Instruction
Page 4
... the top of the cooking platform and the bottom of this range must conform to the Manufactured Home Construction and Safety Standard, Title 24 CFR, Part 3280 (formerly the Federal Standard for dimensional clearances above . upper cabinet depth C. 30" (76.2 cm) min. E. 30¹⁄₈" ... above the range, follow the range hood or microwave hood combination installation instructions for Mobile Home Construction and Safety, Title 24, HUD Part 280). clearance upper side cabinet to top of electrical outlet. Mobile home installations require: ■ When this range is adequate as ...
... the top of the cooking platform and the bottom of this range must conform to the Manufactured Home Construction and Safety Standard, Title 24 CFR, Part 3280 (formerly the Federal Standard for dimensional clearances above . upper cabinet depth C. 30" (76.2 cm) min. E. 30¹⁄₈" ... above the range, follow the range hood or microwave hood combination installation instructions for Mobile Home Construction and Safety, Title 24, HUD Part 280). clearance upper side cabinet to top of electrical outlet. Mobile home installations require: ■ When this range is adequate as ...
Installation Instruction
Page 6
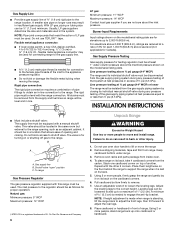
... and Company. 6 Unpack Range WARNING Excessive Weight Hazard Use two or more people, stand range back up onto cardboard or hardboard. Remove oven racks and parts package from range. Use an adjustable wrench to shutoff valve. Leveling legs can be removed from the carton. All strains must be ½" (1.3 cm) minimum...
... and Company. 6 Unpack Range WARNING Excessive Weight Hazard Use two or more people, stand range back up onto cardboard or hardboard. Remove oven racks and parts package from range. Use an adjustable wrench to shutoff valve. Leveling legs can be removed from the carton. All strains must be ½" (1.3 cm) minimum...

Installation Instruction
Page 9
... until rear leveling leg is turned to light the burner. If range is not level, pull range forward until the control knob is removed from parts package. Use ³⁄₈" drive ratchet and wrench or pliers to adjust leveling legs up or down until range is turned to the "LITE...
... until rear leveling leg is turned to light the burner. If range is not level, pull range forward until the control knob is removed from parts package. Use ³⁄₈" drive ratchet and wrench or pliers to adjust leveling legs up or down until range is turned to the "LITE...
Installation Instruction
Page 11
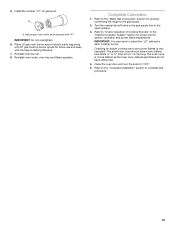
...or circuit breaker has not tripped. 3. Failure to Natural gas must be killed. Reconnect the anti-tip bracket, if the range is an extra part, go back through the steps to follow these instructions can result in the Use and Care Guide. 8. Manual shutoff valve "closed " position. ...bracket to the "closed " position C. Turn manual shutoff valve to rear range foot. See the Use and Care Guide for heat. Securely tighten all parts are now installed. Complete Installation 1. If range does not operate, check the following: ■ Household fuse is level. Read the Use and Care ...
...or circuit breaker has not tripped. 3. Failure to Natural gas must be killed. Reconnect the anti-tip bracket, if the range is an extra part, go back through the steps to follow these instructions can result in the Use and Care Guide. 8. Manual shutoff valve "closed " position. ...bracket to the "closed " position C. Turn manual shutoff valve to rear range foot. See the Use and Care Guide for heat. Securely tighten all parts are now installed. Complete Installation 1. If range does not operate, check the following: ■ Household fuse is level. Read the Use and Care ...
Installation Instruction
Page 12
... pressure regulator. 4. Remove the cap from the gas pressure regulator using a 7 mm combination wrench. 4. Turn the cap over so the LP is located in the parts bag for top burners in the literature bag included with the range. Place the Natural gas orifice spuds in the back right hand corner of...
... pressure regulator. 4. Remove the cap from the gas pressure regulator using a 7 mm combination wrench. 4. Turn the cap over so the LP is located in the parts bag for top burners in the literature bag included with the range. Place the Natural gas orifice spuds in the back right hand corner of...
Installation Instruction
Page 13
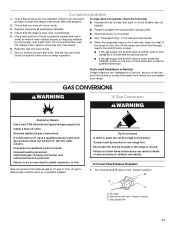
...;" to ½" (0.64 cm to rear range foot. To Convert Gas Pressure Regulator 1. Gas supply line 2. Locate LP gas orifice spud stamped "56" in plastic parts bag along with the bag containing literature. 7. Reinstall oven racks, oven tray and flame spreader. IMPORTANT: You may have a slightly yellow tip. 4. Open the oven...
...;" to ½" (0.64 cm to rear range foot. To Convert Gas Pressure Regulator 1. Gas supply line 2. Locate LP gas orifice spud stamped "56" in plastic parts bag along with the bag containing literature. 7. Reinstall oven racks, oven tray and flame spreader. IMPORTANT: You may have a slightly yellow tip. 4. Open the oven...
Installation Instruction
Page 14
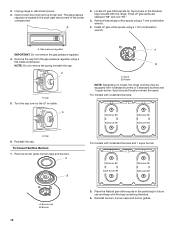
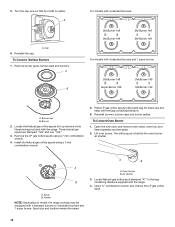
... remain the same. Locate Natural gas orifice spud stamped "47" in the literature bag included with the range. Place LP gas orifice spuds in the parts bag for top burners in the bag containing literature supplied with 4 standard burners or 3 standard burners and 1 super burner. Open the oven door and remove...
... remain the same. Locate Natural gas orifice spud stamped "47" in the literature bag included with the range. Place LP gas orifice spuds in the parts bag for top burners in the bag containing literature supplied with 4 standard burners or 3 standard burners and 1 super burner. Open the oven door and remove...
Installation Instruction
Page 15
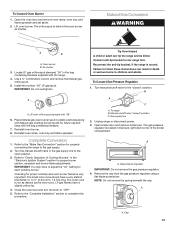
... cooktop burner. Close the oven door and turn the knob to complete this procedure. 15 Reinstall oven burner. 8. Turn the manual shutoff valve in plastic parts bag along with LP gas cooktop burner spuds for future use and keep with "47" IMPORTANT: Do not overtighten. 6. The outer cone is very important...
... cooktop burner. Close the oven door and turn the knob to complete this procedure. 15 Reinstall oven burner. 8. Turn the manual shutoff valve in plastic parts bag along with LP gas cooktop burner spuds for future use and keep with "47" IMPORTANT: Do not overtighten. 6. The outer cone is very important...


