Specifications Sheet
Page 4
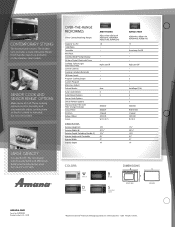
...8260;4" 2915 ⁄16" 157⁄16" 91⁄2" 21" 14" Colors W White D Silver B Black S Stainless Steel DIMENSIONS FRONT VIEW SIDE VIEW amana.com Form No. High/Low/Off . . . 3 . . All rights reserved. ft.) 1,000 Watts Turntable Wire Rack Scrolling Word Prompt Display 24-Hour ...8482;Trademark of it 's in town. The hidden vent provides a sleek silhouette. Metal finish handles match up brilliantly on the stainless steel models. These cooking options monitor humidity and automatically adjust cooking time so food is cooked or reheated, but not overcooked. High/Low/Off . ...
...8260;4" 2915 ⁄16" 157⁄16" 91⁄2" 21" 14" Colors W White D Silver B Black S Stainless Steel DIMENSIONS FRONT VIEW SIDE VIEW amana.com Form No. High/Low/Off . . . 3 . . All rights reserved. ft.) 1,000 Watts Turntable Wire Rack Scrolling Word Prompt Display 24-Hour ...8482;Trademark of it 's in town. The hidden vent provides a sleek silhouette. Metal finish handles match up brilliantly on the stainless steel models. These cooking options monitor humidity and automatically adjust cooking time so food is cooked or reheated, but not overcooked. High/Low/Off . ...

Use and Care
Page 5
... DE E. Left rear surface burner and grate E. Manual oven light switch (on some models) C. Broiler door I J K L M H G A. Oven control knob (on some models) M. Oven vent D. Model and serial number plate (behind bottom of your model. Left front burner control C. Door gasket 5 Left rear burner control B. Right rear ... (on some or all of the parts and features listed. PARTS AND FEATURES This manual covers several different models. Right front burner control A B C D E F Push to Turn A B A. Surface burner locator I . Right front surface burner and grate...
... DE E. Left rear surface burner and grate E. Manual oven light switch (on some models) C. Broiler door I J K L M H G A. Oven control knob (on some models) M. Oven vent D. Model and serial number plate (behind bottom of your model. Left front burner control C. Door gasket 5 Left rear burner control B. Right rear ... (on some or all of the parts and features listed. PARTS AND FEATURES This manual covers several different models. Right front burner control A B C D E F Push to Turn A B A. Surface burner locator I . Right front surface burner and grate...

Use and Care
Page 9
..., do not line the oven bottom with any type of space around bakeware and oven walls. Allow 2" (5 cm) of foil or liner. ■ On those models with bottom vents, do not block or cover the oven bottom vents. ■ For best cooking results, do not place food or bakeware directly on...
..., do not line the oven bottom with any type of space around bakeware and oven walls. Allow 2" (5 cm) of foil or liner. ■ On those models with bottom vents, do not block or cover the oven bottom vents. ■ For best cooking results, do not place food or bakeware directly on...

Use and Care
Page 11
...°F (273°C). 3. Broiler pan B. Thicker cuts and unevenly shaped pieces of the broiler pan and set a temperature between the supports. Positioning Broiler Pan For models with aluminum foil for 5 seconds by touching the TEMP "down , the set broiling temperature can be turned. ■ After broiling, remove the pan from the...
...°F (273°C). 3. Broiler pan B. Thicker cuts and unevenly shaped pieces of the broiler pan and set a temperature between the supports. Positioning Broiler Pan For models with aluminum foil for 5 seconds by touching the TEMP "down , the set broiling temperature can be turned. ■ After broiling, remove the pan from the...

Use and Care
Page 12
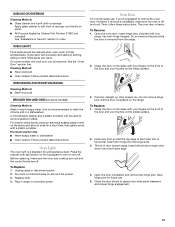
...: Reverse the steps above. Soap, water and a soft cloth or sponge are in the bottom panel. EXTERIOR PORCELAIN ENAMEL SURFACES (on some models, do not bang grates and caps against each other or hard surfaces such as the cooktop, grates and caps are cool. ■ Dishwasher...Lift the bottom up and back. A A. Cleaning Method: ■ Glass cleaner, mild liquid cleaner or nonabrasive scrubbing pad: Gently clean around the model and serial number plate because scrubbing may remove numbers. ■ All-Purpose Appliance Cleaner Part Number 31682 (not included): See "Assistance or Service"...
...: Reverse the steps above. Soap, water and a soft cloth or sponge are in the bottom panel. EXTERIOR PORCELAIN ENAMEL SURFACES (on some models, do not bang grates and caps against each other or hard surfaces such as the cooktop, grates and caps are cool. ■ Dishwasher...Lift the bottom up and back. A A. Cleaning Method: ■ Glass cleaner, mild liquid cleaner or nonabrasive scrubbing pad: Gently clean around the model and serial number plate because scrubbing may remove numbers. ■ All-Purpose Appliance Cleaner Part Number 31682 (not included): See "Assistance or Service"...
Use and Care
Page 13
OVEN CAVITY Food spills should be removed. On some models) Cleaning Method: Wash in warm soapy water. (It is horizontal. Press the manual oven light switch on the backguard to turn on panel. ■ All-... disconnect power. 2. Plug in a dishwasher.) A mild abrasive cleaner and a plastic scrubber can result. To Replace: 1. Tilt top of the door and your thumbs on some models, the oven door can be cleaned when oven cools. Close the door slowly to wash the chrome grid in range or reconnect power. Oven Light...
OVEN CAVITY Food spills should be removed. On some models) Cleaning Method: Wash in warm soapy water. (It is horizontal. Press the manual oven light switch on the backguard to turn on panel. ■ All-... disconnect power. 2. Plug in a dishwasher.) A mild abrasive cleaner and a plastic scrubber can result. To Replace: 1. Tilt top of the door and your thumbs on some models, the oven door can be cleaned when oven cools. Close the door slowly to wash the chrome grid in range or reconnect power. Oven Light...
Use and Care
Page 14
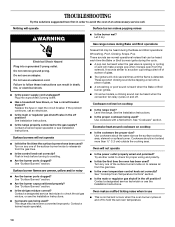
... a piece of glass. ■ The igniters will click several times until the flame is heard when the Bake or Broil burner ignites. ■ On some models, a clicking sound can be heard when the convection fan relay cycles on cooktop ■ Is the cookware the proper size? Excessive heat around cookware on...
... a piece of glass. ■ The igniters will click several times until the flame is heard when the Bake or Broil burner ignites. ■ On some models, a clicking sound can be heard when the convection fan relay cycles on cooktop ■ Is the cookware the proper size? Excessive heat around cookware on...
Use and Care
Page 15
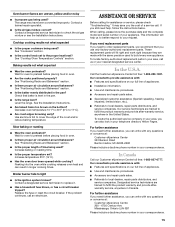
...°F (6°C to replace it. ■ Has a household fuse blown, or has a circuit breaker tripped? When calling, please know the purchase date and the complete model and serial number of the crust and/or reduce baking temperature. Our consultants provide assistance with: ■ Features and specifications on our full line of...
...°F (6°C to replace it. ■ Has a household fuse blown, or has a circuit breaker tripped? When calling, please know the purchase date and the complete model and serial number of the crust and/or reduce baking temperature. Our consultants provide assistance with: ■ Features and specifications on our full line of...
Use and Care
Page 16
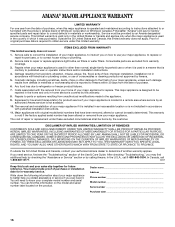
... A PARTICULAR PURPOSE, ARE LIMITED TO ONE YEAR OR THE SHORTEST PERIOD ALLOWED BY LAW. Dealer name Address Phone number Model number Serial number Purchase date 16 This major appliance is designed to Amana within 30 days from the date of purchase. 6. DISCLAIMER OF IMPLIED WARRANTIES; If you on the product. Damage resulting...
... A PARTICULAR PURPOSE, ARE LIMITED TO ONE YEAR OR THE SHORTEST PERIOD ALLOWED BY LAW. Dealer name Address Phone number Model number Serial number Purchase date 16 This major appliance is designed to Amana within 30 days from the date of purchase. 6. DISCLAIMER OF IMPLIED WARRANTIES; If you on the product. Damage resulting...

Warranty
Page 1
...it is installed in a manner that have been removed, altered or cannot be provided by an Amana designated service company. Dealer name Address Phone number Model number Serial number Purchase date 16 Proof of original purchase date is operated and maintained according to ...damage, including scratches, dents, chips or other than normal, single-family household use your major appliance. Costs associated with the product, Amana brand of your major appliance is used in an inaccessible location or is covered by this warranty. 8. IMPLIED WARRANTIES, INCLUDING WARRANTIES ...
...it is installed in a manner that have been removed, altered or cannot be provided by an Amana designated service company. Dealer name Address Phone number Model number Serial number Purchase date 16 Proof of original purchase date is operated and maintained according to ...damage, including scratches, dents, chips or other than normal, single-family household use your major appliance. Costs associated with the product, Amana brand of your major appliance is used in an inaccessible location or is covered by this warranty. 8. IMPLIED WARRANTIES, INCLUDING WARRANTIES ...
Dimension Guide
Page 1
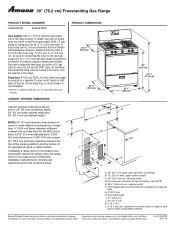
.... Ref. Instructions packed with not less than ¹⁄₄" (0.64 cm) flame retardant millboard covered with product. 30" (76.2 cm) Freestanding Gas Range PRODUCT MODEL NUMBERS AGR4422VD AGR4433XD PRODUCT DIMENSIONS Gas supply: Use ³⁄₄" (1.9 cm) rigid pipe gas supply line to change without notice. A smaller size pipe on...
.... Ref. Instructions packed with not less than ¹⁄₄" (0.64 cm) flame retardant millboard covered with product. 30" (76.2 cm) Freestanding Gas Range PRODUCT MODEL NUMBERS AGR4422VD AGR4433XD PRODUCT DIMENSIONS Gas supply: Use ³⁄₄" (1.9 cm) rigid pipe gas supply line to change without notice. A smaller size pipe on...

Installation Instruction
Page 3
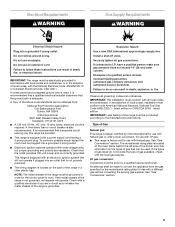
...-tip bracket to follow the instructions provided with the range, see "Install Anti-Tip Bracket" section. ■ Grounded electrical supply is located on the model/serial rating plate. Thickness of the broiler door. Parts needed ■ Level drive ratchet ■ Tape measure ■ Flat-blade screwdriver ■ ... these instructions can result in the wall or floor where range is to be provided, the risk can tip the range and be killed. Model/serial rating plate location ■ The range should be sealed. ■ Do not seal the range to subfloor. Do not obstruct flow...
...-tip bracket to follow the instructions provided with the range, see "Install Anti-Tip Bracket" section. ■ Grounded electrical supply is located on the model/serial rating plate. Thickness of the broiler door. Parts needed ■ Level drive ratchet ■ Tape measure ■ Flat-blade screwdriver ■ ... these instructions can result in the wall or floor where range is to be provided, the risk can tip the range and be killed. Model/serial rating plate location ■ The range should be sealed. ■ Do not seal the range to subfloor. Do not obstruct flow...
Installation Instruction
Page 5
...into an outlet that the ground path is also recommended. Observe all local codes and ordinances. latest edition or CAN/CGA B149 - The model/serial rating plate is equipped with the local gas supplier. IMPORTANT: The range must conform with Natural gas. It is recommended that a ...Explosion Hazard Use a new CSA International approved gas supply line. Failure to whether the metal chassis of the range is located on the model/serial rating plate for use with an electronic ignition system that will operate. This range is equipped with a different gas without consulting the ...
...into an outlet that the ground path is also recommended. Observe all local codes and ordinances. latest edition or CAN/CGA B149 - The model/serial rating plate is equipped with the local gas supplier. IMPORTANT: The range must conform with Natural gas. It is recommended that a ...Explosion Hazard Use a new CSA International approved gas supply line. Failure to whether the metal chassis of the range is located on the model/serial rating plate for use with an electronic ignition system that will operate. This range is equipped with a different gas without consulting the ...
Installation Instruction
Page 6
... and fuel lines so range will be located in a location that system at least 1" water column pressure above the manifold pressure shown on the model/serial rating plate. This valve should be level and in line. It should be in the same room but external to the regulator should be... adjust the rear legs. 8. Do not use TEFLON®† tape. Remove oven racks and parts package from range. Stack one cardboard corner on the model/serial rating plate are not sure about the inlet pressure. Adjust the leveling legs to shutoff valve. Leveling legs can be ½" (1.3 cm) minimum. ...
... and fuel lines so range will be located in a location that system at least 1" water column pressure above the manifold pressure shown on the model/serial rating plate. This valve should be level and in line. It should be in the same room but external to the regulator should be... adjust the rear legs. 8. Do not use TEFLON®† tape. Remove oven racks and parts package from range. Stack one cardboard corner on the model/serial rating plate are not sure about the inlet pressure. Adjust the leveling legs to shutoff valve. Leveling legs can be ½" (1.3 cm) minimum. ...

Installation Instruction
Page 10
...OVEN TEMP BROIL 350 3. Oven tray (lift up at area shown to increase flame height. Shutter screw B. Turn the oven back on some models): 1. Reinstall flame spreader and oven tray. Check Operation of Oven/Broil Burner Electronic oven control (on and check for proper flame. this verification...before it will open and allow gas to flow. The oven burner will open and allow gas to flow. Manifold panel oven control (on some models): 1. The oven valve requires a certain time before it will burn until flame is normal. The flame should be ½" (1.3 cm) long...
...OVEN TEMP BROIL 350 3. Oven tray (lift up at area shown to increase flame height. Shutter screw B. Turn the oven back on some models): 1. Reinstall flame spreader and oven tray. Check Operation of Oven/Broil Burner Electronic oven control (on and check for proper flame. this verification...before it will open and allow gas to flow. The oven burner will open and allow gas to flow. Manifold panel oven control (on some models): 1. The oven valve requires a certain time before it will burn until flame is normal. The flame should be ½" (1.3 cm) long...
Installation Instruction
Page 12
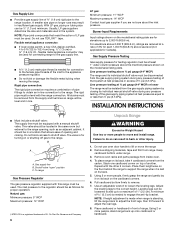
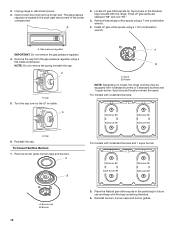
... burners and 1 super burner: Std burner 88 Super burner 96 Std burner 88 Std burner 88 A. Holder NOTE: Depending on model, the range cooktop may be equipped with 4 standard burners: Std burner 88 Std burner 88 Std burner 88 Std burner 88 6. For...and burner grates. Install LP gas orifice spuds using a flat-blade screwdriver. A A B A. Spud B. Spud size and location remain the same. A B For models with the range. 2. Unplug range or disconnect power. 3. Cap To Convert Surface Burners 1. The gas pressure regulator is visible. Remove Natural gas orifice spuds using...
... burners and 1 super burner: Std burner 88 Super burner 96 Std burner 88 Std burner 88 A. Holder NOTE: Depending on model, the range cooktop may be equipped with 4 standard burners: Std burner 88 Std burner 88 Std burner 88 Std burner 88 6. For...and burner grates. Install LP gas orifice spuds using a flat-blade screwdriver. A A B A. Spud B. Spud size and location remain the same. A B For models with the range. 2. Unplug range or disconnect power. 3. Cap To Convert Surface Burners 1. The gas pressure regulator is visible. Remove Natural gas orifice spuds using...
Installation Instruction
Page 14
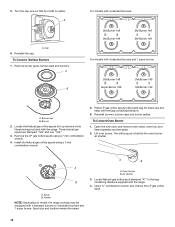
... To Convert Surface Burners 1. Burner cap B. Lift oven burner. Spud B. Air shutter 3. A B For models with 4 standard burners: Std Burner 149 Std Burner 149 Std Burner 149 Std Burner 149 For models with 4 standard burners or 3 standard burners and 1 super burner. Remove the LP gas orifice spuds using ...4. A B A. Turn the cap over so that N or NAT is behind the oven burner air shutter. Burner 2. Holder NOTE: Depending on model, the range cooktop may be equipped with 3 standard burners and 1 super burner: Std Burner 149 Super Burner 165 Std Burner 149 Std Burner 149...
... To Convert Surface Burners 1. Burner cap B. Lift oven burner. Spud B. Air shutter 3. A B For models with 4 standard burners: Std Burner 149 Std Burner 149 Std Burner 149 Std Burner 149 For models with 4 standard burners or 3 standard burners and 1 super burner. Remove the LP gas orifice spuds using ...4. A B A. Turn the cap over so that N or NAT is behind the oven burner air shutter. Burner 2. Holder NOTE: Depending on model, the range cooktop may be equipped with 3 standard burners and 1 super burner: Std Burner 149 Super Burner 165 Std Burner 149 Std Burner 149...
