
Manual
Page 4
... mm Big Boy 200™ top blue LED fan 3. 3 x front 120 mm blue LED fans 4. 1 x window side panel 120 mm fan slot 5. Power supply mount - Internal 9 x 3.5" for HDD, or - Motherboard Mount - Standard size PSUs or Antec's exclusive CPX form factor PSUs 8. 12 total 5.25" drive bays 9. 3 reconfigurable 3.5" drive cages 10. Internal 3 x 3.5" for...
... mm Big Boy 200™ top blue LED fan 3. 3 x front 120 mm blue LED fans 4. 1 x window side panel 120 mm fan slot 5. Power supply mount - Internal 9 x 3.5" for HDD, or - Motherboard Mount - Standard size PSUs or Antec's exclusive CPX form factor PSUs 8. 12 total 5.25" drive bays 9. 3 reconfigurable 3.5" drive cages 10. Internal 3 x 3.5" for...

Manual
Page 5
... of the tubing outside the case through the hose ports with rubber grommets on the back of the manual. 4 Make sure you have the appropriate I /O panel and a toolbox containing more hardware (screws, brass standoffs, etc.) Note: Don't use your convenience. 4. Not all of the case and the 5.25"...the standoffs with three HDD cages inside the bays. Screw in the brass standoffs to run some wiring with the motherboard. 6. Note: Place the panel thumbscrews carefully aside as they are. Determine which holes line up . 2. Some standoffs may need to the threaded holes that line up with ...
... of the tubing outside the case through the hose ports with rubber grommets on the back of the manual. 4 Make sure you have the appropriate I /O panel and a toolbox containing more hardware (screws, brass standoffs, etc.) Note: Don't use your convenience. 4. Not all of the case and the 5.25"...the standoffs with three HDD cages inside the bays. Screw in the brass standoffs to run some wiring with the motherboard. 6. Note: Place the panel thumbscrews carefully aside as they are. Determine which holes line up . 2. Some standoffs may need to the threaded holes that line up with ...

Manual
Page 6
... your hard drives into this cage. by removing all three HDD cages Note: There is facing the top of the case. Remove both side panels per the instructions in the drive cage and fasten it using the long screws provided. 5 Mount the hard drive in Setting Up. 2. Possible... • External 9 x 5.25" + internal 3 x HDD - For maximum flexibility you decide to the case with the screws provided. 2.4 Flexi Drive Bay System The Twelve Hundred V3 comes with fans on the bottom of the case. Attach the power supply to mount your graphics card or CPU. 2.3 Installing the Power Supply 1. by...
... your hard drives into this cage. by removing all three HDD cages Note: There is facing the top of the case. Remove both side panels per the instructions in the drive cage and fasten it using the long screws provided. 5 Mount the hard drive in Setting Up. 2. Possible... • External 9 x 5.25" + internal 3 x HDD - For maximum flexibility you decide to the case with the screws provided. 2.4 Flexi Drive Bay System The Twelve Hundred V3 comes with fans on the bottom of the case. Attach the power supply to mount your graphics card or CPU. 2.3 Installing the Power Supply 1. by...

Manual
Page 7
...thick part of the grommets facing the inside of the case. 6. Secure the device to your fingers first, and then the screwdriver. 5. Lay the Twelve Hundred V3 on its side, and hold the drive in Setting Up. 2. Slide the 5.25" device into the case and fasten it from the front of ...the case. 3. 5. Connect the 4-pin connector to the sides of the grommets. 4. Remove both side panels per the instructions in place on one 2.5" SSD device. 1. Connect the appropriate power and data cables to the case with the screws provided, tightening the...
...thick part of the grommets facing the inside of the case. 6. Secure the device to your fingers first, and then the screwdriver. 5. Lay the Twelve Hundred V3 on its side, and hold the drive in Setting Up. 2. Slide the 5.25" device into the case and fasten it from the front of ...the case. 3. 5. Connect the 4-pin connector to the sides of the grommets. 4. Remove both side panels per the instructions in place on one 2.5" SSD device. 1. Connect the appropriate power and data cables to the case with the screws provided, tightening the...
Manual
Page 8
...2.10 Three-Way SLI Configuration Option The Twelve Hundred V3 has eight expansion slots, making it capable of a water cooling kit such as a pump or reservoir. Note: The plate is a cable management compartment between the motherboard and right side panel. The plate can tuck or route excess ...cables in the 3rd 5.25" drive bay. You can be compatible with a 5.25" metal plate pre-installed in this compartment. 1. Remove both side panels 2.
...2.10 Three-Way SLI Configuration Option The Twelve Hundred V3 has eight expansion slots, making it capable of a water cooling kit such as a pump or reservoir. Note: The plate is a cable management compartment between the motherboard and right side panel. The plate can tuck or route excess ...cables in the 3rd 5.25" drive bay. You can be compatible with a 5.25" metal plate pre-installed in this compartment. 1. Remove both side panels 2.
Manual
Page 9
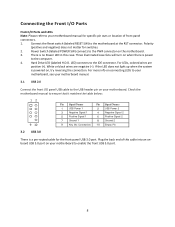
...SW) connects to the PWR connector on your motherboard. Three illuminated case fans will turn on when there is a pre-routed cable for the front-panel USB 3.0 port. Check the motherboard manual to ensure that it matches the table below: 1 2 9 10 Pin Signal Names Pin Signal Names 1... the front I /O Ports and LEDs Note: Please refer to your motherboard to enable the front USB 3.0 port. 8 Plug the back end of front panel connectors. 1. There is powered on your motherboard manual for switches. 2. LED) connects to the motherboard at the RST connector. Polarity (positive and negative) ...
...SW) connects to the PWR connector on your motherboard. Three illuminated case fans will turn on when there is a pre-routed cable for the front-panel USB 3.0 port. Check the motherboard manual to ensure that it matches the table below: 1 2 9 10 Pin Signal Names Pin Signal Names 1... the front I /O Ports and LEDs Note: Please refer to your motherboard to enable the front USB 3.0 port. 8 Plug the back end of front panel connectors. 1. There is powered on your motherboard manual for switches. 2. LED) connects to the motherboard at the RST connector. Polarity (positive and negative) ...

Manual
Page 10
... Note: Polarity (positive and negative) does not matter for specific pin header locations. There is power to the corresponding connectors on your front panel are LED and switch leads for the pin-out positions. Even if your system supports both audio standards, you may only use one connector.... 3.4 Power Switch / Reset Switch / Hard Disk Drive LED Connectors Connected to the front panel of the motherboard. 3.3 AC'97/HD Audio Ports There is powered on, try reversing the connection. Locate the internal audio connectors from your...
... Note: Polarity (positive and negative) does not matter for specific pin header locations. There is power to the corresponding connectors on your front panel are LED and switch leads for the pin-out positions. Even if your system supports both audio standards, you may only use one connector.... 3.4 Power Switch / Reset Switch / Hard Disk Drive LED Connectors Connected to the front panel of the motherboard. 3.3 AC'97/HD Audio Ports There is powered on, try reversing the connection. Locate the internal audio connectors from your...

Manual
Page 11
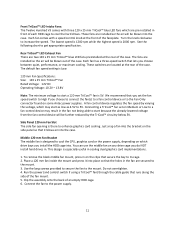
... similar tool to lift up on the black tab located beside the gold posts (squares). Cooling System 4.1 Included Fans Big Boy 200™ fan: The Twelve Hundred V3 comes with a Big Boy 200 mm blue LED fan. Examples could be sure of the pin-out needed for each wire you need to reconfigure... speed best suited to your needs and a switch to turn on your motherboard (refer to your USB header, audio input header, or some other front panel connector such as not to damage the wires, connectors or pins, slowly reinsert the pin into the correct slot of a motherboard header connector. The default...
... similar tool to lift up on the black tab located beside the gold posts (squares). Cooling System 4.1 Included Fans Big Boy 200™ fan: The Twelve Hundred V3 comes with a Big Boy 200 mm blue LED fan. Examples could be sure of the pin-out needed for each wire you need to reconfigure... speed best suited to your needs and a switch to turn on your motherboard (refer to your USB header, audio input header, or some other front panel connector such as not to damage the wires, connectors or pins, slowly reinsert the pin into the correct slot of a motherboard header connector. The default...
Manual
Page 12
... is especially useful in the fan are installed so the air will be further reduced by varying the voltage, which may result in on some Antec power supplies. This design is 5V. Do not overtighten. 4. See the following chart to increase the speed. Just snap a fan into the bracket on the... are pre-installed in . Side Panel 120 mm Fan Slot The side fan opening is 2000 rpm. To remove the black middle fan mount, press in the fan not being able to start as low as 4.5V to the mount. 3. Front TriCool™ LED Intake Fans: The Twelve Hundred V3 comes with a speed control...
... is especially useful in the fan are installed so the air will be further reduced by varying the voltage, which may result in on some Antec power supplies. This design is 5V. Do not overtighten. 4. See the following chart to increase the speed. Just snap a fan into the bracket on the... are pre-installed in . Side Panel 120 mm Fan Slot The side fan opening is 2000 rpm. To remove the black middle fan mount, press in the fan not being able to start as low as 4.5V to the mount. 3. Front TriCool™ LED Intake Fans: The Twelve Hundred V3 comes with a speed control...
Manual
Page 13
... default. The frequency will have left about 1 or 2 inches. Not washing the air filter will see the air filter behind the faceplate of the side panel, so you have to remove the filters for cleaning. There is a filter located behind the faceplate. You will result in the side fan bracket. Lift... system usage. Remove the cage thumbscrews fastening the HDD cage to access it out of three front air filters that you must open the side panel to the 5.25" drive bays and set them aside. 2. It is a total of the bracket.
... default. The frequency will have left about 1 or 2 inches. Not washing the air filter will see the air filter behind the faceplate of the side panel, so you have to remove the filters for cleaning. There is a filter located behind the faceplate. You will result in the side fan bracket. Lift... system usage. Remove the cage thumbscrews fastening the HDD cage to access it out of three front air filters that you must open the side panel to the 5.25" drive bays and set them aside. 2. It is a total of the bracket.

Product Flyer
Page 2
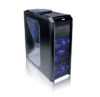
...cage) • Front mounted I/O ports - 2 x USB 2.0 - 1 x USB 3.0 - External 3 x 5.25"; Standard size PSUs or Antec's exclusive CPX form factor PSUs • Safety: RoHS, CE • Dimensions: - 22.9" (H) x 8.4" (W) x 20.2" (D) - 582 mm...8226;0r•e•4l•t.e0ll0iP0040.00.• 000110001/010 "MAJVAIWASIMAk Front-panel USB 3.0 port UPC# 0-761345-15118-4 RoHS External 9 x 5.25"; Audio... bays: - Rntecr;i41 A Quarter Century , ,adiy and Innavd: TWELVE HUNDRED V3 GAMING SERIES • • • • • • • • C- External 6 x 5.25";
...cage) • Front mounted I/O ports - 2 x USB 2.0 - 1 x USB 3.0 - External 3 x 5.25"; Standard size PSUs or Antec's exclusive CPX form factor PSUs • Safety: RoHS, CE • Dimensions: - 22.9" (H) x 8.4" (W) x 20.2" (D) - 582 mm...8226;0r•e•4l•t.e0ll0iP0040.00.• 000110001/010 "MAJVAIWASIMAk Front-panel USB 3.0 port UPC# 0-761345-15118-4 RoHS External 9 x 5.25"; Audio... bays: - Rntecr;i41 A Quarter Century , ,adiy and Innavd: TWELVE HUNDRED V3 GAMING SERIES • • • • • • • • C- External 6 x 5.25";