
Owners Manual
Page 1
... No. 010000 and up ) 991087 - Max Zoom 60 (Serial No. 010000 and up) Gasoline containing up to 10% ethanol (E10) or up to 10%...% ethanol (E10) or 10% MTBE will void the product warranty. ENGLISH FRANÇAIS 04414400 11/11 Printed in this machine. Max Zoom 52 (Serial No. 010000 and up ) 991086 - L'utilisation d'une essence contenant plus de 10% d'éthanol (E10) ou de... 10% d'éthanol (E10) ou 10% de MTBE (éther méthyl-tertiobutylique) sur cette machine. Max Zoom™ Owner/Operator Manual Manuel Du Propriétaire/Utilisateur Models 991085 - The use in USA
... No. 010000 and up ) 991087 - Max Zoom 60 (Serial No. 010000 and up) Gasoline containing up to 10% ethanol (E10) or up to 10%...% ethanol (E10) or 10% MTBE will void the product warranty. ENGLISH FRANÇAIS 04414400 11/11 Printed in this machine. Max Zoom 52 (Serial No. 010000 and up ) 991086 - L'utilisation d'une essence contenant plus de 10% d'éthanol (E10) ou de... 10% d'éthanol (E10) ou 10% de MTBE (éther méthyl-tertiobutylique) sur cette machine. Max Zoom™ Owner/Operator Manual Manuel Du Propriétaire/Utilisateur Models 991085 - The use in USA

Owners Manual
Page 2
...También puede imprimir manuales en idiomas diferentes del inglés descargándolos gratuitamente de nuestra página Web: http://www.ariens.com MANUELS NON ANGLAIS Des manuels dans différentes langues sont disponibles chez votre revendeur. All reference to left, right, front,...and engine. Manuals printed in languages other than English are printed on a serial number label, located on our website: http://www.ariens.com MANUALES EN IDIOMAS DIFERENTES DEL INGLES Puede obtener manuales en idiomas diferentes del inglés en su distribuidor. Les manuels imprimé...
...También puede imprimir manuales en idiomas diferentes del inglés descargándolos gratuitamente de nuestra página Web: http://www.ariens.com MANUELS NON ANGLAIS Des manuels dans différentes langues sont disponibles chez votre revendeur. All reference to left, right, front,...and engine. Manuals printed in languages other than English are printed on a serial number label, located on our website: http://www.ariens.com MANUALES EN IDIOMAS DIFERENTES DEL INGLES Puede obtener manuales en idiomas diferentes del inglés en su distribuidor. Les manuels imprimé...

Owners Manual
Page 3
...products at printing. Keep a proof of purchase if you taking delivery of this unit. UNAUTHORIZED REPLACEMENT PARTS Use only Ariens replacement parts. Ariens disclaims liability for any time without public notice or obligation to you do not register your unit. Check the safety interlock...purchase. Explain Limited Warranty Policy. 5. Fill out Original Purchaser Registration Card and return the card to your unit. Advise customer to www.ariens.com. Figure 1 • Record Unit Model and Serial numbers here. • Record Engine Model and Serial numbers here. Give ...
...products at printing. Keep a proof of purchase if you taking delivery of this unit. UNAUTHORIZED REPLACEMENT PARTS Use only Ariens replacement parts. Ariens disclaims liability for any time without public notice or obligation to you do not register your unit. Check the safety interlock...purchase. Explain Limited Warranty Policy. 5. Fill out Original Purchaser Registration Card and return the card to your unit. Advise customer to www.ariens.com. Figure 1 • Record Unit Model and Serial numbers here. • Record Engine Model and Serial numbers here. Give ...

Owners Manual
Page 4
Failure to alert against unsafe practices. OL1253 OL3900 SAFETY ALERT SYMBOL These are explosive, handle with care. They mean: •ATTENTION! •YOUR SAFETY IS INVOLVED! Read and understand all safety messages. If not avoided, COULD RESULT in serious injury or death. NOTATIONS NOTE: General reference information for Safety Decal locations. Be alert to the presence of children. If unit is not alert to unsafe conditions and the possibility of amputating hands and feet and throwing objects. GB - 4 Never assume that may also be used to observe the safety ...
Failure to alert against unsafe practices. OL1253 OL3900 SAFETY ALERT SYMBOL These are explosive, handle with care. They mean: •ATTENTION! •YOUR SAFETY IS INVOLVED! Read and understand all safety messages. If not avoided, COULD RESULT in serious injury or death. NOTATIONS NOTE: General reference information for Safety Decal locations. Be alert to the presence of children. If unit is not alert to unsafe conditions and the possibility of amputating hands and feet and throwing objects. GB - 4 Never assume that may also be used to observe the safety ...

Owners Manual
Page 5
Danger! NEVER CARRY CHILDREN. GB - 5 NOTE: This unit may contain any of a responsible adult. Never overfill fuel tank. P 9 Replace fuel cap securely and clean up and down slopes, not across. Look down slowly. • Avoid sudden turns. • Keep safety devices (guards, shields, switches, etc.) in place and working. • Check interlock system per manual before and while backing. Keep children and others away from unit while operating. Keep children out of work area and under watchful care of the following safety decals. 1 11 10 Never fill tank when engine is ...
Danger! NEVER CARRY CHILDREN. GB - 5 NOTE: This unit may contain any of a responsible adult. Never overfill fuel tank. P 9 Replace fuel cap securely and clean up and down slopes, not across. Look down slowly. • Avoid sudden turns. • Keep safety devices (guards, shields, switches, etc.) in place and working. • Check interlock system per manual before and while backing. Keep children and others away from unit while operating. Keep children out of work area and under watchful care of the following safety decals. 1 11 10 Never fill tank when engine is ...

Owners Manual
Page 6
To avoid dismemberment hazard do not put hands near moving parts. Before servicing unit do not put hands near rotating blades. 2. Avoid tipping hazard. P Set parking brake. DO NOT operate on slopes over 15°. 2.4 Service Hazard Keep hands away from unit while unit is in operating position or bagger is attached. 2.3 Tipping Hazard Read and understand the operator's manual before operating unit. 2.1 Dismemberment Hazard To avoid dismemberment hazard do the following: Keep all rotating or moving belts. Keep children and others away from all guards and shields ...
To avoid dismemberment hazard do not put hands near moving parts. Before servicing unit do not put hands near rotating blades. 2. Avoid tipping hazard. P Set parking brake. DO NOT operate on slopes over 15°. 2.4 Service Hazard Keep hands away from unit while unit is in operating position or bagger is attached. 2.3 Tipping Hazard Read and understand the operator's manual before operating unit. 2.1 Dismemberment Hazard To avoid dismemberment hazard do the following: Keep all rotating or moving belts. Keep children and others away from all guards and shields ...

Owners Manual
Page 7
DANGER! Thrown objects can cause injury or damage. AVOID INJURY. NEVER operate unit without discharge chute in operating position or bagger is experienced do the following: 4. Do not operate mower unless all guards are in operating position. Look behind when operating the unit in the presence of bystanders. Disengage PTO. DANGER! Proceed off slope slowly. Stay clear of traction is attached. Discharge Hazard - Look before backing. 2.5 Bystander Hazard DO NOT operate the unit in reverse. 2.6 Loss of Traction Hazard If loss of rotating parts. Do not try to turn ...
DANGER! Thrown objects can cause injury or damage. AVOID INJURY. NEVER operate unit without discharge chute in operating position or bagger is experienced do the following: 4. Do not operate mower unless all guards are in operating position. Look behind when operating the unit in the presence of bystanders. Disengage PTO. DANGER! Proceed off slope slowly. Stay clear of traction is attached. Discharge Hazard - Look before backing. 2.5 Bystander Hazard DO NOT operate the unit in reverse. 2.6 Loss of Traction Hazard If loss of rotating parts. Do not try to turn ...

Owners Manual
Page 8
Keep feet and hands away from all guards are hot from operation. Discharge Hazard NEVER operate unit without discharge chute in this area. 6. Do not operate mower unless all guards are in operating position. DANGER! Always stand clear of discharge area. Dismemberment Hazard - DANGER! NEVER operate unit without discharge chute in operating position or bagger is attached. WARNING! Always keep feet and hands away from rotating parts. 9. Thrown objects can cause injury or damage. Thrown objects can cause injury or damage. HOT SURFACES! ALWAYS allow ...
Keep feet and hands away from all guards are hot from operation. Discharge Hazard NEVER operate unit without discharge chute in this area. 6. Do not operate mower unless all guards are in operating position. DANGER! Always stand clear of discharge area. Dismemberment Hazard - DANGER! NEVER operate unit without discharge chute in operating position or bagger is attached. WARNING! Always keep feet and hands away from rotating parts. 9. Thrown objects can cause injury or damage. Thrown objects can cause injury or damage. HOT SURFACES! ALWAYS allow ...

Owners Manual
Page 9
... controls and component questions. Always wear safety goggles or safety glasses with emission controls and components by an Ariens Company dealer or an authorized engine manufacturer's service center. MAX. FILL Fill fuel tank to unit. WARNING: Over Filling may result in personal injury and/or damage ...spots on or near drop-offs, ditches, or embankments. DO NOT wear loose clothing or jewelry and tie back hair that operators, age 60 and above, are needed . Complete a walk around inspection of unit and work area to improve footing on slippery surfaces. Inspect unit before...
... controls and component questions. Always wear safety goggles or safety glasses with emission controls and components by an Ariens Company dealer or an authorized engine manufacturer's service center. MAX. FILL Fill fuel tank to unit. WARNING: Over Filling may result in personal injury and/or damage ...spots on or near drop-offs, ditches, or embankments. DO NOT wear loose clothing or jewelry and tie back hair that operators, age 60 and above, are needed . Complete a walk around inspection of unit and work area to improve footing on slippery surfaces. Inspect unit before...

Owners Manual
Page 10
ALWAYS keep hands and feet away from all pinch points. DO NOT touch parts which eject hydraulic fluid under pressure. ALWAYS keep body and hands away from spark plug. Read, understand, and follow all blades to neutral position. • Immediately set when starting or stopping on the slope. Stop engine before restarting. Steering control levers must be in neutral, PTO disengaged and parking brake set parking brake. • Turn off PTO and engine. DO NOT mow on slopes unless necessary. Always stand clear of more than 15 degrees. Slow down and behind before starting....
ALWAYS keep hands and feet away from all pinch points. DO NOT touch parts which eject hydraulic fluid under pressure. ALWAYS keep body and hands away from spark plug. Read, understand, and follow all blades to neutral position. • Immediately set when starting or stopping on the slope. Stop engine before restarting. Steering control levers must be in neutral, PTO disengaged and parking brake set parking brake. • Turn off PTO and engine. DO NOT mow on slopes unless necessary. Always stand clear of more than 15 degrees. Slow down and behind before starting....

Owners Manual
Page 11
Follow the manufacturer's recommendations for weight limits for your vehicle before servicing or cleaning. NEVER allow engine to cool before tipping unit. NEVER secure from components with a spark arrester meeting applicable local, state or federal laws. A spark arrester, if it on a truck or trailer bed with care. Fuel is running (except where specifically recommended). Properly remove fuel before servicing. Avoid Electric Shock. Reverse connections may result in fuel tank, inside a vehicle or on the ground. ALWAYS connect positive (+) cable FIRST, and negative...
Follow the manufacturer's recommendations for weight limits for your vehicle before servicing or cleaning. NEVER allow engine to cool before tipping unit. NEVER secure from components with a spark arrester meeting applicable local, state or federal laws. A spark arrester, if it on a truck or trailer bed with care. Fuel is running (except where specifically recommended). Properly remove fuel before servicing. Avoid Electric Shock. Reverse connections may result in fuel tank, inside a vehicle or on the ground. ALWAYS connect positive (+) cable FIRST, and negative...

Owners Manual
Page 12
... page 24). 12. See Seat Adjustments on page 15 and Service Position on page 25. 1. Fill fuel tank. Steering Levers 2. Check to one side. 4. On 60-inch Decks: Remove the discharge chute from the transport position and place the discharge chute in front or over the tire assembly when inflating. Check...
... page 24). 12. See Seat Adjustments on page 15 and Service Position on page 25. 1. Fill fuel tank. Steering Levers 2. Check to one side. 4. On 60-inch Decks: Remove the discharge chute from the transport position and place the discharge chute in front or over the tire assembly when inflating. Check...
Owners Manual
Page 13
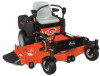
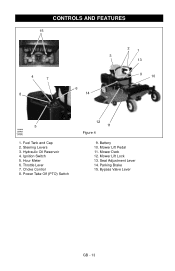
Ignition Switch 5. Seat Adjustment Lever 14. Parking Brake 15. CONTROLS AND FEATURES 15 4 7 8 6 14 21 3 13 9 10 5 OM4090 OM4085 OF4410 OF4040 1. Battery 10. Mower Lift Lock 13. Bypass Valve Lever GB - 13 Fuel Tank and Cap 2. Throttle Lever 7. Mower Deck 12. Hour Meter 6. Power Take Off (PTO) Switch 12 11 Figure 4 9. Mower Lift Pedal 11. Hydraulic Oil Reservoir 4. Choke Control 8. Steering Levers 3.
Ignition Switch 5. Seat Adjustment Lever 14. Parking Brake 15. CONTROLS AND FEATURES 15 4 7 8 6 14 21 3 13 9 10 5 OM4090 OM4085 OF4410 OF4040 1. Battery 10. Mower Lift Lock 13. Bypass Valve Lever GB - 13 Fuel Tank and Cap 2. Throttle Lever 7. Mower Deck 12. Hour Meter 6. Power Take Off (PTO) Switch 12 11 Figure 4 9. Mower Lift Pedal 11. Hydraulic Oil Reservoir 4. Choke Control 8. Steering Levers 3.
Owners Manual
Page 14
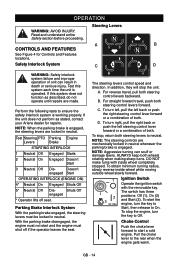
... must shut off seat. To obtain minimum turning radius, slowly reverse inside wheel completely stopped. Test this system does not function as stated, contact your Ariens dealer for Controls and Features locations.
... must shut off seat. To obtain minimum turning radius, slowly reverse inside wheel completely stopped. Test this system does not function as stated, contact your Ariens dealer for Controls and Features locations.
Owners Manual
Page 15
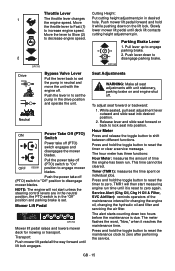
Throttle Lever 1 The throttle lever changes the engine speed. Push the lever in to disengage mower blades. OFF OE0261 Pull the power take off . Mower Lift Pedal OF1700 Mower lift pedal raises and lowers mower deck for changing the engine oil, changing the hydraulic oil and filter and servicing the air filter. Slowly lower mower lift pedal until lift lock engages. Seat Adjustments WARNING: Make all the way forward until deck lift contacts cutting height adjustment pin. Timer (TMR1): measures the time spent on the lift lock. Service Alert (Chg Oil, Chg H Oil & Filter, SVC ...
Throttle Lever 1 The throttle lever changes the engine speed. Push the lever in to disengage mower blades. OFF OE0261 Pull the power take off . Mower Lift Pedal OF1700 Mower lift pedal raises and lowers mower deck for changing the engine oil, changing the hydraulic oil and filter and servicing the air filter. Slowly lower mower lift pedal until lift lock engages. Seat Adjustments WARNING: Make all the way forward until deck lift contacts cutting height adjustment pin. Timer (TMR1): measures the time spent on the lift lock. Service Alert (Chg Oil, Chg H Oil & Filter, SVC ...
Owners Manual
Page 16
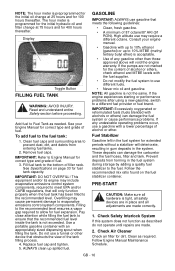
Add fuel to allow for correct type and grade of fuel. 3. IMPORTANT: DO NOT OVERFILL! Filling to the recommended level ensures a vapor gap required to Fuel Tank as required. ALWAYS clean up to evaporative emissions control system components. GASOLINE IMPORTANT: ALWAYS use a gasoline with a lower percentage of fuel. These deposits can damage the fuel system or cause performance problems. If any gasoline other device that meets the following guidelines: • Clean, fresh gasoline. • A minimum of the tank filling process. 4. Read and understand entire Safety ...
Add fuel to allow for correct type and grade of fuel. 3. IMPORTANT: DO NOT OVERFILL! Filling to the recommended level ensures a vapor gap required to Fuel Tank as required. ALWAYS clean up to evaporative emissions control system components. GASOLINE IMPORTANT: ALWAYS use a gasoline with a lower percentage of fuel. These deposits can damage the fuel system or cause performance problems. If any gasoline other device that meets the following guidelines: • Clean, fresh gasoline. • A minimum of the tank filling process. 4. Read and understand entire Safety ...

Owners Manual
Page 17
WARNING: Move the steering control levers slowly and keep the throttle control lever at this time. WARNING: Operating unit on slopes be reached safely from the "Choke" position. Immediately set to the electric clutch. 6. Engage parking brake. 4. If the engine is plugged with grass or other material. As soon as the engine starts, release the key. 8. Bring the steering levers to about 3/4 speed. 5. Slow the engine down to neutral. 4. IMPORTANT: Never engage the PTO if the mower is warm or hot, do not use choke. 5. Move the steering levers forward to the "Slow" position. 3....
WARNING: Move the steering control levers slowly and keep the throttle control lever at this time. WARNING: Operating unit on slopes be reached safely from the "Choke" position. Immediately set to the electric clutch. 6. Engage parking brake. 4. If the engine is plugged with grass or other material. As soon as the engine starts, release the key. 8. Bring the steering levers to about 3/4 speed. 5. Slow the engine down to neutral. 4. IMPORTANT: Never engage the PTO if the mower is warm or hot, do not use choke. 5. Move the steering levers forward to the "Slow" position. 3....
Owners Manual
Page 18
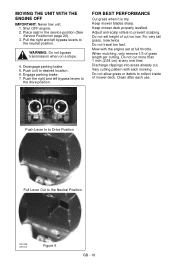
FOR BEST PERFORMANCE Cut grass when it is dry. Do not set at any one time. For very tall grass, mow twice. Do not cut more than 1 inch (2.54 cm) at full throttle. Place seat in the service position (See Service Position on a slope. 4. Disengage parking brake. 5. Mow with each use. When mulching, only remove 1/3 of cut . Push Lever In to Drive Position Pull Lever Out to desired location. 6. Keep mower deck properly levelled. Clean after each mowing. Push unit to the Neutral Position OF4105 OF4110 Figure 5 GB - 18 Adjust anti-scalp rollers to collect inside ...
FOR BEST PERFORMANCE Cut grass when it is dry. Do not set at any one time. For very tall grass, mow twice. Do not cut more than 1 inch (2.54 cm) at full throttle. Place seat in the service position (See Service Position on a slope. 4. Disengage parking brake. 5. Mow with each use. When mulching, only remove 1/3 of cut . Push Lever In to Drive Position Pull Lever Out to desired location. 6. Keep mower deck properly levelled. Clean after each mowing. Push unit to the Neutral Position OF4105 OF4110 Figure 5 GB - 18 Adjust anti-scalp rollers to collect inside ...
Owners Manual
Page 19
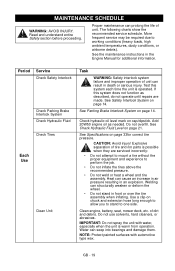
Test this system does not function as needed. Explosive separation of unit can structurally weaken or deform the wheel. • Do not stand in an explosion. Heat can seep into bearings and damage them. Use a clip-on cap/dipstick. Clean engine, battery, seat, mower deck, etc. Add 20W50 engine oil as described, do not operate until repairs are serviced incorrectly: • Do not attempt to mount a tire without the proper equipment and experience to perform the job. • Do not inflate the tires above the recommended pressure. • Do not weld or heat a wheel and ...
Test this system does not function as needed. Explosive separation of unit can structurally weaken or deform the wheel. • Do not stand in an explosion. Heat can seep into bearings and damage them. Use a clip-on cap/dipstick. Clean engine, battery, seat, mower deck, etc. Add 20W50 engine oil as described, do not operate until repairs are serviced incorrectly: • Do not attempt to mount a tire without the proper equipment and experience to perform the job. • Do not inflate the tires above the recommended pressure. • Do not weld or heat a wheel and ...
Owners Manual
Page 20
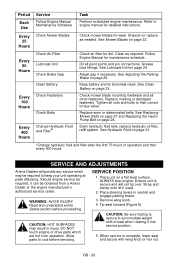
.... Clean as needed. Grease lube fittings. Keep battery and its terminals clean. Tighten all nuts and bolts to engine manual for dirt. SERVICE AND ADJUSTMENTS Ariens Dealers will not tip over. SERVICE POSITION 1. Replace worn or deteriorated belts. Strap and clamp onto lift if used. 2. CAUTION: Be sure footing is secure... unit on a flat level surface. ALWAYS stop engine. Tip seat forward (Figure 6). When service is secure and will provide any service which are hot from a Ariens Dealer or the engine manufacturer's authorized service center.
.... Clean as needed. Grease lube fittings. Keep battery and its terminals clean. Tighten all nuts and bolts to engine manual for dirt. SERVICE AND ADJUSTMENTS Ariens Dealers will not tip over. SERVICE POSITION 1. Replace worn or deteriorated belts. Strap and clamp onto lift if used. 2. CAUTION: Be sure footing is secure... unit on a flat level surface. ALWAYS stop engine. Tip seat forward (Figure 6). When service is secure and will provide any service which are hot from a Ariens Dealer or the engine manufacturer's authorized service center.