

Owners Manual
Page 1
...contenant plus de 10% d'éthanol (E10) ou de 10% de MTBE annulent la garantie. Deluxe 24 Platinum (SN 000101 +) 921029 - Deluxe 28 (SN 000101 +) 921032 - Deluxe 30 Platinum (SN 000101 +) 921030 - Deluxe 30 (SN 000101 +) 921035 - Deluxe 24 (SN 000101 +) 921028 - Deluxe 28 (SN 000101 +) E10... The use of any gasoline exceeding 10% ethanol (E10) or 10% MTBE will void the product warranty. 921 Series Sno-Thro ® Owner/Operator Manual Manuel Du ...
...contenant plus de 10% d'éthanol (E10) ou de 10% de MTBE annulent la garantie. Deluxe 24 Platinum (SN 000101 +) 921029 - Deluxe 28 (SN 000101 +) 921032 - Deluxe 30 Platinum (SN 000101 +) 921030 - Deluxe 30 (SN 000101 +) 921035 - Deluxe 24 (SN 000101 +) 921028 - Deluxe 28 (SN 000101 +) E10... The use of any gasoline exceeding 10% ethanol (E10) or 10% MTBE will void the product warranty. 921 Series Sno-Thro ® Owner/Operator Manual Manuel Du ...

Owners Manual
Page 2
...on the product registration form in operation position and facing the direction of forward travel. Customer Note: If the dealer does not register your manuals. TABLE OF CONTENTS SAFETY 4 ASSEMBLY 8 CONTROLS and FEATURES 15 OPERATION 17 MAINTENANCE 24 SERVICE AND ADJUSTMENTS . . . . . 27 ... 35 TROUBLESHOOTING 36 SPECIFICATIONS 37 WARRANTY 39 INTRODUCTION MANUALS Before operation of unit, carefully and completely read your product, please fill out, sign, and return the product registration card to Ariens or go to www.ariens.com. If used improperly, this unit is returned...
...on the product registration form in operation position and facing the direction of forward travel. Customer Note: If the dealer does not register your manuals. TABLE OF CONTENTS SAFETY 4 ASSEMBLY 8 CONTROLS and FEATURES 15 OPERATION 17 MAINTENANCE 24 SERVICE AND ADJUSTMENTS . . . . . 27 ... 35 TROUBLESHOOTING 36 SPECIFICATIONS 37 WARRANTY 39 INTRODUCTION MANUALS Before operation of unit, carefully and completely read your product, please fill out, sign, and return the product registration card to Ariens or go to www.ariens.com. If used improperly, this unit is returned...
Owners Manual
Page 3
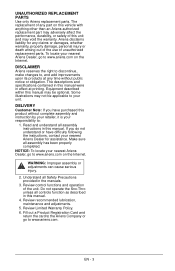
.... Review recommended lubrication, maintenance and adjustments. 5. The descriptions and specifications contained in the manuals. 3. Equipment described within this manual. Make sure all Safety Precautions provided in this product without public notice or obligation. UNAUTHORIZED REPLACEMENT PARTS Use only Ariens replacement parts. Some illustrations may void the warranty. Review control functions and operation of...
.... Review recommended lubrication, maintenance and adjustments. 5. The descriptions and specifications contained in the manuals. 3. Equipment described within this manual. Make sure all Safety Precautions provided in this product without public notice or obligation. UNAUTHORIZED REPLACEMENT PARTS Use only Ariens replacement parts. Some illustrations may void the warranty. Review control functions and operation of...
Owners Manual
Page 4
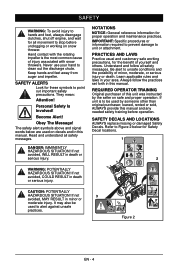
... other than original purchaser; Always follow all safety messages. If unit is the most common cause of this manual. loaned, rented or sold, ALWAYS provide this manual. CAUTION: POTENTIALLY HAZARDOUS SITUATION! If not 3 avoided, MAY RESULT in death or serious injury. The safety...off engine, and wait for all movement to stop before operation. Personal Safety Is Involved! If not avoided, COULD RESULT in this manual and any needed safety training before unclogging or working precautions, for Safety Decal locations. 1 2 WARNING: POTENTIALLY HAZARDOUS SITUATION! Keep hands ...
... other than original purchaser; Always follow all safety messages. If unit is the most common cause of this manual. loaned, rented or sold, ALWAYS provide this manual. CAUTION: POTENTIALLY HAZARDOUS SITUATION! If not 3 avoided, MAY RESULT in death or serious injury. The safety...off engine, and wait for all movement to stop before operation. Personal Safety Is Involved! If not avoided, COULD RESULT in this manual and any needed safety training before unclogging or working precautions, for Safety Decal locations. 1 2 WARNING: POTENTIALLY HAZARDOUS SITUATION! Keep hands ...
Owners Manual
Page 5
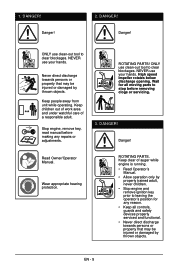
...opening. ROTATING PARTS. Keep clear of a responsible adult. EN - 5 DANGER! Wait for any repairs or adjustments. Read Owner/Operator Manual. ROTATING PARTS! ONLY use your hands. DANGER! Wear appropriate hearing protection. Keep children out of work area and under watchful care of ... for all moving parts to clear blockages. Keep people away from unit while operating. Danger! Danger! Stop engine, remove key, read manual before removing clogs or servicing. 3. 1. ONLY use your hands. NEVER use clean-out tool to stop before making any reason. &#...
...opening. ROTATING PARTS. Keep clear of a responsible adult. EN - 5 DANGER! Wait for any repairs or adjustments. Read Owner/Operator Manual. ROTATING PARTS! ONLY use your hands. DANGER! Wear appropriate hearing protection. Keep children out of work area and under watchful care of ... for all moving parts to clear blockages. Keep people away from unit while operating. Danger! Danger! Stop engine, remove key, read manual before removing clogs or servicing. 3. 1. ONLY use your hands. NEVER use clean-out tool to stop before making any reason. &#...
Owners Manual
Page 6
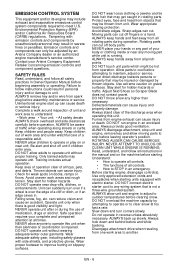
...to stop before beginning assembly or operating. ALWAYS keep hands and feet away from all rotating parts during the use of your Ariens Company Equipment Retailer concerning emission controls and component questions. Allow parts to improve footing on gravel surfaces. Never direct discharge towards ... part while unit is running. ROTATING AUGER CAN CAUSE SERIOUS INJURY. Read, understand, and follow instructions could result in Owner/Operator Manual before leaving operator's position. DO NOT connect electric starter cord to operate or play on docks, ramps or floors. ALWAYS allow ...
...to stop before beginning assembly or operating. ALWAYS keep hands and feet away from all rotating parts during the use of your Ariens Company Equipment Retailer concerning emission controls and component questions. Allow parts to improve footing on gravel surfaces. Never direct discharge towards ... part while unit is running. ROTATING AUGER CAN CAUSE SERIOUS INJURY. Read, understand, and follow instructions could result in Owner/Operator Manual before leaving operator's position. DO NOT connect electric starter cord to operate or play on docks, ramps or floors. ALWAYS allow ...
Owners Manual
Page 7
... dryers. When parking on slopes slow and gradual. NEVER secure from engine exhaust can cause fire or explosion. Properly remove fuel before filling. See Engine Manual for all hardware properly tightened. Before cleaning, removing clogs or making any necessary repairs before leaving unit. If this is running unit unattended. Damaged or...
... dryers. When parking on slopes slow and gradual. NEVER secure from engine exhaust can cause fire or explosion. Properly remove fuel before filling. See Engine Manual for all hardware properly tightened. Before cleaning, removing clogs or making any necessary repairs before leaving unit. If this is running unit unattended. Damaged or...
Owners Manual
Page 14
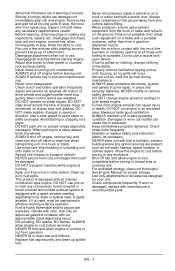
... or over the tire assembly when inflating. remove the protective wrap from skid shoes. 2. Run-in the attached bag. Adjust clutch idler according to Engine Manual for repairs. Attachment clutch should remain engaged until traction clutch lever is possible when they do not, contact your Dealer for detailed instructions. Explosive separation...
... or over the tire assembly when inflating. remove the protective wrap from skid shoes. 2. Run-in the attached bag. Adjust clutch idler according to Engine Manual for repairs. Attachment clutch should remain engaged until traction clutch lever is possible when they do not, contact your Dealer for detailed instructions. Explosive separation...
Owners Manual
Page 20
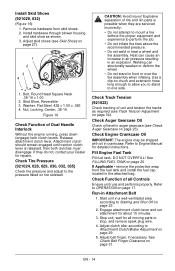
... of 87 octane/87 AKI (91 RON). Normal Transport Deep Cutting Figure 23 FILLING FUEL TANK WARNING: AVOID INJURY. Consult your engine manual. • Gasoline with alcohols or ethers) can be adjusted to hold the position. ALWAYS place unit in open or wellventilated area. .... Read and understand the entire Safety section before proceeding. IMPORTANT: Excessively oxygenated or reformulated fuels (fuels blended with up to Engine Manual for level clearing, deep cutting or transport. Remove fuel cap. Adjust skid shoes equally to hold the position. Squeeze the handlebar...
... of 87 octane/87 AKI (91 RON). Normal Transport Deep Cutting Figure 23 FILLING FUEL TANK WARNING: AVOID INJURY. Consult your engine manual. • Gasoline with alcohols or ethers) can be adjusted to hold the position. ALWAYS place unit in open or wellventilated area. .... Read and understand the entire Safety section before proceeding. IMPORTANT: Excessively oxygenated or reformulated fuels (fuels blended with up to Engine Manual for level clearing, deep cutting or transport. Remove fuel cap. Adjust skid shoes equally to hold the position. Squeeze the handlebar...
Owners Manual
Page 21
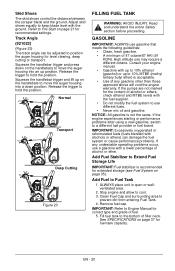
... traction clutch lever is not frozen. Allow 1/8" (3 mm) between scraper blade and uneven or gravel surfaces. 6. Check and add fuel if required. Refer to Engine Manual for all rotating parts to transporting the unit. Use a portable gasoline container with an appropriately sized dispensing spout when filling the tank. Fuel Shut-Off...
... traction clutch lever is not frozen. Allow 1/8" (3 mm) between scraper blade and uneven or gravel surfaces. 6. Check and add fuel if required. Refer to Engine Manual for all rotating parts to transporting the unit. Use a portable gasoline container with an appropriately sized dispensing spout when filling the tank. Fuel Shut-Off...
Owners Manual
Page 22
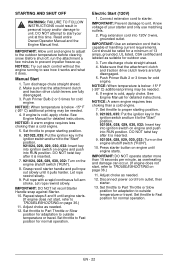
... the engine running to the "Start" position. 921024, 028, 029, 030, 032: Insert key into ignition switch on engine and push into RUN position. Manual Start 1. Push Primer Bulb 2 or 3 times for detailed instructions. If engine is below -15° F (-26° C) additional priming may be ... cold engine. Press starter button on the engine shutoff switch ("RUN"). 10. Adjust choke as needed . 6. Read entire Owner/Operator Manual and the Engine Manual first. IMPORTANT: Allow unit and engine to adjust to outside temperature or travel . Electric Start (120V) 1. Push Primer Bulb 2 or 3...
... the engine running to the "Start" position. 921024, 028, 029, 030, 032: Insert key into ignition switch on engine and push into RUN position. Manual Start 1. Push Primer Bulb 2 or 3 times for detailed instructions. If engine is below -15° F (-26° C) additional priming may be ... cold engine. Press starter button on the engine shutoff switch ("RUN"). 10. Adjust choke as needed . 6. Read entire Owner/Operator Manual and the Engine Manual first. IMPORTANT: Allow unit and engine to adjust to outside temperature or travel . Electric Start (120V) 1. Push Primer Bulb 2 or 3...

Owners Manual
Page 24
...will occur. More frequent service may be required to Engine Manual for complete instructions). 4. Read and understand the entire Safety section before proceeding. Attachment clutch should be required, contact an Ariens dealer or an authorized engine manufacturer's service center. CHECK FASTENERS... Make sure all hardware is released, then both clutch levers. Place unit on page 21) or (see Engine Manual for detailed instructions CHECK DUAL ...
...will occur. More frequent service may be required to Engine Manual for complete instructions). 4. Read and understand the entire Safety section before proceeding. Attachment clutch should be required, contact an Ariens dealer or an authorized engine manufacturer's service center. CHECK FASTENERS... Make sure all hardware is released, then both clutch levers. Place unit on page 21) or (see Engine Manual for detailed instructions CHECK DUAL ...
Owners Manual
Page 25
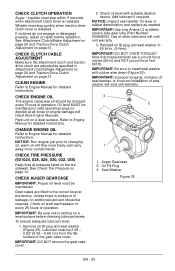
...Auger Gearcase 2. If clutches do not engage or disengage properly, adjust or repair before checking lubricant levels. NOTICE: Run engine just prior to Engine Manual for wear or rubber deterioration and replace as specified in ) and NOT pound force foot (lbf-ft). Unless there is released. Remove oil fill... plug and seal washer (Figure 25). Gear cases are filled to 80 lbf-in safe operating range on page 31. IMPORTANT: Use only Ariens L3 synthetic severe duty gear lube (Part Number 00068800). Reinstall oil fill plug and seal washer to the correct level at pressure listed on ...
...Auger Gearcase 2. If clutches do not engage or disengage properly, adjust or repair before checking lubricant levels. NOTICE: Run engine just prior to Engine Manual for wear or rubber deterioration and replace as specified in ) and NOT pound force foot (lbf-ft). Unless there is released. Remove oil fill... plug and seal washer (Figure 25). Gear cases are filled to 80 lbf-in safe operating range on page 31. IMPORTANT: Use only Ariens L3 synthetic severe duty gear lube (Part Number 00068800). Reinstall oil fill plug and seal washer to the correct level at pressure listed on ...
Owners Manual
Page 36
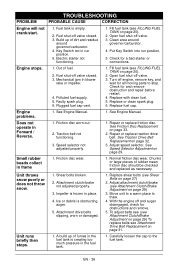
...-off valve closed . 3. Put Key Switch into run position. 5. Fuel shut-off valve. 3. Replace fuel cap. See Engine Manual. 1. Speed selector not adjusted properly. 1. Repair or replace traction drive belt. See Speed Selector Adjustment on page 29) 3. Unit...of rubber mean friction disc should be checked and replaced as necessary. Electric starter not functioning. 1. Mechanical jam in place. 4. See Engine Manual. Small rubber beads collect in Forward / Reverse. 1. Adjust attachment clutch/brake (see Attachment Clutch/Brake Adjustment on page 29. Polluted fuel supply...
...-off valve closed . 3. Put Key Switch into run position. 5. Fuel shut-off valve. 3. Replace fuel cap. See Engine Manual. 1. Speed selector not adjusted properly. 1. Repair or replace traction drive belt. See Speed Selector Adjustment on page 29) 3. Unit...of rubber mean friction disc should be checked and replaced as necessary. Electric starter not functioning. 1. Mechanical jam in place. 4. See Engine Manual. Small rubber beads collect in Forward / Reverse. 1. Adjust attachment clutch/brake (see Attachment Clutch/Brake Adjustment on page 29. Polluted fuel supply...

Owners Manual
Page 40
...must complete the product registration card in the Owner's Manual. • Promptly notify Ariens or an authorized Ariens, Gravely, Parker or Countax service representative of sale. Hallam, Victoria 3803 Australia Phone: (03) 9796 4244 1800 335 489 www.ariens.com.au EN - 40 Sno-Chore 2013 Customer ...In the U.S., Canada, Mexico, Caribbean, In Europe, Asia, Africa or Central and South America: the Middle East: In Australia or New Zealand: Ariens Company 655 W. Refer to 2 years for consumer use . (1 year for warranty All code "PD".) Except as noted above, these components are ...
...must complete the product registration card in the Owner's Manual. • Promptly notify Ariens or an authorized Ariens, Gravely, Parker or Countax service representative of sale. Hallam, Victoria 3803 Australia Phone: (03) 9796 4244 1800 335 489 www.ariens.com.au EN - 40 Sno-Chore 2013 Customer ...In the U.S., Canada, Mexico, Caribbean, In Europe, Asia, Africa or Central and South America: the Middle East: In Australia or New Zealand: Ariens Company 655 W. Refer to 2 years for consumer use . (1 year for warranty All code "PD".) Except as noted above, these components are ...
Owners Manual
Page 41
...state provides that may exist, is expressly made in the Owner/Operator Manual. • Modifying the utility vehicle with parts and accessories that govern within any defective part. LIMITATION OF REMEDY AND DAMAGES Ariens Company's liability under this warranty, and under any implied warranty that ...Products are entitled to incorporate such design changes into previously manufactured products, nor shall such changes be construed as obligating Ariens Company to a replacement or refund for a major failure and for compensation for any other than the United States and Canada, contact ...
...state provides that may exist, is expressly made in the Owner/Operator Manual. • Modifying the utility vehicle with parts and accessories that govern within any defective part. LIMITATION OF REMEDY AND DAMAGES Ariens Company's liability under this warranty, and under any implied warranty that ...Products are entitled to incorporate such design changes into previously manufactured products, nor shall such changes be construed as obligating Ariens Company to a replacement or refund for a major failure and for compensation for any other than the United States and Canada, contact ...

Quick Start Guide
Page 1
Quick Start Guide Deluxe 30 Platinum (921029 s/n 000101 & up) • Step 1: Assemble Handlebars • Step 2: Install Discharge Chute • Step 3: Install Chute Control Assembly • Step 4: Install Discharge Chute Rod • ... Engine Fuel Tank • Step 12: Start Engine • Step 13: Stop Engine READ AND UNDERSTAND ALL INSTRUCTION, WARNING, AND DANGER LABELS. IMPORTANT: READ OPERATOR'S MANUAL AND ENGINE MANUAL THOROUGHLY AND FOLLOW THE IMPORTANT SAFE OPERATION PRACTICES BEFORE OPERATING.
Quick Start Guide Deluxe 30 Platinum (921029 s/n 000101 & up) • Step 1: Assemble Handlebars • Step 2: Install Discharge Chute • Step 3: Install Chute Control Assembly • Step 4: Install Discharge Chute Rod • ... Engine Fuel Tank • Step 12: Start Engine • Step 13: Stop Engine READ AND UNDERSTAND ALL INSTRUCTION, WARNING, AND DANGER LABELS. IMPORTANT: READ OPERATOR'S MANUAL AND ENGINE MANUAL THOROUGHLY AND FOLLOW THE IMPORTANT SAFE OPERATION PRACTICES BEFORE OPERATING.
Quick Start Guide
Page 6
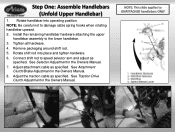
Connect shift rod to the lower handlebar. 3. See Attachment Clutch/Brake Adjustment in the Owners Manual. See Traction Drive Clutch Adjustment in the Owners Manual. 8. Step One: Assemble Handlebars (Unfold Upper Handlebar) Assembly) 1. Tighten all hardware. 4. Rotate shift rod into operating ... remaining handlebar hardware attaching the upper handlebar assembly to speed selector arm and adjust as specified. See Selector Adjustment in the Owners Manual. 7. NOTE: This slide applies to damage cable spring hooks when rotating handlebar upward. 2. NOTE: Be careful not to UNATTACHED...
Connect shift rod to the lower handlebar. 3. See Attachment Clutch/Brake Adjustment in the Owners Manual. See Traction Drive Clutch Adjustment in the Owners Manual. 8. Step One: Assemble Handlebars (Unfold Upper Handlebar) Assembly) 1. Tighten all hardware. 4. Rotate shift rod into operating ... remaining handlebar hardware attaching the upper handlebar assembly to speed selector arm and adjust as specified. See Selector Adjustment in the Owners Manual. 7. NOTE: This slide applies to damage cable spring hooks when rotating handlebar upward. 2. NOTE: Be careful not to UNATTACHED...
Quick Start Guide
Page 13
... the chute control cable ends are properly seated in control assembly and control arm. 6. Make sure the cable stays connected while unit is in Owner Manual. Check to 15-31 lbf-ft (20-42 N∙m). 8. Make sure the discharge chute rotates left and right when you push the discharge chute control...
... the chute control cable ends are properly seated in control assembly and control arm. 6. Make sure the cable stays connected while unit is in Owner Manual. Check to 15-31 lbf-ft (20-42 N∙m). 8. Make sure the discharge chute rotates left and right when you push the discharge chute control...

Quick Start Guide
Page 14
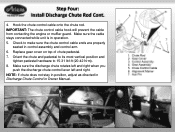
... push the cable fitting into the bracket on the left side of chute deflector. 4. Check deflector travel , if necessary see Remote Deflector Control in Owners Manual. Hold seal out of the way while routing the cable through the bracket on left side of the chute pedestal. 3. Adjust nut on the cable...
... push the cable fitting into the bracket on the left side of chute deflector. 4. Check deflector travel , if necessary see Remote Deflector Control in Owners Manual. Hold seal out of the way while routing the cable through the bracket on left side of the chute pedestal. 3. Adjust nut on the cable...


