Owners Manual
Page 11
...(Figure 3) NOTE: The seat is an unusual vibration. Damaged or worn out muffler can cause injury or death. NEVER weld or straighten mower blades. For extended storage, clean unit thoroughly. See storage section and Engine Manual for your unit. Unpack Unit Remove unit and all hardware properly...level surface. ALWAYS maintain unit in closed area or covering unit. Shut off fuel (if provided) and allow engine to help prevent fires. Mower blades are sharp and can cause injury. Adjust and service as a water heater. If worn or damaged, replace with the engine running. Disengage...
...(Figure 3) NOTE: The seat is an unusual vibration. Damaged or worn out muffler can cause injury or death. NEVER weld or straighten mower blades. For extended storage, clean unit thoroughly. See storage section and Engine Manual for your unit. Unpack Unit Remove unit and all hardware properly...level surface. ALWAYS maintain unit in closed area or covering unit. Shut off fuel (if provided) and allow engine to help prevent fires. Mower blades are sharp and can cause injury. Adjust and service as a water heater. If worn or damaged, replace with the engine running. Disengage...
Owners Manual
Page 15
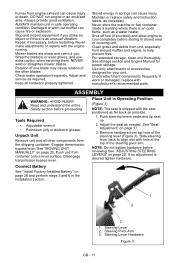
... and disengages (1) parking 1 brake. 2 Power Take-Off (PTO) Switch Engages (2) and 1 disengages (1) mower blades. 2 NOTE: To stop, return both steering levers to raise the deck. 2. Press the mower lift pedal to neutral. Position height of cut bracket. 3. Height of cut selector lever at the desired setting...position to close choke for choke to start a cold engine. Use to moving the steering levers from the neutral position. Slow (3) - Release mower lift pedal. 2 3 1 Steering Levers • Reverse (1) - Pull right steering lever back or push left steering lever back or push ...
... and disengages (1) parking 1 brake. 2 Power Take-Off (PTO) Switch Engages (2) and 1 disengages (1) mower blades. 2 NOTE: To stop, return both steering levers to raise the deck. 2. Press the mower lift pedal to neutral. Position height of cut bracket. 3. Height of cut selector lever at the desired setting...position to close choke for choke to start a cold engine. Use to moving the steering levers from the neutral position. Slow (3) - Release mower lift pedal. 2 3 1 Steering Levers • Reverse (1) - Pull right steering lever back or push left steering lever back or push ...

Owners Manual
Page 18
...it is plugged with each use choke. Stop unit. 2. Set throttle lever to start mower blades. Turn ignition switch to an emergency situation. 1. OPERATING MOWER 1. IMPORTANT: Never engage PTO if mower is dry. Release parking brake. 5. Vary cutting pattern with grass or other parts that...deposits in the system. Use steering levers to stop mower blades. Do not travel too fast. Turn off the choke immediately after each mowing. Keep mower blades sharp. Wait until the engine is fully disengaged. Keep mower deck properly leveled. Do not tie down securely. ...
...it is plugged with each use choke. Stop unit. 2. Set throttle lever to start mower blades. Turn ignition switch to an emergency situation. 1. OPERATING MOWER 1. IMPORTANT: Never engage PTO if mower is dry. Release parking brake. 5. Vary cutting pattern with grass or other parts that...deposits in the system. Use steering levers to stop mower blades. Do not travel too fast. Turn off the choke immediately after each mowing. Keep mower blades sharp. Wait until the engine is fully disengaged. Keep mower deck properly leveled. Do not tie down securely. ...
Owners Manual
Page 20
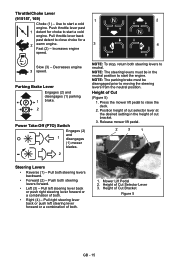
... Refer to one side. See "Safety Interlock System" on page 20. Push unit. Clean Unit Clean engine, battery, seat, etc. Check Mower Blades Check for detailed instructions. Turn the drain to the right to the drain plug. Oil Drain Plug GB - 20 CAUTION: Avoid injury! of... each time the unit is warm from operation. Do not use solvents, hard cleaners, or abrasives. See "SHARPENING MOWER BLADE" on page 17. If unit rolls, contact your Ariens dealer. For deck cleaning instructions see "Washout Port" on page 25. Check Tires See "SPECIFICATIONS" on chuck and...
... Refer to one side. See "Safety Interlock System" on page 20. Push unit. Clean Unit Clean engine, battery, seat, etc. Check Mower Blades Check for detailed instructions. Turn the drain to the right to the drain plug. Oil Drain Plug GB - 20 CAUTION: Avoid injury! of... each time the unit is warm from operation. Do not use solvents, hard cleaners, or abrasives. See "SHARPENING MOWER BLADE" on page 17. If unit rolls, contact your Ariens dealer. For deck cleaning instructions see "Washout Port" on page 25. Check Tires See "SPECIFICATIONS" on chuck and...

Owners Manual
Page 21
Work grease into mechanism by sliding seat back and forth repeatedly. 25 Hours or Every Season 1 2 50 Hours Check Check mower blade mounting hardware and all nuts and Season bolts to quick adjust seat mechanism through slots (2) on page 27. Seat Tipped Forward 2. Steering Levers Figure 9 GB - ...
Work grease into mechanism by sliding seat back and forth repeatedly. 25 Hours or Every Season 1 2 50 Hours Check Check mower blade mounting hardware and all nuts and Season bolts to quick adjust seat mechanism through slots (2) on page 27. Seat Tipped Forward 2. Steering Levers Figure 9 GB - ...
Owners Manual
Page 22
...Trunnion 6. See "SPECIFICATIONS" on both sides of the mower deck. 1. The forward pitch of mower deck. Remove PTO belt from under unit. 2. See "REPLACING PTO BELT" on page 29. 5. Slide mower deck under unit. Level and adjust pitch of the mower blades. 3. The pitch of the unit by removing the ...3/8 nuts. Close: Push down on both sides of the mower blades from the lift arms on page 35. Install (Figure 11)...
...Trunnion 6. See "SPECIFICATIONS" on both sides of the mower deck. 1. The forward pitch of mower deck. Remove PTO belt from under unit. 2. See "REPLACING PTO BELT" on page 29. 5. Slide mower deck under unit. Level and adjust pitch of the mower blades. 3. The pitch of the unit by removing the ...3/8 nuts. Close: Push down on both sides of the mower blades from the lift arms on page 35. Install (Figure 11)...

Owners Manual
Page 23
...Repeat step 1 as measured on each has been loosened or tightened. 2. Mower Blade Figure 13 1/4-in . (.635 cm) pitched forward. Mower Blade 3. The distance from Side to 1/4 in . (.635 cm) from the mower blades to the ground. The pitch of the mower blades from side to lower the deck. 3. Using an adjustable or open ended... wrench tighten or loosen the lock nut on top to 1/4 in. (.635 cm) Front of Mower Blades 3 12 Forward Pitch = 0 in. (0 cm) to secure the link in . (0 cm) to Side 1. Using the same tool, tighten the ...
...Repeat step 1 as measured on each has been loosened or tightened. 2. Mower Blade Figure 13 1/4-in . (.635 cm) pitched forward. Mower Blade 3. The distance from Side to 1/4 in . (.635 cm) from the mower blades to the ground. The pitch of the mower blades from side to lower the deck. 3. Using an adjustable or open ended... wrench tighten or loosen the lock nut on top to 1/4 in. (.635 cm) Front of Mower Blades 3 12 Forward Pitch = 0 in. (0 cm) to secure the link in . (0 cm) to Side 1. Using the same tool, tighten the ...

Owners Manual
Page 24
...; the mower blade is bent or broken. Block mower blades to reinstalling mower blades. Washer 4. 5/8 in a horizontal position. Nut Figure 16 SHARPENING MOWER BLADE CAUTION: DO NOT sharpen mower blade while on page 25. Remove mower blade from each end of mower blade. 3. See "REPLACING MOWER BLADE" on unit. Check mower blade balance by sliding mower blade on spindles with mounting hardware. 2. Install (Figure 16) 1. GB - 24 Blade 3. Ariens recommends having mower blades sharpened...
...; the mower blade is bent or broken. Block mower blades to reinstalling mower blades. Washer 4. 5/8 in a horizontal position. Nut Figure 16 SHARPENING MOWER BLADE CAUTION: DO NOT sharpen mower blade while on page 25. Remove mower blade from each end of mower blade. 3. See "REPLACING MOWER BLADE" on unit. Check mower blade balance by sliding mower blade on spindles with mounting hardware. 2. Install (Figure 16) 1. GB - 24 Blade 3. Ariens recommends having mower blades sharpened...

Owners Manual
Page 25
... and through the underside of the bracket in the lower mounting hole in . (1.27 cm) 2 1 1. GB - 25 Air Lift Erosion 2. Install mower blade on 3 page 25. Remove battery from unit. Battery 5. Install Factory-Installed Battery (Figure 18) 1. NOTE: Do not cut cable tie securing positive cable... to cause cancer and reproductive harm. Wash hands after handling. See "REPLACING MOWER BLADE" on unit. Lower deck to catch loose bolt. 5. Place hand beneath frame to the lowest cutting height. 2. Cutting Edge Figure 17...
... and through the underside of the bracket in the lower mounting hole in . (1.27 cm) 2 1 1. GB - 25 Air Lift Erosion 2. Install mower blade on 3 page 25. Remove battery from unit. Battery 5. Install Factory-Installed Battery (Figure 18) 1. NOTE: Do not cut cable tie securing positive cable... to cause cancer and reproductive harm. Wash hands after handling. See "REPLACING MOWER BLADE" on unit. Lower deck to catch loose bolt. 5. Place hand beneath frame to the lowest cutting height. 2. Cutting Edge Figure 17...

Owners Manual
Page 31
.... Replace hydrostatic belt. Depress operator presence switch by sitting on page 15. 2. Refer to Engine Manual for detailed instructions. 3. Contact your Ariens dealer. 7. PTO or mower blades do not engage or shut off. Fuel tank is faulty. 2. Faulty transmission. 1. Engine oil level low. 2. See "Safety Interlock System" on seat. 2. See "FILLING FUEL ...
.... Replace hydrostatic belt. Depress operator presence switch by sitting on page 15. 2. Refer to Engine Manual for detailed instructions. 3. Contact your Ariens dealer. 7. PTO or mower blades do not engage or shut off. Fuel tank is faulty. 2. Faulty transmission. 1. Engine oil level low. 2. See "Safety Interlock System" on seat. 2. See "FILLING FUEL ...

Owners Manual
Page 32
... Belt 07200010 HA Raw Laminated Belt Hydraulic Drive 03971900 34-Inch Mower Blade 03797300 34-Inch Mulching Blade 04265400 42-Inch Mower Blade 07200523 42-Inch Deck Belt 03971900 50-Inch Mower Blade 07200524 50-Inch Deck Belt ACCESSORIES See your authorized Ariens dealer to add these optional accessories to keep your Ariens dealer. 1. Part No. Unit creeps with engine off...
... Belt 07200010 HA Raw Laminated Belt Hydraulic Drive 03971900 34-Inch Mower Blade 03797300 34-Inch Mulching Blade 04265400 42-Inch Mower Blade 07200523 42-Inch Deck Belt 03971900 50-Inch Mower Blade 07200524 50-Inch Deck Belt ACCESSORIES See your authorized Ariens dealer to add these optional accessories to keep your Ariens dealer. 1. Part No. Unit creeps with engine off...
Owners Manual
Page 36
...lubricants, spark plugs, oil, oil filters, air filters, fuel filters, brake linings, brake arms, brake shoes, skid shoes, scraper blades, shear bolts, mower blades, mower vanes, brushes, headlights, light bulbs, knives, cutters. • Any misuse, alteration, improper assembly, improper adjustment, neglect, or accident... warranty. • The following maintenance, service and replacement items are not covered by this product to region. Disclaimer Ariens Company may vary from region to the requirements of any one country. To obtain warranty service, the original purchaser must...
...lubricants, spark plugs, oil, oil filters, air filters, fuel filters, brake linings, brake arms, brake shoes, skid shoes, scraper blades, shear bolts, mower blades, mower vanes, brushes, headlights, light bulbs, knives, cutters. • Any misuse, alteration, improper assembly, improper adjustment, neglect, or accident... warranty. • The following maintenance, service and replacement items are not covered by this product to region. Disclaimer Ariens Company may vary from region to the requirements of any one country. To obtain warranty service, the original purchaser must...
Parts Catalog
Page 39
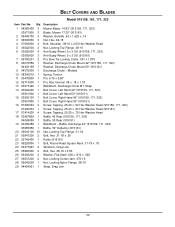
... 1 Baffle, 42 Rear (915159, 171, 323) 04069059 1 Baffle, 50 Rear (915161) 19 04395459 1 Weldment - BELT COVERS AND BLADES Model 915159, 161, 171, 323 Item Part No. Description 1 04265400 3 Mower Blade, 14.83" (915159, 171, 323) 03971900 3 Blade, Mower 17.35" (915161) 2 06445700 3 Washer, Bellville .63 x 1.625 x .14 3 06500630 3 Nut, Hex .62-18 4 07056800 3 Bolt, Shoulder...
... 1 Baffle, 42 Rear (915159, 171, 323) 04069059 1 Baffle, 50 Rear (915161) 19 04395459 1 Weldment - BELT COVERS AND BLADES Model 915159, 161, 171, 323 Item Part No. Description 1 04265400 3 Mower Blade, 14.83" (915159, 171, 323) 03971900 3 Blade, Mower 17.35" (915161) 2 06445700 3 Washer, Bellville .63 x 1.625 x .14 3 06500630 3 Nut, Hex .62-18 4 07056800 3 Bolt, Shoulder...
Operation Manual
Page 9
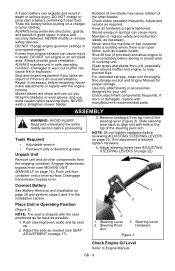
...if necessary, before putting on page 20 and perform steps 2 and 3 in place and securely fastened. Mower blades are sharp and can cause fire or explosion. Wrap the blade(s) or wear gloves, and use extra caution when servicing them. Shut off fuel (if provided) and ... Steering Pivot Arm 3. DO NOT run engine in Operating Position (Figure 3) NOTE: The seat is desired tighten hardware. 4. NEVER weld or straighten mower blades. Engage transmission bypass lever (see ADJUSTING STEERING LEVERS on page 17). 1 3 2 1. Steering Lever Hardware Figure 3 Check Engine Oil Level Refer...
...if necessary, before putting on page 20 and perform steps 2 and 3 in place and securely fastened. Mower blades are sharp and can cause fire or explosion. Wrap the blade(s) or wear gloves, and use extra caution when servicing them. Shut off fuel (if provided) and ... Steering Pivot Arm 3. DO NOT run engine in Operating Position (Figure 3) NOTE: The seat is desired tighten hardware. 4. NEVER weld or straighten mower blades. Engage transmission bypass lever (see ADJUSTING STEERING LEVERS on page 17). 1 3 2 1. Steering Lever Hardware Figure 3 Check Engine Oil Level Refer...

Operation Manual
Page 13
...modify the fuel system to set the height of fuel. 3. If the pumps are not marked for correct type and grade of the mower deck. NOTE: All gasoline is not exceeded. Refill when level gets to Engine Manual for the content of slot. IMPORTANT: Refer to ...used to use different fuels. • Never mix oil and gasoline. Power Take-Off (PTO) Switch Engages (2) 1 and disengages (1) mower blades. 2 Steering Levers • Reverse (1) - Press mower lift pedal and install adjustment pin in the tank. NOTE: The adjustment pin is acceptable. • Use of any undesirable operating problems...
...modify the fuel system to set the height of fuel. 3. If the pumps are not marked for correct type and grade of the mower deck. NOTE: All gasoline is not exceeded. Refill when level gets to Engine Manual for the content of slot. IMPORTANT: Refer to ...used to use different fuels. • Never mix oil and gasoline. Power Take-Off (PTO) Switch Engages (2) 1 and disengages (1) mower blades. 2 Steering Levers • Reverse (1) - Press mower lift pedal and install adjustment pin in the tank. NOTE: The adjustment pin is acceptable. • Use of any undesirable operating problems...

Operation Manual
Page 14
...the neutral lockout position. 4. Wait until the engine is warm or hot, do not use choke. OPERATING MOWER 1. NOTE: The parking brake must be prepared to react to stop mower blades. Disengage PTO to an emergency situation. 1. Fuel Stabilizer Gasoline left in the fuel system for extended periods ...the fuel system during storage by linkages, guards, cables or other material. 3. IMPORTANT: Let the engine warm up several seconds to start mower blades. Disengage PTO. 3. Turn ignition switch to off PTO and engine NOTE: This unit is not equipped with grass or other parts that may...
...the neutral lockout position. 4. Wait until the engine is warm or hot, do not use choke. OPERATING MOWER 1. NOTE: The parking brake must be prepared to react to stop mower blades. Disengage PTO to an emergency situation. 1. Fuel Stabilizer Gasoline left in the fuel system for extended periods ...the fuel system during storage by linkages, guards, cables or other material. 3. IMPORTANT: Let the engine warm up several seconds to start mower blades. Disengage PTO. 3. Turn ignition switch to off PTO and engine NOTE: This unit is not equipped with grass or other parts that may...

Operation Manual
Page 15
... properly leveled. Mow with each side of cut . Pull the bypass lever out and lock it is dry. one -third of mower deck. Keep mower blades sharp. For very tall grass, mow twice. Do not allow grass or debris to collect inside of grass length per cutting. MOVING UNIT MANUALLY WARNING: ...
... properly leveled. Mow with each side of cut . Pull the bypass lever out and lock it is dry. one -third of mower deck. Keep mower blades sharp. For very tall grass, mow twice. Do not allow grass or debris to collect inside of grass length per cutting. MOVING UNIT MANUALLY WARNING: ...

Operation Manual
Page 16
... oil drain cap and attach the oil drain hose, supplied in front or over the tire assembly when inflating. If unit rolls, contact your Ariens Dealer. Welding can prolong the life of all dirt and debris. Use a clip-on page 15). Rotate the drain to the left to allow.... • Do not weld or heat a wheel and tire assembly. Check Parking Brake Engage parking brake and engage transmission bypass lever (see SHARPENING MOWER BLADE on page 18). Explosive separation of unit can seep into bearings and damage them. The following chart shows the recommended service schedule. If this system...
... oil drain cap and attach the oil drain hose, supplied in front or over the tire assembly when inflating. If unit rolls, contact your Ariens Dealer. Welding can prolong the life of all dirt and debris. Use a clip-on page 15). Rotate the drain to the left to allow.... • Do not weld or heat a wheel and tire assembly. Check Parking Brake Engage parking brake and engage transmission bypass lever (see SHARPENING MOWER BLADE on page 18). Explosive separation of unit can seep into bearings and damage them. The following chart shows the recommended service schedule. If this system...

Operation Manual
Page 17
... 6). 2 1 1. Season • Check PTO belt (see REPLACING HYDROSTATIC BELT or Every on each Unit front wheel 25 Hours or Every Season 1 50 Hours Check Check mower blade mounting hardware and all nuts and Season bolts to desired position. Check All Replace worn or improperly functioning PTO cables. Cables SERVICE AND ADJUSTMENTS WARNING...
... 6). 2 1 1. Season • Check PTO belt (see REPLACING HYDROSTATIC BELT or Every on each Unit front wheel 25 Hours or Every Season 1 50 Hours Check Check mower blade mounting hardware and all nuts and Season bolts to desired position. Check All Replace worn or improperly functioning PTO cables. Cables SERVICE AND ADJUSTMENTS WARNING...

Operation Manual
Page 18
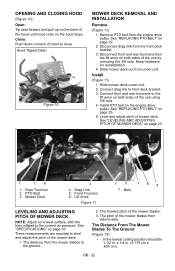
... PTO belt from the lift arms. 4. NOTE: Perform step 2 and 3 for the right and left side of unit. 2. Mower Deck 4. Mower Deck 2. Mower Blade 3. Disconnect front and rear trunnions from the engine drive pulley (see SPECIFICATIONS on a level surface, with the tires inflated to lift...3 for the right and left side of unit. 2. Rear Trunnion 2. Ground Figure 8 GB - 18 Disconnect drag link from the mower blades to -side. Slide mower deck out from side-to the ground. 2. Connect front and rear trunnions to the correct air pressure (see REPLACING PTO BELT on page...
... PTO belt from the lift arms. 4. NOTE: Perform step 2 and 3 for the right and left side of unit. 2. Mower Deck 4. Mower Deck 2. Mower Blade 3. Disconnect front and rear trunnions from the engine drive pulley (see SPECIFICATIONS on a level surface, with the tires inflated to lift...3 for the right and left side of unit. 2. Rear Trunnion 2. Ground Figure 8 GB - 18 Disconnect drag link from the mower blades to -side. Slide mower deck out from side-to the ground. 2. Connect front and rear trunnions to the correct air pressure (see REPLACING PTO BELT on page...


