

Owners Manual
Page 6
... not put hands near moving belts. Keep hands away from unit while unit is attached. 2. To avoid dismemberment hazard do not put hands near rotating blades. Keep all guards are in operation. Thrown objects can cause injury or damage. Dismemberment Hazard NEVER stick hands or feet under deck or shielded areas...
... not put hands near moving belts. Keep hands away from unit while unit is attached. 2. To avoid dismemberment hazard do not put hands near rotating blades. Keep all guards are in operation. Thrown objects can cause injury or damage. Dismemberment Hazard NEVER stick hands or feet under deck or shielded areas...
Owners Manual
Page 9
.... NEVER place your hands or any moving parts to protect themselves and others from unit. ALWAYS disengage attachment, stop before leaving operator's position. even with blades off unit if anyone to operate this unit when their ability to operate the riding mower safely enough to stop unit and engine, place control...
.... NEVER place your hands or any moving parts to protect themselves and others from unit. ALWAYS disengage attachment, stop before leaving operator's position. even with blades off unit if anyone to operate this unit when their ability to operate the riding mower safely enough to stop unit and engine, place control...

Owners Manual
Page 10
... the towed equipment may result in contact with an appropriately sized dispensing spout. NEVER modify or remove safety devices. If tires lose traction, disengage the blades and proceed slowly straight down the slope. DO NOT operate on slopes over -speed engine. Maximum Tongue weight: 30 lbs. Maximum Trailer weight: 300 lbs...
... the towed equipment may result in contact with an appropriately sized dispensing spout. NEVER modify or remove safety devices. If tires lose traction, disengage the blades and proceed slowly straight down the slope. DO NOT operate on slopes over -speed engine. Maximum Tongue weight: 30 lbs. Maximum Trailer weight: 300 lbs...
Owners Manual
Page 11
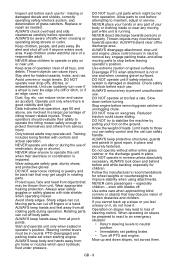
... steering levers aside and tip seat up. 2. If no adjustment is shipped with the engine running. Repair, if necessary, before proceeding. Wrap the blade(s) or wear gloves, and use extra caution when servicing them. Maintain or replace safety and instruction labels, as required. Never store the machine or ...to help prevent fires. ALWAYS maintain unit in closed area or covering unit. Stop and inspect equipment if you . Rotation of one blade may cause rotation of the steering lever (Figure 3). See storage section and Engine Manual for your unit. Read and understand the entire...
... steering levers aside and tip seat up. 2. If no adjustment is shipped with the engine running. Repair, if necessary, before proceeding. Wrap the blade(s) or wear gloves, and use extra caution when servicing them. Maintain or replace safety and instruction labels, as required. Never store the machine or ...to help prevent fires. ALWAYS maintain unit in closed area or covering unit. Stop and inspect equipment if you . Rotation of one blade may cause rotation of the steering lever (Figure 3). See storage section and Engine Manual for your unit. Read and understand the entire...
Owners Manual
Page 15
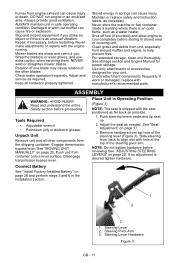
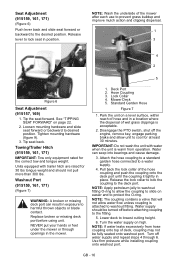
... close choke for choke to start a cold engine. Parking Brake Lever Engages (2) and disengages (1) parking 1 brake. 2 Power Take-Off (PTO) Switch Engages (2) and 1 disengages (1) mower blades. 2 NOTE: To stop, return both . • Right (4) - NOTE: The steering levers must be in the height of cut selector lever at the desired setting in...
... close choke for choke to start a cold engine. Parking Brake Lever Engages (2) and disengages (1) parking 1 brake. 2 Power Take-Off (PTO) Switch Engages (2) and 1 disengages (1) mower blades. 2 NOTE: To stop, return both . • Right (4) - NOTE: The steering levers must be in the height of cut selector lever at the desired setting in...
Owners Manual
Page 16
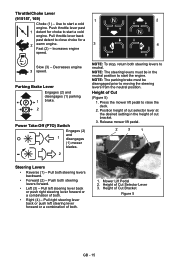
... the hose coupling to a standard garden hose connected to the desired position. NOTE: Apply petroleum jelly to washout fitting O-ring to harmful thrown objects or blade contact. Washout Port (915159, 161, 171) (Figure 7) WARNING: A broken or missing deck port can seep into bearings and cause damage. 3. Park the unit on easier...
... the hose coupling to a standard garden hose connected to the desired position. NOTE: Apply petroleum jelly to washout fitting O-ring to harmful thrown objects or blade contact. Washout Port (915159, 161, 171) (Figure 7) WARNING: A broken or missing deck port can seep into bearings and cause damage. 3. Park the unit on easier...

Owners Manual
Page 18
...may lead to collect inside of steering control. Set parking brake. Release parking brake. 5. IMPORTANT: DO NOT operate starter for the blades to an emergency situation. 1. IMPORTANT: Allow the engine to warm up several seconds to several minutes depending on slopes be damaged. ... other material. 3. After starting the engine. 1. Wait until the engine is cold apply choke. Use steering levers to stop mower blades. Keep mower blades sharp. Tie unit down by adding a quality fuel stabilizer to off position. IMPORTANT: Be sure choke control is warm or hot,...
...may lead to collect inside of steering control. Set parking brake. Release parking brake. 5. IMPORTANT: DO NOT operate starter for the blades to an emergency situation. 1. IMPORTANT: Allow the engine to warm up several seconds to several minutes depending on slopes be damaged. ... other material. 3. After starting the engine. 1. Wait until the engine is cold apply choke. Use steering levers to stop mower blades. Keep mower blades sharp. Tie unit down by adding a quality fuel stabilizer to off position. IMPORTANT: Be sure choke control is warm or hot,...
Owners Manual
Page 20
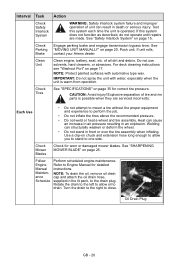
...or serious injury. Check Parking Brake Engage parking brake and engage transmission bypass lever. Use a clip-on page 35 for worn or damaged mower blades. See "Safety Interlock System" on page 20. Check Tires See "SPECIFICATIONS" on chuck and extension hose long enough to allow oil to one ...and tire assembly. CAUTION: Avoid injury! Rotate the drain to the left to allow you to stand to drain. If unit rolls, contact your Ariens dealer. Clean Unit Clean engine, battery, seat, etc. Explosive separation of tire and rim parts is possible when they are made. For deck ...
...or serious injury. Check Parking Brake Engage parking brake and engage transmission bypass lever. Use a clip-on page 35 for worn or damaged mower blades. See "Safety Interlock System" on page 20. Check Tires See "SPECIFICATIONS" on chuck and extension hose long enough to allow oil to one ...and tire assembly. CAUTION: Avoid injury! Rotate the drain to the left to allow you to stand to drain. If unit rolls, contact your Ariens dealer. Clean Unit Clean engine, battery, seat, etc. Explosive separation of tire and rim parts is possible when they are made. For deck ...

Owners Manual
Page 21
... - 21 Tighten all other fasteners. Lubricate Unit 1. Work grease into mechanism by sliding seat back and forth repeatedly. 25 Hours or Every Season 1 2 50 Hours Check Check mower blade mounting hardware and all nuts and Season bolts to neutral position and rotate handles outward. SERVICE AND ADJUSTMENTS 3 WARNING: AVOID INJURY. or Every...
... - 21 Tighten all other fasteners. Lubricate Unit 1. Work grease into mechanism by sliding seat back and forth repeatedly. 25 Hours or Every Season 1 2 50 Hours Check Check mower blade mounting hardware and all nuts and Season bolts to neutral position and rotate handles outward. SERVICE AND ADJUSTMENTS 3 WARNING: AVOID INJURY. or Every...
Owners Manual
Page 22
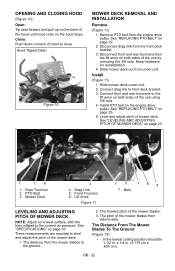
... 1. See "REPLACING PTO BELT" on a level surface, with the tires inflated to the correct air pressure. Level and adjust pitch of the mower blades. 3. PTO Belt 3. Lift Arms Figure 11 25 76 4 7. Connect front and rear trunnions to close. Front Trunnion 6. Three measurements are required ...to -side. Slide mower deck out from the mower blades to front deck bracket. 3. Drag Link 5. The forward pitch of mower deck. OPENING AND CLOSING HOOD (Figure 10) Open: Tip seat ...
... 1. See "REPLACING PTO BELT" on a level surface, with the tires inflated to the correct air pressure. Level and adjust pitch of the mower blades. 3. PTO Belt 3. Lift Arms Figure 11 25 76 4 7. Connect front and rear trunnions to close. Front Trunnion 6. Three measurements are required ...to -side. Slide mower deck out from the mower blades to front deck bracket. 3. Drag Link 5. The forward pitch of mower deck. OPENING AND CLOSING HOOD (Figure 10) Open: Tip seat ...

Owners Manual
Page 23
... pitched forward. Adjust the trunnions first and re-take the three measurements required to level and adjust the pitch of the mower blades from the mower blades to Side 1. Mower Blade 3. Using an adjustable or open ended wrench tighten or loosen the lock nut on top to Side Pitch 3 1 2 4-1/2 ... 1/4 in . (0 cm) to side. Tighten the lock nut on top. Mower Deck 3. Ground Figure 14 Adjusting The Mower Deck To Adjust Mower Blade Height And Pitch (Figure 15) NOTE: Adjusting the mower deck will adjust the height and pitch of the mower deck. Lowest Cutting Position 3 1 2...
... pitched forward. Adjust the trunnions first and re-take the three measurements required to level and adjust the pitch of the mower blades from the mower blades to Side 1. Mower Blade 3. Using an adjustable or open ended wrench tighten or loosen the lock nut on top to Side Pitch 3 1 2 4-1/2 ... 1/4 in . (0 cm) to side. Tighten the lock nut on top. Mower Deck 3. Ground Figure 14 Adjusting The Mower Deck To Adjust Mower Blade Height And Pitch (Figure 15) NOTE: Adjusting the mower deck will adjust the height and pitch of the mower deck. Lowest Cutting Position 3 1 2...

Owners Manual
Page 24
... an unthreaded bolt. Spindle 2. Washer 4. 5/8 in . (1.27 cm) of mower blade. 3. Contact your Ariens dealer. Hex Nut Figure 15 REPLACING MOWER BLADE Remove (Figure 16) CAUTION: Mower blades are sharp and can cut you. NEVER weld or straighten mower blades. 1. Install (Figure 16) 1. Do not change angle of cutting edge or round the corner at...
... an unthreaded bolt. Spindle 2. Washer 4. 5/8 in . (1.27 cm) of mower blade. 3. Contact your Ariens dealer. Hex Nut Figure 15 REPLACING MOWER BLADE Remove (Figure 16) CAUTION: Mower blades are sharp and can cut you. NEVER weld or straighten mower blades. 1. Install (Figure 16) 1. Do not change angle of cutting edge or round the corner at...

Owners Manual
Page 25
... reinstallation. Remove battery from unit. Install Factory-Installed Battery (Figure 18) 1. See "TIPPING SEAT FORWARD" on unit. DO NOT overtighten. GB - 25 See "REPLACING MOWER BLADE" on page 22. 3. WARNING: Battery posts, terminals and related accessories contain lead and lead compounds, chemicals known to battery hold down bracket on top of...
... reinstallation. Remove battery from unit. Install Factory-Installed Battery (Figure 18) 1. See "TIPPING SEAT FORWARD" on unit. DO NOT overtighten. GB - 25 See "REPLACING MOWER BLADE" on page 22. 3. WARNING: Battery posts, terminals and related accessories contain lead and lead compounds, chemicals known to battery hold down bracket on top of...

Owners Manual
Page 31
..." on page 29. 4. See "Charging the Battery" on page 20. 2. See "MOVING UNIT MANUALLY" on page 28. 4. Contact your Ariens dealer. 7. Add engine oil. Unit does not move with engine running when using steering levers. Faulty electrical system. 7. Contact your... battery. 4. Faulty PTO belt. 4. Depress operator presence switch by sitting on page 27. 5. Contact your Ariens dealer. GB - 31 Engine runs rough. Check safety interlock system. PTO or mower blades do not engage or shut off. Connect spark plug wire(s) or replace spark plug(s). Clean cooling system.
..." on page 29. 4. See "Charging the Battery" on page 20. 2. See "MOVING UNIT MANUALLY" on page 28. 4. Contact your Ariens dealer. 7. Add engine oil. Unit does not move with engine running when using steering levers. Faulty electrical system. 7. Contact your... battery. 4. Faulty PTO belt. 4. Depress operator presence switch by sitting on page 27. 5. Contact your Ariens dealer. GB - 31 Engine runs rough. Check safety interlock system. PTO or mower blades do not engage or shut off. Connect spark plug wire(s) or replace spark plug(s). Clean cooling system.

Owners Manual
Page 32
... Raw Laminated Belt Hydraulic Drive 03971900 34-Inch Mower Blade 03797300 34-Inch Mulching Blade 04265400 42-Inch Mower Blade 07200523 42-Inch Deck Belt 03971900 50-Inch Mower Blade 07200524 50-Inch Deck Belt ACCESSORIES See your authorized Ariens dealer to add these optional accessories to keep your Ariens dealer. 1. Part No. Faulty parking brake. 1. Adjust steering...
... Raw Laminated Belt Hydraulic Drive 03971900 34-Inch Mower Blade 03797300 34-Inch Mulching Blade 04265400 42-Inch Mower Blade 07200523 42-Inch Deck Belt 03971900 50-Inch Mower Blade 07200524 50-Inch Deck Belt ACCESSORIES See your authorized Ariens dealer to add these optional accessories to keep your Ariens dealer. 1. Part No. Faulty parking brake. 1. Adjust steering...
Owners Manual
Page 36
..., spark plugs, oil, oil filters, air filters, fuel filters, brake linings, brake arms, brake shoes, skid shoes, scraper blades, shear bolts, mower blades, mower vanes, brushes, headlights, light bulbs, knives, cutters. • Any misuse, alteration, improper assembly, improper adjustment, neglect..., or accident which vary from country to you. Differ- LIMITATION OF REMEDY AND DAMAGES Ariens Company's liability under any ...
..., spark plugs, oil, oil filters, air filters, fuel filters, brake linings, brake arms, brake shoes, skid shoes, scraper blades, shear bolts, mower blades, mower vanes, brushes, headlights, light bulbs, knives, cutters. • Any misuse, alteration, improper assembly, improper adjustment, neglect..., or accident which vary from country to you. Differ- LIMITATION OF REMEDY AND DAMAGES Ariens Company's liability under any ...
Parts Catalog
Page 3
... Serial No. 010000 and up Model 915159 (Zoom 42) Kohler with 42" Mower Serial No. 010000 and up Model 915161 (Zoom 50) Kohler with 50" Mower Serial No. 010000 and up Model 915169 (Zoom 34 CARB) Briggs & Stratton with 34" Mower Serial No. 010000 and up Model 915171 (Zoom 42 CARB) Kohler with 42" Mower Serial... SYSTEM Continuity Diagram 25 Electrical System 26 Wiring Diagram 28 MOWER DECKS Mower Deck Lift 30 Mower Deck, Belt and Idlers 32 Belt Covers and Blades 36 3 © Copyright 2012 Ariens Company
... Serial No. 010000 and up Model 915159 (Zoom 42) Kohler with 42" Mower Serial No. 010000 and up Model 915161 (Zoom 50) Kohler with 50" Mower Serial No. 010000 and up Model 915169 (Zoom 34 CARB) Briggs & Stratton with 34" Mower Serial No. 010000 and up Model 915171 (Zoom 42 CARB) Kohler with 42" Mower Serial... SYSTEM Continuity Diagram 25 Electrical System 26 Wiring Diagram 28 MOWER DECKS Mower Deck Lift 30 Mower Deck, Belt and Idlers 32 Belt Covers and Blades 36 3 © Copyright 2012 Ariens Company
Parts Catalog
Page 36
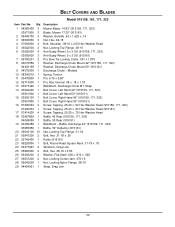
... 06700201 14 05920900 15 06543100 16 06435700 17 01258100 18 06713500 19 04424951 Qty. Description 1 Chute Reinforcement 1 Molded Chute 1 Pin, 5/16 x 3.88" 2 Blade, Mower 17.35 (915157, 169) 1 Blade, 17.34 OS Mulch (915322) 2 Washer, Beveled .63 x 1.625 x .14 2 Nut, Hex .62-18 1 Bracket, Baffle Discharge 34" 2 ...Bolt, Hex .31-18 x .75 2 Nut, .31-18 Nyloc Flange 1 Wireform, Drag Link 2 Molded Cover, Belt 4 Screw, Tapping .25-20 x .50 Hex Washer Head 2 Pin,...
... 06700201 14 05920900 15 06543100 16 06435700 17 01258100 18 06713500 19 04424951 Qty. Description 1 Chute Reinforcement 1 Molded Chute 1 Pin, 5/16 x 3.88" 2 Blade, Mower 17.35 (915157, 169) 1 Blade, 17.34 OS Mulch (915322) 2 Washer, Beveled .63 x 1.625 x .14 2 Nut, Hex .62-18 1 Bracket, Baffle Discharge 34" 2 ...Bolt, Hex .31-18 x .75 2 Nut, .31-18 Nyloc Flange 1 Wireform, Drag Link 2 Molded Cover, Belt 4 Screw, Tapping .25-20 x .50 Hex Washer Head 2 Pin,...

Parts Catalog
Page 38
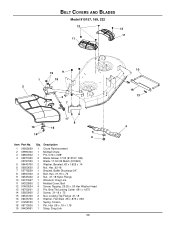
BELT COVERS AND BLADES Model 915159, 161, 171, 323 16 9 20 20 12 10 11 8 17 16 15 20 17 915159, 171, 323 14 5 6 4 7 29 13 21 2 1 21 24 3 20 18 19 23 9 15 17 16 17 14 20 12 22 25 26 20 20 26 27 915161 10 8 28 11 29 7 24 13 19 21 2 18 21 5 1 3 20 6 4 23 38
BELT COVERS AND BLADES Model 915159, 161, 171, 323 16 9 20 20 12 10 11 8 17 16 15 20 17 915159, 171, 323 14 5 6 4 7 29 13 21 2 1 21 24 3 20 18 19 23 9 15 17 16 17 14 20 12 22 25 26 20 20 26 27 915161 10 8 28 11 29 7 24 13 19 21 2 18 21 5 1 3 20 6 4 23 38
Parts Catalog
Page 39
...1 Baffle, 42 Rear (915159, 171, 323) 04069059 1 Baffle, 50 Rear (915161) 19 04395459 1 Weldment - BELT COVERS AND BLADES Model 915159, 161, 171, 323 Item Part No. Description 1 04265400 3 Mower Blade, 14.83" (915159, 171, 323) 03971900 3 Blade, Mower 17.35" (915161) 2 06445700 3 Washer, Bellville .63... x 1.625 x .14 3 06500630 3 Nut, Hex .62-18 4 07056800 3 Bolt, Shoulder .38-16 x 2.50 Hex Washer Head 5 06542000 3 Nut, Locking Top...
...1 Baffle, 42 Rear (915159, 171, 323) 04069059 1 Baffle, 50 Rear (915161) 19 04395459 1 Weldment - BELT COVERS AND BLADES Model 915159, 161, 171, 323 Item Part No. Description 1 04265400 3 Mower Blade, 14.83" (915159, 171, 323) 03971900 3 Blade, Mower 17.35" (915161) 2 06445700 3 Washer, Bellville .63... x 1.625 x .14 3 06500630 3 Nut, Hex .62-18 4 07056800 3 Bolt, Shoulder .38-16 x 2.50 Hex Washer Head 5 06542000 3 Nut, Locking Top...

