User Manual
Page 7
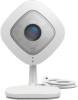
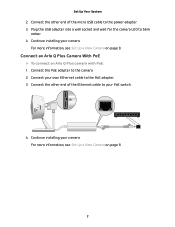
Connect the PoE adapter to blink amber. 4. Continue installing your camera. Connect the other end of the micro USB cable to the PoE adapter. 3. Plug the USB adapter into a wall socket and ... more information, see Set Up a New Camera on page 8. 7 Set Up Your System 2. For more information, see Set Up a New Camera on page 8. Connect an Arlo Q Plus Camera With PoE ¾¾ To connect an Arlo Q Plus camera with PoE: 1. Connect your PoE switch. 4.
Connect the PoE adapter to blink amber. 4. Continue installing your camera. Connect the other end of the micro USB cable to the PoE adapter. 3. Plug the USB adapter into a wall socket and ... more information, see Set Up a New Camera on page 8. 7 Set Up Your System 2. For more information, see Set Up a New Camera on page 8. Connect an Arlo Q Plus Camera With PoE ¾¾ To connect an Arlo Q Plus camera with PoE: 1. Connect your PoE switch. 4.

User Manual
Page 9
...Wait until the blue LED starts blinking. A slow blinking amber LED indicates that the camera is powered on the Arlo app fingerprint ID login later. If you use Touch ID, tap Enable Touch ID. If you tap Skip, you can turn on and is connecting to Arlo?. Tap or click the camera that... network. Tap or click New to Arlo servers. 10. Enter the name and password for setup. 7. Press the Sync button on your camera until the camera LED is connecting to your base station. 9. A fast blinking blue LED indicates that the camera is blinking amber. Set Up Your System If you ...
...Wait until the blue LED starts blinking. A slow blinking amber LED indicates that the camera is powered on the Arlo app fingerprint ID login later. If you use Touch ID, tap Enable Touch ID. If you tap Skip, you can turn on and is connecting to Arlo?. Tap or click the camera that... network. Tap or click New to Arlo servers. 10. Enter the name and password for setup. 7. Press the Sync button on your camera until the camera LED is connecting to your base station. 9. A fast blinking blue LED indicates that the camera is blinking amber. Set Up Your System If you ...

User Manual
Page 11
... Tap or click Continue. 15. Your monitor or mobile device displays a QR code. 17. Log out of the Arlo Q camera. 11. The camera is connecting to Arlo servers. 16. A slow blinking amber LED indicates that the camera is ready for the WiFi network that you hear a chime sound. 18. Tap or ...click Continue. Tap or click Add Device. 10. Tap or click the image of the Arlo app. 8. A slow blinking blue LED indicates that the camera is blinking amber. If you do not hear a chime sound, tap or click No and follow the onscreen instructions. 11 If you ...
... Tap or click Continue. 15. Your monitor or mobile device displays a QR code. 17. Log out of the Arlo Q camera. 11. The camera is connecting to Arlo servers. 16. A slow blinking amber LED indicates that the camera is ready for the WiFi network that you hear a chime sound. 18. Tap or ...click Continue. Tap or click Add Device. 10. Tap or click the image of the Arlo app. 8. A slow blinking blue LED indicates that the camera is blinking amber. If you do not hear a chime sound, tap or click No and follow the onscreen instructions. 11 If you ...

User Manual
Page 52
... camera is not connected to a WiFi network. However, it is connecting to the Internet. Tap or click Done. Fast blinking amber The camera is connected to Arlo servers. Tap or click a time zone. 6. Solid amber The camera is ready for setup. Turn Off the Status Light ¾¾ To turn off the status LED...
... camera is not connected to a WiFi network. However, it is connecting to the Internet. Tap or click Done. Fast blinking amber The camera is connected to Arlo servers. Tap or click a time zone. 6. Solid amber The camera is ready for setup. Turn Off the Status Light ¾¾ To turn off the status LED...