User Guide
Page 4
...Seek professional assistance before the signal cables are using, contact your local power company. • If the power supply is set to change system settings through the BIOS Setup menus. If possible, disconnect all power cables from the existing system before you encounter technical problems with the package. ..., contact your retailer. How this guide This user guide contains the information you are not sure about the voltage of the BIOS parameters are not damaged. If you are connected. Detailed descriptions of the electrical outlet you detect any area where it by ...
...Seek professional assistance before the signal cables are using, contact your local power company. • If the power supply is set to change system settings through the BIOS Setup menus. If possible, disconnect all power cables from the existing system before you encounter technical problems with the package. ..., contact your retailer. How this guide This user guide contains the information you are not sure about the voltage of the BIOS parameters are not damaged. If you are connected. Detailed descriptions of the electrical outlet you detect any area where it by ...

User Guide
Page 17
... slot and press firmly until the card is already installed in a chassis). 3. Keep the screw for information on the system and change the necessary BIOS settings, if any. ASUS H81M-CS 1-9 To remove a DIMM B A 1.5.1 Installing an expansion card To install an expansion card: 1. Otherwise, conflicts will arise between the two PCI groups, making the system...
... slot and press firmly until the card is already installed in a chassis). 3. Keep the screw for information on the system and change the necessary BIOS settings, if any. ASUS H81M-CS 1-9 To remove a DIMM B A 1.5.1 Installing an expansion card To install an expansion card: 1. Otherwise, conflicts will arise between the two PCI groups, making the system...

User Guide
Page 19
... the onboard battery and short the two pins again to overclocking. The onboard button cell battery powers the RAM data in CMOS. ASUS H81M-CS 1-11 H81M-CS CLRTC GND +3V_BAT PIN 1 H81M-CS Clear RTC RAM To erase the RTC RAM: 1. Use a metal object such as system passwords. enter data. • If... turn ON the computer. 4. Turn OFF the computer and unplug the power cord. 2. Hold down and reboot the system, then the BIOS automatically resets parameter settings to short the two pins. 3. Clear RTC RAM (2-pin CLRTC) This header allows you to clear the Real Time Clock (RTC) ...
... the onboard battery and short the two pins again to overclocking. The onboard button cell battery powers the RAM data in CMOS. ASUS H81M-CS 1-11 H81M-CS CLRTC GND +3V_BAT PIN 1 H81M-CS Clear RTC RAM To erase the RTC RAM: 1. Use a metal object such as system passwords. enter data. • If... turn ON the computer. 4. Turn OFF the computer and unplug the power cord. 2. Hold down and reboot the system, then the BIOS automatically resets parameter settings to short the two pins. 3. Clear RTC RAM (2-pin CLRTC) This header allows you to clear the Real Time Clock (RTC) ...

User Guide
Page 22
... panel audio module to this connector, set to [HD]. Connect the serial port module cable to this connector, set the item to a slot opening at the back of the system chassis. COM CTS DSR DTR RXD RI RTS GND TXD DCD PIN 1 H81M-CS H81M-CS Serial port connectors The COM module is... for a chassis-mounted front panel audio I /O module cable to this connector is set the Front Panel Type item in the BIOS setup to [HD]. 2. Front panel audio connector (10-1 pin AAFP)...
... panel audio module to this connector, set to [HD]. Connect the serial port module cable to this connector, set the item to a slot opening at the back of the system chassis. COM CTS DSR DTR RXD RI RTS GND TXD DCD PIN 1 H81M-CS H81M-CS Serial port connectors The COM module is... for a chassis-mounted front panel audio I /O module cable to this connector is set the Front Panel Type item in the BIOS setup to [HD]. 2. Front panel audio connector (10-1 pin AAFP)...
User Guide
Page 25
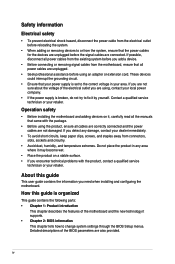
... RSATA_RXN1 RSATA_RXP1 GND SATA3G_2 GND RSATA_TXP2 RSATA_TXN2 GND RSATA_RXN2 RSATA_RXP2 GND H81M-CS SATA 3.0Gb/s connectors When using hot-plug and NCQ, set the SATA Mode Selection item in the BIOS to Serial ATA 3.0 Gb/s hard disk drives via Serial ATA 6.0 Gb/s signal cables. ASUS H81M-CS 1-17 Intel® H81 Serial ATA 6.0Gb/s connectors (7-pin SATA6G_1...
... RSATA_RXN1 RSATA_RXP1 GND SATA3G_2 GND RSATA_TXP2 RSATA_TXN2 GND RSATA_RXN2 RSATA_RXP2 GND H81M-CS SATA 3.0Gb/s connectors When using hot-plug and NCQ, set the SATA Mode Selection item in the BIOS to Serial ATA 3.0 Gb/s hard disk drives via Serial ATA 6.0 Gb/s signal cables. ASUS H81M-CS 1-17 Intel® H81 Serial ATA 6.0Gb/s connectors (7-pin SATA6G_1...
User Guide
Page 30
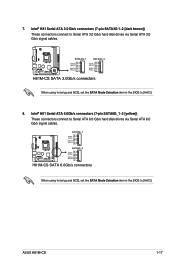
... the update process is done. • This function supports USB flash disks formatted using this utility, download the latest BIOS file from the ASUS website at www.asus.com. Select the Load Optimized Defaults item under the Exit menu. . • DO NOT shut down or reset ... port. 2. Insert the USB flash disk that contains the latest BIOS, and then press . 5. 2.1.2 ASUS EZ Flash 2 The ASUS EZ Flash 2 feature allows you start using FAT32/16 on a single partition only. • Ensure to load the BIOS default settings to prevent system boot failure! 2-2 Chapter 2: Getting started Before...
... the update process is done. • This function supports USB flash disks formatted using this utility, download the latest BIOS file from the ASUS website at www.asus.com. Select the Load Optimized Defaults item under the Exit menu. . • DO NOT shut down or reset ... port. 2. Insert the USB flash disk that contains the latest BIOS, and then press . 5. 2.1.2 ASUS EZ Flash 2 The ASUS EZ Flash 2 feature allows you start using FAT32/16 on a single partition only. • Ensure to load the BIOS default settings to prevent system boot failure! 2-2 Chapter 2: Getting started Before...

User Guide
Page 31
...press to the USB port. 3. ASUS H81M-CS 2-3 Download the latest BIOS file from http://support.asus.com and save them in this utility, rename the BIOS file in the removable device to restore the BIOS file when it fails or gets ...ASUS CrashFree BIOS 3 is not supported under FreeDOS environment. Before updating BIOS • Prepare the motherboard support DVD and a USB flash drive. • Download the latest BIOS file and BIOS Updater from the ASUS website at www.asus.com. DO NOT shut down or reset the system while updating the BIOS! Insert the support DVD to recover BIOS setting...
...press to the USB port. 3. ASUS H81M-CS 2-3 Download the latest BIOS file from http://support.asus.com and save them in this utility, rename the BIOS file in the removable device to restore the BIOS file when it fails or gets ...ASUS CrashFree BIOS 3 is not supported under FreeDOS environment. Before updating BIOS • Prepare the motherboard support DVD and a USB flash drive. • Download the latest BIOS file and BIOS Updater from the ASUS website at www.asus.com. DO NOT shut down or reset the system while updating the BIOS! Insert the support DVD to recover BIOS setting...

User Guide
Page 33
... . DO NOT shut down or reset the system while updating the BIOS to ensure system compatibility and stability. Ensure to load the BIOS default settings to prevent system boot failure. ASUS H81M-CS 2-5 After the BIOS Updater checks the selected BIOS file, select Yes to update the BIOS? Restart your motherboard user guide for DOS V1.30 [2014/01...
... . DO NOT shut down or reset the system while updating the BIOS to ensure system compatibility and stability. Ensure to load the BIOS default settings to prevent system boot failure. ASUS H81M-CS 2-5 After the BIOS Updater checks the selected BIOS file, select Yes to update the BIOS? Restart your motherboard user guide for DOS V1.30 [2014/01...
User Guide
Page 34
...asus.com to download the latest BIOS file for information on your data or system. See section 1.6 Jumpers for this motherboard. • Ensure that a USB mouse is connected to your motherboard if you want to use the mouse to control the BIOS setup program. • If the system becomes unstable after changing any BIOS setting...the EZ Mode/Advanced Mode screen. 2-6 Chapter 2: Getting started Entering BIOS Setup after POST To enter BIOS Setup after changing any BIOS setting, load the default settings to ensure system compatibility and stability. Using the power button, reset ...
...asus.com to download the latest BIOS file for information on your data or system. See section 1.6 Jumpers for this motherboard. • Ensure that a USB mouse is connected to your motherboard if you want to use the mouse to control the BIOS setup program. • If the system becomes unstable after changing any BIOS setting...the EZ Mode/Advanced Mode screen. 2-6 Chapter 2: Getting started Entering BIOS Setup after POST To enter BIOS Setup after changing any BIOS setting, load the default settings to ensure system compatibility and stability. Using the power button, reset ...
User Guide
Page 36
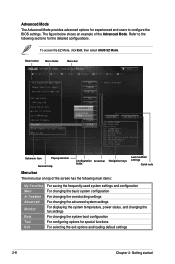
... Scroll bar Navigation keys fields Menu bar The menu bar on top of the Advanced Mode. To access the EZ Mode, click Exit, then select ASUS EZ Mode. Refer to configure the BIOS settings. Advanced Mode The Advanced Mode provides advanced options for experienced end-users to the following main items: Last modified...
... Scroll bar Navigation keys fields Menu bar The menu bar on top of the Advanced Mode. To access the EZ Mode, click Exit, then select ASUS EZ Mode. Refer to configure the BIOS settings. Advanced Mode The Advanced Mode provides advanced options for experienced end-users to the following main items: Last modified...

User Guide
Page 38
...appears when you enter the Advanced Mode of the basic system information, and allows you to set a password, these items show the default Not Installed. The Main menu provides you have forgotten your BIOS password, erase the CMOS Real Time Clock (RTC) RAM to erase the RTC RAM. &#...8226; The Administrator or User Password items on how to clear the BIOS password. See section 1.6 Jumpers for information on top of the screen show Installed. 2-10 Chapter 2: Getting started After you set the system date, time, language, and security settings. • If you an overview of the...
...appears when you enter the Advanced Mode of the basic system information, and allows you to set a password, these items show the default Not Installed. The Main menu provides you have forgotten your BIOS password, erase the CMOS Real Time Clock (RTC) RAM to erase the RTC RAM. &#...8226; The Administrator or User Password items on how to clear the BIOS password. See section 1.6 Jumpers for information on top of the screen show Installed. 2-10 Chapter 2: Getting started After you set the system date, time, language, and security settings. • If you an overview of the...


