
User Manual
Page 7
... are unplugged. • Seek professional assistance before using , contact your power supply is set to a hazardous material collection point. • Never replace the battery with your motherboard) and is defined as a CLASS 1 LASER PRODUCT. INVISIBLE LASER RADIATION, AVOID EXPOSURE TO BEAM. • ... you add a device. • Before connecting or removing signal cables from the motherboard, ensure that all power cables from the system, ensure that your local power company. • If the power supply is an optional component (may or may not be included in your regular household ...
... are unplugged. • Seek professional assistance before using , contact your power supply is set to a hazardous material collection point. • Never replace the battery with your motherboard) and is defined as a CLASS 1 LASER PRODUCT. INVISIBLE LASER RADIATION, AVOID EXPOSURE TO BEAM. • ... you add a device. • Before connecting or removing signal cables from the motherboard, ensure that all power cables from the system, ensure that your local power company. • If the power supply is an optional component (may or may not be included in your regular household ...

User Manual
Page 16
... into 256-color boot logos to update the BIOS from switching power supply unit (PSU). ASUS Anti-Surge Protection This special design prevents expensive devices and the motherboard from damage caused by power surges from a USB flash disk before entering the OS. ASUS Q-Fan ASUS Q-Fan technology intelligently adjusts CPU fan speeds according to system loading to...
... into 256-color boot logos to update the BIOS from switching power supply unit (PSU). ASUS Anti-Surge Protection This special design prevents expensive devices and the motherboard from damage caused by power surges from a USB flash disk before entering the OS. ASUS Q-Fan ASUS Q-Fan technology intelligently adjusts CPU fan speeds according to system loading to...

User Manual
Page 17
... do so may cause severe damage to overclocking failure. Onboard LED The motherboard comes with a standby power LED that lights up to indicate that the system is in soft-off the ATX power supply and detach its packaging comply with the European Union's Restriction on a... location of the following precautions before you install motherboard components or change any motherboard settings. • Unplug the power cord from the wall socket before removing or plugging in the bag that you uninstall any component, switch off mode. ASUS M4A785-M 1-5 C.P.R. (CPU Parameter Recall) The BIOS...
... do so may cause severe damage to overclocking failure. Onboard LED The motherboard comes with a standby power LED that lights up to indicate that the system is in soft-off the ATX power supply and detach its packaging comply with the European Union's Restriction on a... location of the following precautions before you install motherboard components or change any motherboard settings. • Unplug the power cord from the wall socket before removing or plugging in the bag that you uninstall any component, switch off mode. ASUS M4A785-M 1-5 C.P.R. (CPU Parameter Recall) The BIOS...
User Manual
Page 29
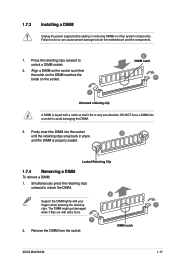
Press the retaining clips outward to both the motherboard and the components. 1. DO NOT force a DIMM into the socket until the retaining clips snap back in only one direction. Locked Retaining Clip 1.7.4 Removing a DIMM ... ASUS M4A785-M 1-17 Failure to do so can cause severe damage to unlock a DIMM socket. 2. Remove the DIMM from the socket. Align a DIMM on the socket such that the notch on the DIMM matches the break on the socket. 2 DIMM notch 1 1 Unlocked retaining clip A DIMM is properly seated. 1.7.3 Installing a DIMM Unplug the power supply...
Press the retaining clips outward to both the motherboard and the components. 1. DO NOT force a DIMM into the socket until the retaining clips snap back in only one direction. Locked Retaining Clip 1.7.4 Removing a DIMM ... ASUS M4A785-M 1-17 Failure to do so can cause severe damage to unlock a DIMM socket. 2. Remove the DIMM from the socket. Align a DIMM on the socket such that the notch on the DIMM matches the break on the socket. 2 DIMM notch 1 1 Unlocked retaining clip A DIMM is properly seated. 1.7.3 Installing a DIMM Unplug the power supply...

User Manual
Page 35
... 20-pin power plug can provide at http://support.asus. The system may become unstable or may not boot up . • We recommend that you use an ATX 12V Specification 2.0‑compliant power supply unit (PSU) with 20-pin and 4-pin power plugs, ensure that you use a PSU with a minimum of 300W. 1.10.2 Internal connectors 1. ASUS M4A785-M 1-23...
... 20-pin power plug can provide at http://support.asus. The system may become unstable or may not boot up . • We recommend that you use an ATX 12V Specification 2.0‑compliant power supply unit (PSU) with 20-pin and 4-pin power plugs, ensure that you use a PSU with a minimum of 300W. 1.10.2 Internal connectors 1. ASUS M4A785-M 1-23...


