User Guide
Page 3
... Safety information vi Care & Cleaning vii Chapter 1: Product introduction 1.1 Welcome 1-1 1.2 Package contents 1-1 1.3 Monitor introduction 1-2 1.3.1 Front view 1-2 1.3.2 Back view 1-3 Chapter 2: Setup 2.1 Assembling the monitor base 2-1 2.2 Adjusting the monitor 2-1 2.3 Detaching the arm/base (for VESA wall mount 2-2 2.4 Connecting the cables 2-3 2.5 Turning on the monitor 2-3 Chapter 3: General instruction 3.1 OSD (On-Screen Display) menu 3-1 3.1.1 How to reconfigure 3-1 3.1.2 OSD...
... Safety information vi Care & Cleaning vii Chapter 1: Product introduction 1.1 Welcome 1-1 1.2 Package contents 1-1 1.3 Monitor introduction 1-2 1.3.1 Front view 1-2 1.3.2 Back view 1-3 Chapter 2: Setup 2.1 Assembling the monitor base 2-1 2.2 Adjusting the monitor 2-1 2.3 Detaching the arm/base (for VESA wall mount 2-2 2.4 Connecting the cables 2-3 2.5 Turning on the monitor 2-3 Chapter 3: General instruction 3.1 OSD (On-Screen Display) menu 3-1 3.1.1 How to reconfigure 3-1 3.1.2 OSD...

User Guide
Page 4
... user is encouraged to try to which the receiver is connected. • Consult the dealer or an experienced radio/TV technician for connection of the monitor to the graphics card is required to Part 15 of Communications Statement This digital apparatus does not exceed the Class B limits for energy efficiency. The...
... user is encouraged to try to which the receiver is connected. • Consult the dealer or an experienced radio/TV technician for connection of the monitor to the graphics card is required to Part 15 of Communications Statement This digital apparatus does not exceed the Class B limits for energy efficiency. The...

User Guide
Page 6
...This symbol of the crossed out wheeled bin indicates that came with the package. • To prevent fire or shock hazard, never expose the monitor to rain or moisture. • Never try to your home, consult your dealer or local power company. • Use the appropriate power plug... appropriate configured receptacles marked between 100-240V AC. • If you encounter technical problems with your retailer. The dangerous high voltages inside the monitor may become wet. Never place this product near or over a radiator or heat source unless proper ventilation is broken, do not try to...
...This symbol of the crossed out wheeled bin indicates that came with the package. • To prevent fire or shock hazard, never expose the monitor to rain or moisture. • Never try to your home, consult your dealer or local power company. • Use the appropriate power plug... appropriate configured receptacles marked between 100-240V AC. • If you encounter technical problems with your retailer. The dangerous high voltages inside the monitor may become wet. Never place this product near or over a radiator or heat source unless proper ventilation is broken, do not try to...

User Guide
Page 7
... Power Switch and turn off the Power Switch for hours. • When the screen becomes black or flashes, or cannot work anymore, contact your monitor, it . The following symptoms are normal with a lint-free, non-abrasive cloth. NOTE: Tips and additional information to complete a task. The .... • When the same image is better to disconnect the cables and power cord. Follow the correct lifting techniques when positioning the monitor. Stubborn stains may remain after switching the image. Never spray cleaner directly on the desktop pattern you lift or reposition your dealer or ...
... Power Switch and turn off the Power Switch for hours. • When the screen becomes black or flashes, or cannot work anymore, contact your monitor, it . The following symptoms are normal with a lint-free, non-abrasive cloth. NOTE: Tips and additional information to complete a task. The .... • When the same image is better to disconnect the cables and power cord. Follow the correct lifting techniques when positioning the monitor. Stubborn stains may remain after switching the image. Never spray cleaner directly on the desktop pattern you lift or reposition your dealer or ...
User Guide
Page 9
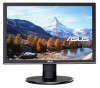
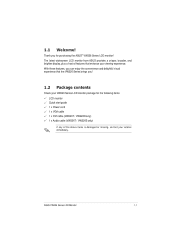
... delightful visual experience that enhance your retailer immediately. Thank you ! 1.2 Package contents Check your VW226 Series LCD monitor package for purchasing the ASUS® VW226 Series LCD monitor! ASUS VW226 Series LCD Monitor 1-1 The latest widescreen LCD monitor from ASUS provides a crisper, broader, and brighter display, plus a host of features that the VW226 Series brings you for...
... delightful visual experience that enhance your retailer immediately. Thank you ! 1.2 Package contents Check your VW226 Series LCD monitor package for purchasing the ASUS® VW226 Series LCD monitor! ASUS VW226 Series LCD Monitor 1-1 The latest widescreen LCD monitor from ASUS provides a crisper, broader, and brighter display, plus a host of features that the VW226 Series brings you for...

User Guide
Page 10
Button: • Press this button to increase the value of the function selected or move right/down to the next function. • This is activated. 4. 1.3 Monitor introduction 1.3.1 Front view Base 1 2 3 4 5 1. Button: • Use this button for 2-4 seconds (for Brightness adjustment. 1-2 Chapter 1: Product introduction MENU Button: • Press this button to decrease ...). 2. Button: • Press this button to the previous menu as the OSD menu is also a hotkey for Volume adjustment or Contrast adjustment depending on the monitor models. 3.
Button: • Press this button to increase the value of the function selected or move right/down to the next function. • This is activated. 4. 1.3 Monitor introduction 1.3.1 Front view Base 1 2 3 4 5 1. Button: • Use this button for 2-4 seconds (for Brightness adjustment. 1-2 Chapter 1: Product introduction MENU Button: • Press this button to decrease ...). 2. Button: • Press this button to the previous menu as the OSD menu is also a hotkey for Volume adjustment or Contrast adjustment depending on the monitor models. 3.

User Guide
Page 11
.... This port connects the power connector from the bundled power cord. 3. Power button/power indicator • Press this button to turn the monitor on/off • The color definition of the power indicator is for VESA Wall Mount Rear connectors 12 34 Rear connectors 1. This 24...-pin port is as the below table. ASUS VW226 Series LCD Monitor 1-3 Audio-in port. Status Blue Amber OFF Description ON Standby mode OFF 1.3.2 Back view Stereo speaker Stereo speaker Screw holes for...
.... This port connects the power connector from the bundled power cord. 3. Power button/power indicator • Press this button to turn the monitor on/off • The color definition of the power indicator is for VESA Wall Mount Rear connectors 12 34 Rear connectors 1. This 24...-pin port is as the below table. ASUS VW226 Series LCD Monitor 1-3 Audio-in port. Status Blue Amber OFF Description ON Standby mode OFF 1.3.2 Back view Stereo speaker Stereo speaker Screw holes for...

User Guide
Page 13
... comfortable for you. • Hold the stand to prevent the monitor from falling when you change its angle. 2.1 Assembling the monitor base To assemble the monitor base: 1. We recommend that you look at the full face of the monitor face down on a table. 2. Connect the base with soft ...cloth to prevent damage to the monitor. 2.2 Adjusting the monitor • For optimal viewing, we ...
... comfortable for you. • Hold the stand to prevent the monitor from falling when you change its angle. 2.1 Assembling the monitor base To assemble the monitor base: 1. We recommend that you look at the full face of the monitor face down on a table. 2. Connect the base with soft ...cloth to prevent damage to the monitor. 2.2 Adjusting the monitor • For optimal viewing, we ...

User Guide
Page 14
... the screw holes Figure 1 Two screws Arm/base Figure 2 We recommend that you cover the table surface with soft cloth to prevent damage to the monitor. 2-2 Chapter 2: Setup Use a screwdriver to remove the two screws on a table. 2. To detach the arm/base: 1. Rubbers in the four screw holes (Figure 1). 3. ...Have the front of the VW226 Series LCD monitor is specially designed for VESA wall mount. 2.3 Detaching the arm/base (for VESA wall mount) The detachable arm/base of the...
... the screw holes Figure 1 Two screws Arm/base Figure 2 We recommend that you cover the table surface with soft cloth to prevent damage to the monitor. 2-2 Chapter 2: Setup Use a screwdriver to remove the two screws on a table. 2. To detach the arm/base: 1. Rubbers in the four screw holes (Figure 1). 3. ...Have the front of the VW226 Series LCD monitor is specially designed for VESA wall mount. 2.3 Detaching the arm/base (for VESA wall mount) The detachable arm/base of the...

User Guide
Page 15
b. Cable hook 2.5 Turning on the monitor Gently press the power button . c. Connect the other end to a...audio cable: connect one end of the power cord securely to the monitor's AC input port, the other end of the VGA/ DVI cable to show that the monitor is ON. See page 1-2 for the location of the OSD ...functions. 2. 2.4 Connecting the cables 1. Tighten the two screws to the LCD monitor's VGA/DVI port. When both the VGA and the DVI cables are connected, you can ...: connect one end of the audio cable to the monitor's Audio-in blue to your computer's VGA/ DVI port...
b. Cable hook 2.5 Turning on the monitor Gently press the power button . c. Connect the other end to a...audio cable: connect one end of the power cord securely to the monitor's AC input port, the other end of the VGA/ DVI cable to show that the monitor is ON. See page 1-2 for the location of the OSD ...functions. 2. 2.4 Connecting the cables 1. Tighten the two screws to the LCD monitor's VGA/DVI port. When both the VGA and the DVI cables are connected, you can ...: connect one end of the audio cable to the monitor's Audio-in blue to your computer's VGA/ DVI port...
User Guide
Page 17
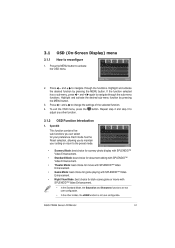
.... 2. Spendid This function contains five sub-functions you to maintain your setting or return to navigate through the functions. Press the MENU button to reconfigure 1. ASUS VW226 Series LCD Monitor 3-1
.... 2. Spendid This function contains five sub-functions you to maintain your setting or return to navigate through the functions. Press the MENU button to reconfigure 1. ASUS VW226 Series LCD Monitor 3-1
User Guide
Page 19
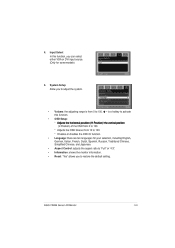
is from 10 to 120. * Enables or disables the DDC/CI function. • Language: there are ten languages for some models) 5. ASUS VW226 Series LCD Monitor 3-3 Input Select In this function. • OSD Setup: * Adjusts the horizontal postition (H-Position)/ the vertical position (V-Position) of the OSD from 0 to 100. * Adjusts ...Italian, French, Dutch, Spanish, Russian, Traditional Chinese, Simplified Chinese, and Japanese. • Aspect Control: adjusts the aspect ratio to "Full" or "4:3". • Information: shows the monitor information. • Reset: "Yes" allows you to 100.
is from 10 to 120. * Enables or disables the DDC/CI function. • Language: there are ten languages for some models) 5. ASUS VW226 Series LCD Monitor 3-3 Input Select In this function. • OSD Setup: * Adjusts the horizontal postition (H-Position)/ the vertical position (V-Position) of the OSD from 0 to 100. * Adjusts ...Italian, French, Dutch, Spanish, Russian, Traditional Chinese, Simplified Chinese, and Japanese. • Aspect Control: adjusts the aspect ratio to "Full" or "4:3". • Information: shows the monitor information. • Reset: "Yes" allows you to 100.

User Guide
Page 21
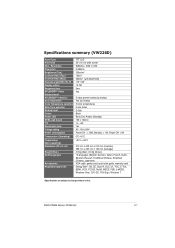
Resolution Pixel pitch Brightness (Typ.) Contrast Ratio (Typ.) Contrast Ratio (Max.) Viewing angle(H/V) CR>10 Display colors Response time SPLENDID™ Video Enhancement SPLENDID™ selection Auto adjustment Color temperature selection Skin-Tone selection Digital input Analog input Audio-in port Colors Speaker (Built-in) Power LED VESA wall mount Tilt Kensington lock Voltage rating Power consumption Temperature (Operating) Temperature (Non-operating) Dimension (W x H x D) Weight (Esti.) Multi-languages Accessories Regulation approvals TFT LCD 22" (16:10) wide screen WSXGA+ 1680 x ...
Resolution Pixel pitch Brightness (Typ.) Contrast Ratio (Typ.) Contrast Ratio (Max.) Viewing angle(H/V) CR>10 Display colors Response time SPLENDID™ Video Enhancement SPLENDID™ selection Auto adjustment Color temperature selection Skin-Tone selection Digital input Analog input Audio-in port Colors Speaker (Built-in) Power LED VESA wall mount Tilt Kensington lock Voltage rating Power consumption Temperature (Operating) Temperature (Non-operating) Dimension (W x H x D) Weight (Esti.) Multi-languages Accessories Regulation approvals TFT LCD 22" (16:10) wide screen WSXGA+ 1680 x ...
User Guide
Page 23
Resolution Pixel pitch Brightness (Typ.) Contrast Ratio (Typ.) Contrast Ratio (Max.) Viewing angle(H/V) CR>10 Display colors Response time SPLENDID™ Video Enhancement SPLENDID™ selection Auto adjustment Color temperature selection Skin-Tone selection Analog input Colors Power LED VESA wall mount Tilt Kensington lock Voltage rating Power consumption Temperature (Operating) Temperature (Non-operating) Dimension (W x H x D) Weight (Esti.) Multi-languages Accessories Regulation approvals TFT LCD 22" (16:10) wide screen WSXGA+ 1680 x 1050 0.282mm 250cd/m2 1000:1 50000:1 (with ASCR ON...
Resolution Pixel pitch Brightness (Typ.) Contrast Ratio (Typ.) Contrast Ratio (Max.) Viewing angle(H/V) CR>10 Display colors Response time SPLENDID™ Video Enhancement SPLENDID™ selection Auto adjustment Color temperature selection Skin-Tone selection Analog input Colors Power LED VESA wall mount Tilt Kensington lock Voltage rating Power consumption Temperature (Operating) Temperature (Non-operating) Dimension (W x H x D) Weight (Esti.) Multi-languages Accessories Regulation approvals TFT LCD 22" (16:10) wide screen WSXGA+ 1680 x 1050 0.282mm 250cd/m2 1000:1 50000:1 (with ASCR ON...
User Guide
Page 24
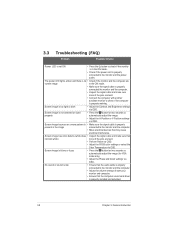
... and make sure none of the pins are screen image in the ON mode. • Make sure the signal cable is properly connected the monitor and the computer. • Inspect the signal cable and make sure that the computer sound card driver is properly installed and activated. 3-8 Chapter...VGA mode only). • Adjust the Phase and Clock settings via OSD. The power LED lights amber and there is no • Check if the monitor and the computer are bent. • Perform Reset via OSD. • Adjust the R/G/B color settings or select the Color Temperature via OSD. 3.3 ...
... and make sure none of the pins are screen image in the ON mode. • Make sure the signal cable is properly connected the monitor and the computer. • Inspect the signal cable and make sure that the computer sound card driver is properly installed and activated. 3-8 Chapter...VGA mode only). • Adjust the Phase and Clock settings via OSD. The power LED lights amber and there is no • Check if the monitor and the computer are bent. • Perform Reset via OSD. • Adjust the R/G/B color settings or select the Color Temperature via OSD. 3.3 ...
User Guide
Page 25
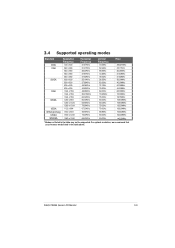
For optimal resolution, we recommend that you choose a mode listed in the table may not be supported. ASUS VW226 Series LCD Monitor 3-9 3.4 Supported operating modes Standard DOS VGA SVGA XGA SXGA VESA VESA (primary) UXGA WSXGA Resolution Frequency 720 x 400 640 x 480 640 x 480 640 x 480 640 x ...
For optimal resolution, we recommend that you choose a mode listed in the table may not be supported. ASUS VW226 Series LCD Monitor 3-9 3.4 Supported operating modes Standard DOS VGA SVGA XGA SXGA VESA VESA (primary) UXGA WSXGA Resolution Frequency 720 x 400 640 x 480 640 x 480 640 x 480 640 x ...


