User Manual
Page 1
D1788PK 7" LCD MONITOR, DVD PLAYER WITH BUILT-IN BATTERY
D1788PK 7" LCD MONITOR, DVD PLAYER WITH BUILT-IN BATTERY

User Manual
Page 2
... LCD panel or video monitor is protected by Macrovision Corporation, and is prohibited. An LCD panel or video monitor used for television reception, video or DVD play , the LCD panel or video monitor must be installed so that operates when the vehicle is in gear or when the parking brake is... navigation. If the LCD panel or video monitor is applied. Notice: This Product incorporates copyright protection technology that is used for television reception, video or DVD play that these features will not be visible, directly or indirectly, to the operator of the motor vehicle. 2
... LCD panel or video monitor is protected by Macrovision Corporation, and is prohibited. An LCD panel or video monitor used for television reception, video or DVD play , the LCD panel or video monitor must be installed so that operates when the vehicle is in gear or when the parking brake is... navigation. If the LCD panel or video monitor is applied. Notice: This Product incorporates copyright protection technology that is used for television reception, video or DVD play that these features will not be visible, directly or indirectly, to the operator of the motor vehicle. 2

User Manual
Page 3
...hotels, offices home or vehicle. Objects and Liquids Do not push objects of reliable, trouble-free service, and is compact so that the D1788PK is brought directly from a cold to rain or moisture. Please read the entire instruction manual supplied with you can take it from strong ...use in installing the system properly to operation. The main features include a 7" Screen (16:9 Aspect Ratio) Liquid Crystal Display (LCD) monitor and a DVD player. Do not place the set on or in accordance with a cloth or other material. 3 Cautions and Warnings 1. If the unit is used and...
...hotels, offices home or vehicle. Objects and Liquids Do not push objects of reliable, trouble-free service, and is compact so that the D1788PK is brought directly from a cold to rain or moisture. Please read the entire instruction manual supplied with you can take it from strong ...use in installing the system properly to operation. The main features include a 7" Screen (16:9 Aspect Ratio) Liquid Crystal Display (LCD) monitor and a DVD player. Do not place the set on or in accordance with a cloth or other material. 3 Cautions and Warnings 1. If the unit is used and...
User Manual
Page 4
...after playing. Clean the disc by region. Since this unit. 4 Do not stick paper, tape or glue on the disc. Regional Coding Both the DVD player and disc are coded by wiping the disc from the center out with other regional codes cannot be played in need of the system... attempt to the disc contents the software producers designed, some playback features may be available. If the codes don't match, the disc won't play . DVD's with a cleaning cloth. Some playback operations of disc. This unit's code is in this unit plays discs according to disassemble the cabinet. Handle the ...
...after playing. Clean the disc by region. Since this unit. 4 Do not stick paper, tape or glue on the disc. Regional Coding Both the DVD player and disc are coded by wiping the disc from the center out with other regional codes cannot be played in need of the system... attempt to the disc contents the software producers designed, some playback features may be available. If the codes don't match, the disc won't play . DVD's with a cleaning cloth. Some playback operations of disc. This unit's code is in this unit plays discs according to disassemble the cabinet. Handle the ...
User Manual
Page 5
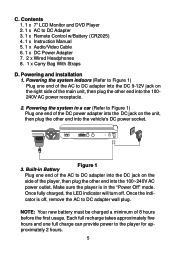
... DC adapter into the DC 9-12V jack on the unit, then plug the other end into the 100240V AC power receptacle. 2. C. Contents 1. 1 x 7" LCD Monitor and DVD Player 2. 1 x AC to the player for approximately 2 hours. 5 Once the indi- Each full recharge takes approximately five hours and one end of the DC power...
... DC adapter into the DC 9-12V jack on the unit, then plug the other end into the 100240V AC power receptacle. 2. C. Contents 1. 1 x 7" LCD Monitor and DVD Player 2. 1 x AC to the player for approximately 2 hours. 5 Once the indi- Each full recharge takes approximately five hours and one end of the DC power...
User Manual
Page 6
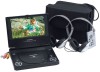
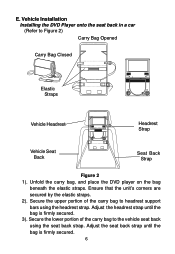
E. Unfold the carry bag, and place the DVD player on the bag beneath the elastic straps. Secure the upper portion of the carry bag to the vehicle seat back using the headrest strap. ... 2 1). Adjust the headrest strap until the bag is firmly secured. 3). Ensure that the unit's corners are secured by the elastic straps. 2). Vehicle Installation Installing the DVD Player onto the seat back in a car (Refer to headrest support bars using the seat back strap.
E. Unfold the carry bag, and place the DVD player on the bag beneath the elastic straps. Secure the upper portion of the carry bag to the vehicle seat back using the headrest strap. ... 2 1). Adjust the headrest strap until the bag is firmly secured. 3). Ensure that the unit's corners are secured by the elastic straps. 2). Vehicle Installation Installing the DVD Player onto the seat back in a car (Refer to headrest support bars using the seat back strap.
User Manual
Page 8
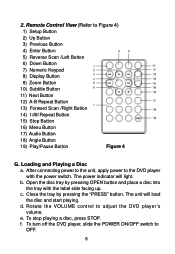
... Playing a Disc a. b. Close the tray by pressing OPEN button and place a disc into the tray with the power switch. e. c. To turn off the DVD player, slide the POWER ON/OFF switch to Figure 4) 1) Setup Button 2) Up Button 3) Previous Button 4) Enter Button 5) Reverse Scan /Left Button 6) Down...G. The power indicator will load the disc and start playing. d. Remote Control View (Refer to OFF. 8 Rotate the VOLUME control to the DVD player with the label side facing up. f. To stop playing a disc, press STOP. The unit will light. After connecting power to the ...
... Playing a Disc a. b. Close the tray by pressing OPEN button and place a disc into the tray with the power switch. e. c. To turn off the DVD player, slide the POWER ON/OFF switch to Figure 4) 1) Setup Button 2) Up Button 3) Previous Button 4) Enter Button 5) Reverse Scan /Left Button 6) Down...G. The power indicator will load the disc and start playing. d. Remote Control View (Refer to OFF. 8 Rotate the VOLUME control to the DVD player with the label side facing up. f. To stop playing a disc, press STOP. The unit will light. After connecting power to the ...
User Manual
Page 11
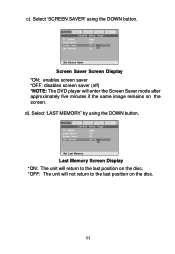
... Preferen Exit Angle Mark Off On O ff Set Screen Saver Screen Saver Screen Display *ON: enables screen saver *OFF: disables screen saver (off) *NOTE: The DVD player will not return to the last position on the screen. Select 'LAST MEMORY' by using the DOWN button. d). General Video Password Preferen Exit Angle...
... Preferen Exit Angle Mark Off On O ff Set Screen Saver Screen Saver Screen Display *ON: enables screen saver *OFF: disables screen saver (off) *NOTE: The DVD player will not return to the last position on the screen. Select 'LAST MEMORY' by using the DOWN button. d). General Video Password Preferen Exit Angle...

User Manual
Page 18
.... PLAYING TIME AND REMAINING TIME a. During playback press the 'DISPLAY' button to select disc playback options using the DVD root menu. J. K. The heading will disappear automatically in 3 seconds. Some DVDs only allow you play a DVD, a root menu of the disc will appear on the screen of the title. The heading will disappear automatically...
.... PLAYING TIME AND REMAINING TIME a. During playback press the 'DISPLAY' button to select disc playback options using the DVD root menu. J. K. The heading will disappear automatically in 3 seconds. Some DVDs only allow you play a DVD, a root menu of the disc will appear on the screen of the title. The heading will disappear automatically...

User Manual
Page 19
... disappear automatically if the 'SUB' button is displayed. If there are multiple languages press 'SUB' again to this function through the DVD menu. 19 Subtitle 01/ 02 Subtitle Screen Display * Some DVDs only allow access to select another subtitle language. To turn subtitles OFF, press the 'SUB' button until 'SUB OFF' is...
... disappear automatically if the 'SUB' button is displayed. If there are multiple languages press 'SUB' again to this function through the DVD menu. 19 Subtitle 01/ 02 Subtitle Screen Display * Some DVDs only allow access to select another subtitle language. To turn subtitles OFF, press the 'SUB' button until 'SUB OFF' is...

User Manual
Page 20
... button until 'SUB OFF' is not pressed again within 3 seconds. SUBTITLE During disc playback press 'SUB' to this function through the DVD menu. 20 The Subtitle display will disappear automatically if the 'SUB' button is displayed. Angle Screen Display 3. Subtitle 01/ 02 Subtitle Screen ...Display * Some DVDs only allow access to select the subtitle language you desire*, with the current Subtitle Language Number (1) and the total Number of Subtitle Languages...
... button until 'SUB OFF' is not pressed again within 3 seconds. SUBTITLE During disc playback press 'SUB' to this function through the DVD menu. 20 The Subtitle display will disappear automatically if the 'SUB' button is displayed. Angle Screen Display 3. Subtitle 01/ 02 Subtitle Screen ...Display * Some DVDs only allow access to select the subtitle language you desire*, with the current Subtitle Language Number (1) and the total Number of Subtitle Languages...

User Manual
Page 21
... if the 'AUDIO' button is not pressed within 3 seconds. The audio display will return to normal size. 4. Audio 1/ 2: Ac3 5. 1ch Audio Language Screen Display * Some DVDs only allow access to enlarge the picture by 2x, 3x or 4X with the current Audio Channel Number (1) and the total number of Audio Channels...
... if the 'AUDIO' button is not pressed within 3 seconds. The audio display will return to normal size. 4. Audio 1/ 2: Ac3 5. 1ch Audio Language Screen Display * Some DVDs only allow access to enlarge the picture by 2x, 3x or 4X with the current Audio Channel Number (1) and the total number of Audio Channels...

User Manual
Page 27
Playing JPEG files 1) Load the JPEG disc into the unit's DVD's AV jack, and connect the other end to the AV INPUT jacks on the display meaning that these options are not available. You player will ...
Playing JPEG files 1) Load the JPEG disc into the unit's DVD's AV jack, and connect the other end to the AV INPUT jacks on the display meaning that these options are not available. You player will ...
User Manual
Page 28
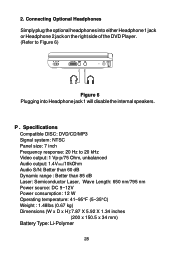
Connecting Optional Headphones Simply plug the optional headphones into either Headphone 1 jack or Headphone 2 jack on the right side of the DVD Player. (Refer to 20 kHz Video output: 1 Vp-p/75 Ohm, unbalanced Audio output: 1.4Vrms/10kOhm Audio S/N: Better than 60 dB... : 1.48lbs (0.67 kg) Dimensions (W x D x H):7.87 X 5.92 X 1.34 inches (200 x 150.5 x 34 mm) Battery Type: Li-Polymer 28 Specifications Compatible DISC: DVD/CD/MP3 Signal system: NTSC Panel size: 7 inch Frequency response: 20 Hz to Figure 6) Figure 6 Plugging into Headphone jack 1 will disable the internal speakers. 2. P .
Connecting Optional Headphones Simply plug the optional headphones into either Headphone 1 jack or Headphone 2 jack on the right side of the DVD Player. (Refer to 20 kHz Video output: 1 Vp-p/75 Ohm, unbalanced Audio output: 1.4Vrms/10kOhm Audio S/N: Better than 60 dB... : 1.48lbs (0.67 kg) Dimensions (W x D x H):7.87 X 5.92 X 1.34 inches (200 x 150.5 x 34 mm) Battery Type: Li-Polymer 28 Specifications Compatible DISC: DVD/CD/MP3 Signal system: NTSC Panel size: 7 inch Frequency response: 20 Hz to Figure 6) Figure 6 Plugging into Headphone jack 1 will disable the internal speakers. 2. P .
User Manual
Page 29
...1. For longer periods of whether you may remove the wall plug and stop charging. During recharge, the red indicator will turn off . The DVD player must be set to POWER OFF to maintain the battery in order to maximize battery life. 3. Using and Maintaining your batteries. Recharge efficiency ... discharged. Please make sure you fully charge the battery. NOTE: If you plan not to use . Q. Built-In Rechargeable Battery The DVD player utilizes a long-life Li-Polymer battery for an extended period of time (one full charge can only be recharged regardless of degradation.
...1. For longer periods of whether you may remove the wall plug and stop charging. During recharge, the red indicator will turn off . The DVD player must be set to POWER OFF to maintain the battery in order to maximize battery life. 3. Using and Maintaining your batteries. Recharge efficiency ... discharged. Please make sure you fully charge the battery. NOTE: If you plan not to use . Q. Built-In Rechargeable Battery The DVD player utilizes a long-life Li-Polymer battery for an extended period of time (one full charge can only be recharged regardless of degradation.


