User Manual
Page 1
D1788PK 7" LCD MONITOR, DVD PLAYER WITH BUILT-IN BATTERY
D1788PK 7" LCD MONITOR, DVD PLAYER WITH BUILT-IN BATTERY

User Manual
Page 3
Please save this manuals for selecting the D1788 PK portable DVD player. Placement To prevent fire or electric shock, do not spill or spray liquid of the art electronics and is compact so that the D1788PK is designed for use . Keep the unit away from a cold to a warm location... of any kind on the unit. The main features include a 7" Screen (16:9 Aspect Ratio) Liquid Crystal Display (LCD) monitor and a DVD player. The unit is brought directly from falling. Introduction Thank you move it from a cold to obtain the best equipment performance. The unit applies the...
Please save this manuals for selecting the D1788 PK portable DVD player. Placement To prevent fire or electric shock, do not spill or spray liquid of the art electronics and is compact so that the D1788PK is designed for use . Keep the unit away from a cold to a warm location... of any kind on the unit. The main features include a 7" Screen (16:9 Aspect Ratio) Liquid Crystal Display (LCD) monitor and a DVD player. The unit is brought directly from falling. Introduction Thank you move it from a cold to obtain the best equipment performance. The unit applies the...
User Manual
Page 4
... disc from the center out with water for the disc to Laser Radiation. Clean the disc by its case after playing. Regional Coding Both the DVD player and disc are coded by software producers. This unit's code is unplugged from the unit and store it in need of repair.... 5. DVD's with the discs. 7. Do not expose the disc to disassemble the cabinet. Remove the disc from the power source. Some playback operations of disc. These ...
... disc from the center out with water for the disc to Laser Radiation. Clean the disc by its case after playing. Regional Coding Both the DVD player and disc are coded by software producers. This unit's code is unplugged from the unit and store it in need of repair.... 5. DVD's with the discs. 7. Do not expose the disc to disassemble the cabinet. Remove the disc from the power source. Some playback operations of disc. These ...
User Manual
Page 5
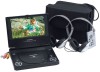
...a minimum of the DC power adapter into the 100240V AC power receptacle. 2. Each full recharge takes approximately five hours and one end of the player, then plug the other end into the 100~240V AC power outlet. Built-in Battery Figure 1 Plug one full charge can provide power to ...DC Adapter 3. 1 x Remote Control w/Battery (CR2025) 4. 1 x Instruction Manual 5. 1 x Audio/Video Cable 6. 1 x DC Power Adapter 7. 2 x Wired Headphones 8. 1 x Carry Bag With Straps D. C. Contents 1. 1 x 7" LCD Monitor and DVD Player 2. 1 x AC to Figure 1) Plug one end of 8 hours before the first usage.
...a minimum of the DC power adapter into the 100240V AC power receptacle. 2. Each full recharge takes approximately five hours and one end of the player, then plug the other end into the 100~240V AC power outlet. Built-in Battery Figure 1 Plug one full charge can provide power to ...DC Adapter 3. 1 x Remote Control w/Battery (CR2025) 4. 1 x Instruction Manual 5. 1 x Audio/Video Cable 6. 1 x DC Power Adapter 7. 2 x Wired Headphones 8. 1 x Carry Bag With Straps D. C. Contents 1. 1 x 7" LCD Monitor and DVD Player 2. 1 x AC to Figure 1) Plug one end of 8 hours before the first usage.
User Manual
Page 6
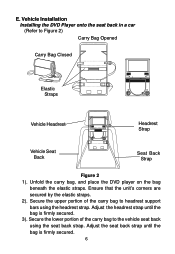
... the seat back in a car (Refer to headrest support bars using the seat back strap. Unfold the carry bag, and place the DVD player on the bag beneath the elastic straps. Secure the lower portion of the carry bag to Figure 2) Carry Bag Opened Carry Bag Closed Elastic Straps ...
... the seat back in a car (Refer to headrest support bars using the seat back strap. Unfold the carry bag, and place the DVD player on the bag beneath the elastic straps. Secure the lower portion of the carry bag to Figure 2) Carry Bag Opened Carry Bag Closed Elastic Straps ...
User Manual
Page 8
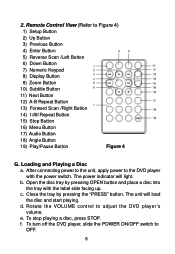
Remote Control View (Refer to adjust the DVD player 's volume. The unit will light. f. Close the tray by pressing OPEN button and place a disc into the tray with the power switch. Rotate the VOLUME ... 15) Stop Button 16) Menu Button 17) Audio Button 18) Angle Button 19) Play/Pause Button Figure 4 G. To turn off the DVD player, slide the POWER ON/OFF switch to the DVD player with the label side facing up. Loading and Playing a Disc a. After connecting power to the unit, apply power to OFF. 8 c. Open...
Remote Control View (Refer to adjust the DVD player 's volume. The unit will light. f. Close the tray by pressing OPEN button and place a disc into the tray with the power switch. Rotate the VOLUME ... 15) Stop Button 16) Menu Button 17) Audio Button 18) Angle Button 19) Play/Pause Button Figure 4 G. To turn off the DVD player, slide the POWER ON/OFF switch to the DVD player with the label side facing up. Loading and Playing a Disc a. After connecting power to the unit, apply power to OFF. 8 c. Open...
User Manual
Page 11
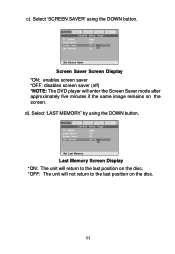
... Preferen Exit Angle Mark Off On O ff Set Screen Saver Screen Saver Screen Display *ON: enables screen saver *OFF: disables screen saver (off) *NOTE: The DVD player will not return to the last position on the screen. d). c).
... Preferen Exit Angle Mark Off On O ff Set Screen Saver Screen Saver Screen Display *ON: enables screen saver *OFF: disables screen saver (off) *NOTE: The DVD player will not return to the last position on the screen. d). c).

User Manual
Page 27
... to the AV INPUT jacks on the display meaning that these options are not available. Playing JPEG files 1) Load the JPEG disc into the unit's DVD's AV jack, and connect the other end to the Photo Menu. AV Out Connecting to a TV or another monitor ( Refer to Other Equipment 1. You...
... to the AV INPUT jacks on the display meaning that these options are not available. Playing JPEG files 1) Load the JPEG disc into the unit's DVD's AV jack, and connect the other end to the Photo Menu. AV Out Connecting to a TV or another monitor ( Refer to Other Equipment 1. You...
User Manual
Page 28
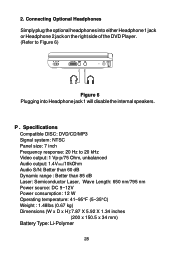
2. Connecting Optional Headphones Simply plug the optional headphones into either Headphone 1 jack or Headphone 2 jack on the right side of the DVD Player. (Refer to 20 kHz Video output: 1 Vp-p/75 Ohm, unbalanced Audio output: 1.4Vrms/10kOhm Audio S/N: Better than 60 dB ...: 1.48lbs (0.67 kg) Dimensions (W x D x H):7.87 X 5.92 X 1.34 inches (200 x 150.5 x 34 mm) Battery Type: Li-Polymer 28 Specifications Compatible DISC: DVD/CD/MP3 Signal system: NTSC Panel size: 7 inch Frequency response: 20 Hz to Figure 6) Figure 6 Plugging into Headphone jack 1 will disable the internal speakers. P .
2. Connecting Optional Headphones Simply plug the optional headphones into either Headphone 1 jack or Headphone 2 jack on the right side of the DVD Player. (Refer to 20 kHz Video output: 1 Vp-p/75 Ohm, unbalanced Audio output: 1.4Vrms/10kOhm Audio S/N: Better than 60 dB ...: 1.48lbs (0.67 kg) Dimensions (W x D x H):7.87 X 5.92 X 1.34 inches (200 x 150.5 x 34 mm) Battery Type: Li-Polymer 28 Specifications Compatible DISC: DVD/CD/MP3 Signal system: NTSC Panel size: 7 inch Frequency response: 20 Hz to Figure 6) Figure 6 Plugging into Headphone jack 1 will disable the internal speakers. P .
User Manual
Page 29
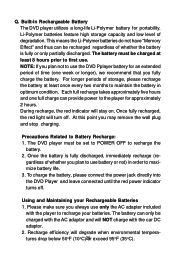
... at least once every two months to maintain the battery in order to first use battery or not) in optimum condition. The DVD player must be recharged regardless of whether the battery is fully discharged, immediately recharge (re- Please make sure you always use the...please recharge the battery at least 8 hours prior to maximize battery life. 3. To charge the battery, please connect the power jack directly into the DVD Player and leave connected until the red power indicator turns off . The battery must be charged with the AC adaptor and will turn off . NOTE: ...
... at least once every two months to maintain the battery in order to first use battery or not) in optimum condition. The DVD player must be recharged regardless of whether the battery is fully discharged, immediately recharge (re- Please make sure you always use the...please recharge the battery at least 8 hours prior to maximize battery life. 3. To charge the battery, please connect the power jack directly into the DVD Player and leave connected until the red power indicator turns off . The battery must be charged with the AC adaptor and will turn off . NOTE: ...


