
User Guide
Page 2
... Batteries 7 Controlling Your DIRECTV® Receiver 7 Setting Up Your DIRECTV Remote 7 Onscreen Remote Setup 8 Controlling Your TV 8 Setting Up the TV Input Key 9 Deactivating the TV Input Select Key 9 Controlling Other Components 9 Searching for TV, AV1 or AV2 Codes 10 Verifying the Codes 11 Changing Volume Lock 11 Locking Volume to AV1, AV2 or...
... Batteries 7 Controlling Your DIRECTV® Receiver 7 Setting Up Your DIRECTV Remote 7 Onscreen Remote Setup 8 Controlling Your TV 8 Setting Up the TV Input Key 9 Deactivating the TV Input Select Key 9 Controlling Other Components 9 Searching for TV, AV1 or AV2 Codes 10 Verifying the Codes 11 Changing Volume Lock 11 Locking Volume to AV1, AV2 or...

User Guide
Page 3
...TV, and two stereo or video components (for popular video and stereo components • Code search to re- Please follow the instructions detailed in this guide to set up your DIRECTV Universal Remote Control so you may need to program it to operate with features such as: &#...Four-position MODE slide switch for easy component selection • Code library for example, a DVD, stereo, or second TV). INTRODUCTION Congratulations! You now have an exclusive DIRECTV® Universal Remote Control that 's packed with your original remote controls into one easy-to-use unit that will not have...
...TV, and two stereo or video components (for popular video and stereo components • Code search to re- Please follow the instructions detailed in this guide to set up your DIRECTV Universal Remote Control so you may need to program it to operate with features such as: &#...Four-position MODE slide switch for easy component selection • Code library for example, a DVD, stereo, or second TV). INTRODUCTION Congratulations! You now have an exclusive DIRECTV® Universal Remote Control that 's packed with your original remote controls into one easy-to-use unit that will not have...
User Guide
Page 8
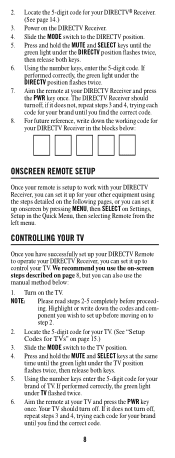
... set it up before proceed- We recommend you use the manual method below : ONSCREEN REMOTE SETUP Once your remote is setup to work with your DIRECTV Receiver, you can set it up for your TV. (See "Setup Codes for TVs" on the TV. NOTE: Please read steps 2-5 completely before moving on...the steps detailed on the following pages, or you can set up your DIRECTV Remote to control your DIRECTV Receiver in the Quick Menu, then selecting Remote from the left menu. Using the number keys, enter the 5-digit code. Turn on page 15.) 3. Press and hold the MUTE and SELECT keys ...
... set it up before proceed- We recommend you use the manual method below : ONSCREEN REMOTE SETUP Once your remote is setup to work with your DIRECTV Receiver, you can set it up for your TV. (See "Setup Codes for TVs" on the TV. NOTE: Please read steps 2-5 completely before moving on...the steps detailed on the following pages, or you can set up your DIRECTV Remote to control your DIRECTV Receiver in the Quick Menu, then selecting Remote from the left menu. Using the number keys, enter the 5-digit code. Turn on page 15.) 3. Press and hold the MUTE and SELECT keys ...

User Guide
Page 9
...also use the manual method below : SETTING UP THE TV INPUT KEY Once you find the correct code. 9 Press and hold the MUTE and SELECT keys until you have setup the DIRECTV® Remote control for your DVD Player). 2. The component should turn off; your TV in the blocks below... : 1. For future reference, write down the working code for your component. (See "Setup Codes, Other Devices" starting on . 8. Pressing the TV ...
...also use the manual method below : SETTING UP THE TV INPUT KEY Once you find the correct code. 9 Press and hold the MUTE and SELECT keys until you have setup the DIRECTV® Remote control for your DVD Player). 2. The component should turn off; your TV in the blocks below... : 1. For future reference, write down the working code for your component. (See "Setup Codes, Other Devices" starting on . 8. Pressing the TV ...

User Guide
Page 10
... the following fourdigits: COMPONENT TYPE Satellite TV VCR/DVD/PVR Stereo COMPONENT ID # 0 1 2 3 5. NOTE: Every time CHANS is pressed the remote advances to the next code and power is transmitted to the TV, AV1 or AV2 position, as desired. 3. Enter 9-9-1 followed by one of TV or component, you can... try a code search. PLAY for the component(s) set up to use. 6. Point the remote at the same time until the TV or component turns off or performs the action you want to 30 minutes...
... the following fourdigits: COMPONENT TYPE Satellite TV VCR/DVD/PVR Stereo COMPONENT ID # 0 1 2 3 5. NOTE: Every time CHANS is pressed the remote advances to the next code and power is transmitted to the TV, AV1 or AV2 position, as desired. 3. Enter 9-9-1 followed by one of TV or component, you can... try a code search. PLAY for the component(s) set up to use. 6. Point the remote at the same time until the TV or component turns off or performs the action you want to 30 minutes...

User Guide
Page 11
Verifying the Codes Once you set up the DIRECTV® Universal Remote Control using the above steps, use the remote that the VOL and MUTE keys work only for the component selected by the MODE switch. Enter 9-9-0. (The green light under the selected switch flashes ... both keys. 3. Repeat step 4 four more times for the final digit. This remote can be set up your remote, the VOL and MUTE may control the volume only on your TV or component. To enable this number down in the code, Press and release then number 1 key. Press and hold the MUTE and...
Verifying the Codes Once you set up the DIRECTV® Universal Remote Control using the above steps, use the remote that the VOL and MUTE keys work only for the component selected by the MODE switch. Enter 9-9-0. (The green light under the selected switch flashes ... both keys. 3. Repeat step 4 four more times for the final digit. This remote can be set up your remote, the VOL and MUTE may control the volume only on your TV or component. To enable this number down in the code, Press and release then number 1 key. Press and hold the MUTE and...

User Guide
Page 12
...that you are within 15 feet of the remote blinks when you are not recognized properly. 3. SOLUTION: Try all the functions of -the-box settings), follow these functions. SOLUTION: Use the VCR codes for certain models (19831987), only the original remote control will not allow the user to ...lock volume to the factory defaults (the original, out-of the remote control to the DIRECTV mode. PROBLEM: CHANS, CHANT, and PREV ...
...that you are within 15 feet of the remote blinks when you are not recognized properly. 3. SOLUTION: Try all the functions of -the-box settings), follow these functions. SOLUTION: Use the VCR codes for certain models (19831987), only the original remote control will not allow the user to ...lock volume to the factory defaults (the original, out-of the remote control to the DIRECTV mode. PROBLEM: CHANS, CHANT, and PREV ...
User Guide
Page 13
For Sharp, use TV code 10000 and VCR code 20032. For Sony, use TV code 10093 and VCR code 20048. (See "Controlling Other Components" on page 9.) 13 SOLUTION: For power on, these products require setting up TV codes on Sony or Sharp TV/VCR Combo. PROBLEM: Remote control does not turn on the remote control.
For Sharp, use TV code 10000 and VCR code 20032. For Sony, use TV code 10093 and VCR code 20048. (See "Controlling Other Components" on page 9.) 13 SOLUTION: For power on, these products require setting up TV codes on Sony or Sharp TV/VCR Combo. PROBLEM: Remote control does not turn on the remote control.

