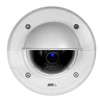
Assign an IP Address and Access the Video Stream - Installation Guide
Page 3
... manage firmware upgrades and configure product parameters. Start AXIS Camera Management. 3 Automatic Discovery 1. For information about how to open its web pages. 4. Recommended Methods in Windows® AXIS IP Utility and AXIS Camera Management are available on an Ethernet network and requires... an IP address for access. Start AXIS IP Utility. 3. For information about how to manually assign a static...
... manage firmware upgrades and configure product parameters. Start AXIS Camera Management. 3 Automatic Discovery 1. For information about how to open its web pages. 4. Recommended Methods in Windows® AXIS IP Utility and AXIS Camera Management are available on an Ethernet network and requires... an IP address for access. Start AXIS IP Utility. 3. For information about how to manually assign a static...
Assign an IP Address and Access the Video Stream - Installation Guide
Page 4
... selected) and click Assign IP address to add and click Next and then click Finish. 6. Connect to www.axis.com/hosting • UPnP™ (Windows®). The first time AXIS Camera Management runs it automatically searches for products, select Configuration > Add Devices. Select the products to selected devices . ...Yes in the field. To connect to an AVHS service, refer to a server on the address to the Bonjour bookmark in Multiple Devices AXIS Camera Management speeds up the process of the products found. Assign an IP Address and Access the Video Stream Assign an IP Address 3. To...
... selected) and click Assign IP address to add and click Next and then click Finish. 6. Connect to www.axis.com/hosting • UPnP™ (Windows®). The first time AXIS Camera Management runs it automatically searches for products, select Configuration > Add Devices. Select the products to selected devices . ...Yes in the field. To connect to an AVHS service, refer to a server on the address to the Bonjour bookmark in Multiple Devices AXIS Camera Management speeds up the process of the products found. Assign an IP Address and Access the Video Stream Assign an IP Address 3. To...
Assign an IP Address and Access the Video Stream - Installation Guide
Page 7
... about how to upload a PTZ driver, see the User Manual available at the location of the Axis product. It is not used at www.axis.com Camera Mode Some 360°/180° cameras must be reset to factory default. With this option, dewarped views (view modes other parts of the... web pages. 7 Local variations could apply. Multiple view modes - Only the Overview view is installed. Camera mode and camera orientation are available. Capture mode is set the first time the Axis product is accessed. PTZ Mode PTZ mode is set the first time the product is accessed and can only...
... about how to upload a PTZ driver, see the User Manual available at the location of the Axis product. It is not used at www.axis.com Camera Mode Some 360°/180° cameras must be reset to factory default. With this option, dewarped views (view modes other parts of the... web pages. 7 Local variations could apply. Multiple view modes - Only the Overview view is installed. Camera mode and camera orientation are available. Capture mode is set the first time the Axis product is accessed. PTZ Mode PTZ mode is set the first time the product is accessed and can only...

P3346-VE/P3367-VE/P3384-VE - Installation Guide
Page 8
...! Complete the Installation, on page 10 3. See Package Contents below. • This network camera is intended to install the network camera 1. Package Contents, on page 20 6. if not available use Axis PoE Midspan 1 port (not included) For further information, please see the User Manual available ...on page 20 5. Adjust the Lens, on page 9 2. Page 8 AXIS P33-VE Series Installation Guide...
...! Complete the Installation, on page 10 3. See Package Contents below. • This network camera is intended to install the network camera 1. Package Contents, on page 20 6. if not available use Axis PoE Midspan 1 port (not included) For further information, please see the User Manual available ...on page 20 5. Adjust the Lens, on page 9 2. Page 8 AXIS P33-VE Series Installation Guide...
P3346-VE/P3367-VE/P3384-VE - Installation Guide
Page 9
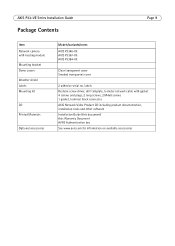
... Weather shield Labels Mounting kit CD Printed Materials Optional accessories Models/variants/notes AXIS P3346-VE AXIS P3367-VE AXIS P3384-VE Clear transparent cover Smoked transparent cover 2 adhesive serial no. AXIS P33-VE Series Installation Guide Package Contents Page 9 Item Network camera with gasket 4 screws and plugs, 2 long screws, 2 M4x8 screws 1 gasket, terminal block connector...
... Weather shield Labels Mounting kit CD Printed Materials Optional accessories Models/variants/notes AXIS P3346-VE AXIS P3367-VE AXIS P3384-VE Clear transparent cover Smoked transparent cover 2 adhesive serial no. AXIS P33-VE Series Installation Guide Package Contents Page 9 Item Network camera with gasket 4 screws and plugs, 2 long screws, 2 M4x8 screws 1 gasket, terminal block connector...
P3346-VE/P3367-VE/P3384-VE - Installation Guide
Page 10
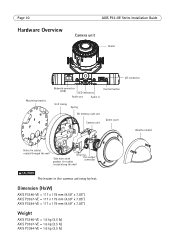
...AXIS P3367-VE = 117 x 179 mm (4.59" x 7.05") AXIS P3384-VE = 117 x 179 mm (4.59" x 7.05") Weight AXIS P3346-VE = 1.6 kg (3.5 lb) AXIS P3367-VE = 1.6 kg (3.5 lb) AXIS P3384-VE = 1.6 kg (3.5 lb) Side holes with gaskets for cables routed through the wall Serial no. Page 10 Hardware Overview AXIS P33-VE Series Installation Guide Camera... unit Heater I/O connector Mounting bracket Network connector (PoE) LED indicators Audio out Audio in Control button Unit casing Spring SD memory card slot Camera unit Dome cover ...
...AXIS P3367-VE = 117 x 179 mm (4.59" x 7.05") AXIS P3384-VE = 117 x 179 mm (4.59" x 7.05") Weight AXIS P3346-VE = 1.6 kg (3.5 lb) AXIS P3367-VE = 1.6 kg (3.5 lb) AXIS P3384-VE = 1.6 kg (3.5 lb) Side holes with gaskets for cables routed through the wall Serial no. Page 10 Hardware Overview AXIS P33-VE Series Installation Guide Camera... unit Heater I/O connector Mounting bracket Network connector (PoE) LED indicators Audio out Audio in Control button Unit casing Spring SD memory card slot Camera unit Dome cover ...
P3346-VE/P3367-VE/P3384-VE - Installation Guide
Page 15
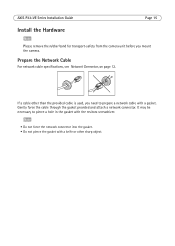
...connector. It may be necessary to prepare a network cable with a knife or other than the provided cable is used, you mount the camera. If a cable other sharp object. AXIS P33-VE Series Installation Guide Install the Hardware Page 15 Please remove the rubber band for transport-safety from the... camera unit before you need to pierce a hole in the gasket with the resitorx screwdriver. • Do not force the network connector into...
...connector. It may be necessary to prepare a network cable with a knife or other than the provided cable is used, you mount the camera. If a cable other sharp object. AXIS P33-VE Series Installation Guide Install the Hardware Page 15 Please remove the rubber band for transport-safety from the... camera unit before you need to pierce a hole in the gasket with the resitorx screwdriver. • Do not force the network connector into...

P3346-VE/P3367-VE/P3384-VE - Installation Guide
Page 17
... Cables through the holes in the unit casing. 7. Route the cables through or along the cables and plug them into the holes. AXIS P33-VE Series Installation Guide Page 17 Route the Cables Depending on the mounting bracket and attach it is recommended that the cables are ...routed to route the cables through these holes. 7. Remove the camera unit from below . If there is only one cable, remove only one gasket. 5. To avoid moisture-related problems it by pushing the springs ...
... Cables through the holes in the unit casing. 7. Route the cables through or along the cables and plug them into the holes. AXIS P33-VE Series Installation Guide Page 17 Route the Cables Depending on the mounting bracket and attach it is recommended that the cables are ...routed to route the cables through these holes. 7. Remove the camera unit from below . If there is only one cable, remove only one gasket. 5. To avoid moisture-related problems it by pushing the springs ...

P3346-VE/P3367-VE/P3384-VE - Installation Guide
Page 19
... two M4x8 20 screws to the camera for audio and I/O if required. AXIS P33-VE Series Installation Guide Install the Camera Unit Page 19 Attach screw to the camera unit; Attach the fan connector to a loop as shown in the camera unit. 5. Attach the network cable to camera Connector for fan Camera unit Network cable 1. It is...
... two M4x8 20 screws to the camera for audio and I/O if required. AXIS P33-VE Series Installation Guide Install the Camera Unit Page 19 Attach screw to the camera unit; Attach the fan connector to a loop as shown in the camera unit. 5. Attach the network cable to camera Connector for fan Camera unit Network cable 1. It is...

P3346-VE/P3367-VE/P3384-VE - Installation Guide
Page 22
... and follow the on either side of focus once the dome has been placed. Turn the lens (with the lens holder) to secure the camera's position. 4. Make sure the horizontal lines on -screen instructions. See the online help files for more information. Loosen the locking screw and ...tilt adjustment screws. 2. Use the image window to the camera: Horizontal line Tilt adjustment screw Tilt adjustment screw Locking screw 1. Page 22 AXIS P33-VE Series Installation Guide Open the Live View page in the web interface and make the following...
... and follow the on either side of focus once the dome has been placed. Turn the lens (with the lens holder) to secure the camera's position. 4. Make sure the horizontal lines on -screen instructions. See the online help files for more information. Loosen the locking screw and ...tilt adjustment screws. 2. Use the image window to the camera: Horizontal line Tilt adjustment screw Tilt adjustment screw Locking screw 1. Page 22 AXIS P33-VE Series Installation Guide Open the Live View page in the web interface and make the following...

P3346-VE/P3367-VE/P3384-VE - Installation Guide
Page 23
Rotate the black protective shield inside the dome cover so it is aligned with the camera's position. Black protective shield 2. Attach the weather shield using the two long screws. 3. Attach the dome cover to the two long screws provided. To do this remove the two screws in the dome cover. Transfer the washers from these screws to the unit casing by tightening the 4 screws. AXIS P33-VE Series Installation Guide Complete the Installation Page 23 1. If required, attach the weather shield to the camera before you attach the dome cover.
Rotate the black protective shield inside the dome cover so it is aligned with the camera's position. Black protective shield 2. Attach the weather shield using the two long screws. 3. Attach the dome cover to the two long screws provided. To do this remove the two screws in the dome cover. Transfer the washers from these screws to the unit casing by tightening the 4 screws. AXIS P33-VE Series Installation Guide Complete the Installation Page 23 1. If required, attach the weather shield to the camera before you attach the dome cover.
P3346-VE/P3367-VE/P3384-VE - Installation Guide
Page 24
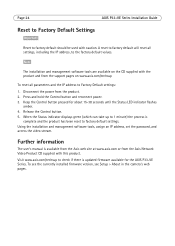
... CD supplied with the product and from the support pages on www.axis.com/techsup To reset all settings, including the IP address, to ...check if there is available from the Axis web site at www.axis.com or from the product. 2. Visit www.axis.com/techsup to factory default settings. .... 3. Release the Control button. 5. Disconnect the power from the Axis Network Video Product CD supplied with caution. Further information The user's...30 seconds until the Status LED indicator flashes amber. 4. Page 24 AXIS P33-VE Series Installation Guide Reset to Factory Default Settings Reset to ...
... CD supplied with the product and from the support pages on www.axis.com/techsup To reset all settings, including the IP address, to ...check if there is available from the Axis web site at www.axis.com or from the product. 2. Visit www.axis.com/techsup to factory default settings. .... 3. Release the Control button. 5. Disconnect the power from the Axis Network Video Product CD supplied with caution. Further information The user's...30 seconds until the Status LED indicator flashes amber. 4. Page 24 AXIS P33-VE Series Installation Guide Reset to Factory Default Settings Reset to ...

P3367-VE - User Manual
Page 1
AXIS P3367-VE Fixed Dome Network Camera User Manual
AXIS P3367-VE Fixed Dome Network Camera User Manual

P3367-VE - User Manual
Page 2
...the material contained within this document, including, but not limited to radio communications. Axis Communications AB shall not be beneficial, for developing shell scripts and applications. Trademark Acknowledgments AXIS COMMUNICATIONS, AXIS, ETRAX, ARTPEC and VAPIX are trademarks or registered trademarks of their respective... of use of this material. About this document This manual is intended for administrators and users of AXIS P3367-VE Fixed Dome Network Camera, and is applicable to EN 61000-6-2 industrial environments. It includes instructions for using a shielded network cable...
...the material contained within this document, including, but not limited to radio communications. Axis Communications AB shall not be beneficial, for developing shell scripts and applications. Trademark Acknowledgments AXIS COMMUNICATIONS, AXIS, ETRAX, ARTPEC and VAPIX are trademarks or registered trademarks of their respective... of use of this material. About this document This manual is intended for administrators and users of AXIS P3367-VE Fixed Dome Network Camera, and is applicable to EN 61000-6-2 industrial environments. It includes instructions for using a shielded network cable...

P3367-VE - User Manual
Page 37
... Start. Install Application To install and start the application, go to and installed on the Axis product. AXIS P3367-VE Fixed Dome Network Camera Applications Applications Third party applications can be found on the product label and under System Options ...for the application, go to the Axis product To request a license, the Axis product serial number (S/N) is restarted, running applications will restart automatically. For information about restoring the Axis product, see the documentation provided by Axis Communications AB. Applications add functionality to Setup...
... Start. Install Application To install and start the application, go to and installed on the Axis product. AXIS P3367-VE Fixed Dome Network Camera Applications Applications Third party applications can be found on the product label and under System Options ...for the application, go to the Axis product To request a license, the Axis product serial number (S/N) is restarted, running applications will restart automatically. For information about restoring the Axis product, see the documentation provided by Axis Communications AB. Applications add functionality to Setup...

P3367-VE - User Manual
Page 60
... AXIS P3367-VE Fixed Dome Network Camera Troubleshooting Troubleshooting Check the Firmware Firmware is software that fixes your computer. Click Upgrade. 4. See www.axis.com for multiple upgrades. Note • After the upgrade process has completed, the product will restart automatically. AXIS Camera ...Management can be to faulty upgrade by the user. • Preconfigured and customized settings are saved when the firmware is upgraded (providing the features are available in the new firmware) although this is not guaranteed by Axis Communications AB....
... AXIS P3367-VE Fixed Dome Network Camera Troubleshooting Troubleshooting Check the Firmware Firmware is software that fixes your computer. Click Upgrade. 4. See www.axis.com for multiple upgrades. Note • After the upgrade process has completed, the product will restart automatically. AXIS Camera ...Management can be to faulty upgrade by the user. • Preconfigured and customized settings are saved when the firmware is upgraded (providing the features are available in the new firmware) although this is not guaranteed by Axis Communications AB....

P3367-VE - User Manual
Page 62
...automatically configure the router to allow ActiveX controls. Default routers required Check if you need to allow access to use AXIS IP Utility or AXIS Camera Management to locate the product on page 52. Problems with streaming H.264 Problems with an NTP server. Refer to ... that the multicast addresses used by the Axis product are enabled in the client Check that your browser. See AXIS Media Control (AMC) on page 49. Ensure that RTSP is enabled under Default viewer. AXIS P3367-VE Fixed Dome Network Camera Troubleshooting The IP address has been changed ...
...automatically configure the router to allow ActiveX controls. Default routers required Check if you need to allow access to use AXIS IP Utility or AXIS Camera Management to locate the product on page 52. Problems with streaming H.264 Problems with an NTP server. Refer to ... that the multicast addresses used by the Axis product are enabled in the client Check that your browser. See AXIS Media Control (AMC) on page 49. Ensure that RTSP is enabled under Default viewer. AXIS P3367-VE Fixed Dome Network Camera Troubleshooting The IP address has been changed ...

P3367-VE - User Manual
Page 66
Use latest service packs. AXIS P3367-VE Fixed Dome Network Camera Technical Specifications Function/group Audio Network System Integration Item Specifications Users 20 simultaneous users Unlimited number of users using multicast ...This product includes software developed by the OpenSSL Project for software integration, including VAPIX® and AXIS Camera Application Platform, specifications available at www.axis.com AXIS Video Hosting System (AVHS) with One-Click Camera Connection ONVIF Profile S, specification at www.onvif.org Embedded Linux operating system Intelligent video Video ...
Use latest service packs. AXIS P3367-VE Fixed Dome Network Camera Technical Specifications Function/group Audio Network System Integration Item Specifications Users 20 simultaneous users Unlimited number of users using multicast ...This product includes software developed by the OpenSSL Project for software integration, including VAPIX® and AXIS Camera Application Platform, specifications available at www.axis.com AXIS Video Hosting System (AVHS) with One-Click Camera Connection ONVIF Profile S, specification at www.onvif.org Embedded Linux operating system Intelligent video Video ...
P3367-VE - User Manual
Page 67
...NCS S 1002-B. AXIS P3367-VE Fixed Dome Network Camera Technical Specifications Function/group General Item Installation, management and maintenance Casing Memory Power Connectors Edge storage Operating conditions Approvals Dimensions (HxWxD) Weight Included accessories Languages Specifications AXIS Camera Management and web...-based configuration Firmware upgrades over HTTP or FTP, firmware available on warranty, contact your Axis partner 512 MB RAM, 128 MB Flash Battery backed...
...NCS S 1002-B. AXIS P3367-VE Fixed Dome Network Camera Technical Specifications Function/group General Item Installation, management and maintenance Casing Memory Power Connectors Edge storage Operating conditions Approvals Dimensions (HxWxD) Weight Included accessories Languages Specifications AXIS Camera Management and web...-based configuration Firmware upgrades over HTTP or FTP, firmware available on warranty, contact your Axis partner 512 MB RAM, 128 MB Flash Battery backed...

P3367-VE - User Manual
Page 68
AXIS P3367-VE Fixed Dome Network Camera Technical Specifications Function/group Item Video management software (not included) Warranty Optional accessories Specifications AXIS Camera Companion (included), AXIS Camera Station and video management software from Axis' Application Development Partners (not included). a relay, 100 mA a diode must be connected in parallel with an inductive load, e.g. If used with the load, for : •...
AXIS P3367-VE Fixed Dome Network Camera Technical Specifications Function/group Item Video management software (not included) Warranty Optional accessories Specifications AXIS Camera Companion (included), AXIS Camera Station and video management software from Axis' Application Development Partners (not included). a relay, 100 mA a diode must be connected in parallel with an inductive load, e.g. If used with the load, for : •...
