User Manual
Page 5
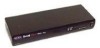
..., pushbutton or keyboard "Hot" key command switching • AutoScan mode for purchasing the Belkin Components OmniView™ PRO KVM switch. Controlling 8 PCs from one keyboard, mouse and monitor has never been easier! The OmniView™ PRO gives you for even more system control. ...; • No software required • One year product warranty Package Contents OmniView™ PRO 8-Port 12VDC, 1000mA power supply This manual Registration card Two rackmount brackets Mounting screws F1D108-OSD F1D108-PWR-UK P73055 P72009 1 Features • Allows a user to control eight...
..., pushbutton or keyboard "Hot" key command switching • AutoScan mode for purchasing the Belkin Components OmniView™ PRO KVM switch. Controlling 8 PCs from one keyboard, mouse and monitor has never been easier! The OmniView™ PRO gives you for even more system control. ...; • No software required • One year product warranty Package Contents OmniView™ PRO 8-Port 12VDC, 1000mA power supply This manual Registration card Two rackmount brackets Mounting screws F1D108-OSD F1D108-PWR-UK P73055 P72009 1 Features • Allows a user to control eight...

User Manual
Page 9
...actual settings. The DIP switches must be set as the MASTER (BANK 0). See the next section for more units (for a total of 128 computers! If you are slave banks. BANK numbers range from 0 to any unused unique bank number from 1 through F are using the OmniView™ PRO in a single-unit...125 126 127 128 Single-unit operation or Daisy-chained operation The OmniView™ PRO has the capability to be used as a BANK. The MASTER bank is to be daisy-chained to the console keyboard, mouse, and monitor. P73055/F1D108-OSD/EU/man.qxd 4/21/00 2:25 PM Page 5 Hardware ...
...actual settings. The DIP switches must be set as the MASTER (BANK 0). See the next section for more units (for a total of 128 computers! If you are slave banks. BANK numbers range from 0 to any unused unique bank number from 1 through F are using the OmniView™ PRO in a single-unit...125 126 127 128 Single-unit operation or Daisy-chained operation The OmniView™ PRO has the capability to be used as a BANK. The MASTER bank is to be daisy-chained to the console keyboard, mouse, and monitor. P73055/F1D108-OSD/EU/man.qxd 4/21/00 2:25 PM Page 5 Hardware ...

User Manual
Page 10
... a convenient place to the previous section for more information. Take note of the length of the OmniView™ PRO. Belkin Components will be held responsible for 48.3cm racks. DIP SWITCH # 3 4 5 6 ON ON ON ON OFF ON ON ON ON OFF ON ON OFF OFF ON ON ON ON OFF ...Plugging and unplugging cables may cause irreversible damage to your computers, OmniView™ PRO, keyboard, mouse, and monitor are using will not be daisy-chained off . Its 48.3cm form factor makes it ideal for damage caused. 1. Set the DIP switches. P73055/F1D108-OSD/EU/man.qxd 4/21/00 2:25 PM Page 6 Hardware ...
... a convenient place to the previous section for more information. Take note of the length of the OmniView™ PRO. Belkin Components will be held responsible for 48.3cm racks. DIP SWITCH # 3 4 5 6 ON ON ON ON OFF ON ON ON ON OFF ON ON OFF OFF ON ON ON ON OFF ...Plugging and unplugging cables may cause irreversible damage to your computers, OmniView™ PRO, keyboard, mouse, and monitor are using will not be daisy-chained off . Its 48.3cm form factor makes it ideal for damage caused. 1. Set the DIP switches. P73055/F1D108-OSD/EU/man.qxd 4/21/00 2:25 PM Page 6 Hardware ...

User Manual
Page 11
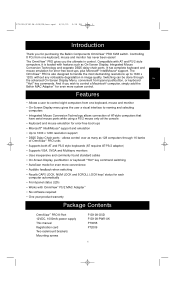
Connect the first computer's VGA cable to the OmniView™ PRO. Back of OmniView™ PRO Back of OmniView™ PRO En 4. Back of PC F2N025-XX-T 7 Connect the keyboard and mouse to the OmniView™ PRO. Using the VGA cable (Belkin Part# F2N025-XX-T or A3H981-XX), connect the ... back of the OmniView™ PRO labeled with the monitor symbol at the CONSOLE section. Using the attached cable, or the one included with your monitor, connect it to the OmniView™ PRO. Back of OmniView™ PRO PS/2 Style Keyboard PS/2 Mouse 5. P73055/F1D108-OSD/EU/man.qxd ...
Connect the first computer's VGA cable to the OmniView™ PRO. Back of OmniView™ PRO Back of OmniView™ PRO En 4. Back of PC F2N025-XX-T 7 Connect the keyboard and mouse to the OmniView™ PRO. Using the VGA cable (Belkin Part# F2N025-XX-T or A3H981-XX), connect the ... back of the OmniView™ PRO labeled with the monitor symbol at the CONSOLE section. Using the attached cable, or the one included with your monitor, connect it to the OmniView™ PRO. Back of OmniView™ PRO PS/2 Style Keyboard PS/2 Mouse 5. P73055/F1D108-OSD/EU/man.qxd ...
User Manual
Page 12
... connections. Make sure the keyboard and mouse cables go to the OmniView™ PRO. Power up all your computers simultaneously. P73055/F1D108-OSD/EU/man.qxd 4/21/00 2:25 PM Page 8 Hardware Installation (continued) 6. If using a PS/2 cable (Belkin Part# F2N036-XX), connect one end to the PS/2 keyboard ...PRO F2N036-XX for PS/2 mouse OR F2N209-XX-T for the remainder of the other end to the PC1 PS/2 mouse port on the back of the OmniView™. Flip the power switch on the back of the cable connections. 8 The first computer will need a PS/2-AT keyboard adapter (Belkin ...
... connections. Make sure the keyboard and mouse cables go to the OmniView™ PRO. Power up all your computers simultaneously. P73055/F1D108-OSD/EU/man.qxd 4/21/00 2:25 PM Page 8 Hardware Installation (continued) 6. If using a PS/2 cable (Belkin Part# F2N036-XX), connect one end to the PS/2 keyboard ...PRO F2N036-XX for PS/2 mouse OR F2N209-XX-T for the remainder of the other end to the PC1 PS/2 mouse port on the back of the OmniView™. Flip the power switch on the back of the cable connections. 8 The first computer will need a PS/2-AT keyboard adapter (Belkin ...
User Manual
Page 13
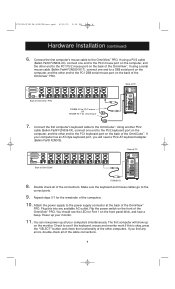
Here, four OmniView™ PRO units are cascaded together for control over 32 computers. DO NOT POWER UP THE COMPUTERS YET. • Using the F1D108-CBL daisy-chain cable, connect one end to the "Master Input/ Slave Output" of booting up. The F1D108-CBL daisy-chain cable is a slave...(Bank 3) • After setting the DIP switches on the slave unit, connect the computers using the same procedure outlined in steps 5 to the "Slave Input" port of 16 OmniView™ PRO units can be cascaded together for control over 128 computers. P73055/F1D108-OSD/EU/man.qxd 4/21/00 2:25 PM ...
Here, four OmniView™ PRO units are cascaded together for control over 32 computers. DO NOT POWER UP THE COMPUTERS YET. • Using the F1D108-CBL daisy-chain cable, connect one end to the "Master Input/ Slave Output" of booting up. The F1D108-CBL daisy-chain cable is a slave...(Bank 3) • After setting the DIP switches on the slave unit, connect the computers using the same procedure outlined in steps 5 to the "Slave Input" port of 16 OmniView™ PRO units can be cascaded together for control over 128 computers. P73055/F1D108-OSD/EU/man.qxd 4/21/00 2:25 PM ...

User Manual
Page 14
...again to detect the presence of the On-Screen Display (OSD) menu feature. If it is desirable to have booted up, you can also be used with the slave unit. Thus, all the computers have the OmniView™ PRO as the MASTER unit because of powered computers on the ...F1D108-OSD/EU/man.qxd 4/21/00 2:25 PM Page 10 Hardware Installation (continued) • Upon connecting the daisy-chain cable to the previous unit, it is still recommended that the MASTER unit has detected the new slave by pressing the BANK/SCAN and CHANNEL buttons simultaneously. NOTE: The OmniView™ PRO...
...again to detect the presence of the On-Screen Display (OSD) menu feature. If it is desirable to have booted up, you can also be used with the slave unit. Thus, all the computers have the OmniView™ PRO as the MASTER unit because of powered computers on the ...F1D108-OSD/EU/man.qxd 4/21/00 2:25 PM Page 10 Hardware Installation (continued) • Upon connecting the daisy-chain cable to the previous unit, it is still recommended that the MASTER unit has detected the new slave by pressing the BANK/SCAN and CHANNEL buttons simultaneously. NOTE: The OmniView™ PRO...
User Manual
Page 15
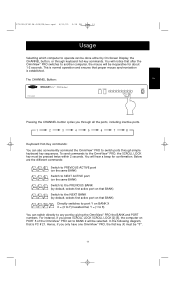
... LOCK [2] [5], the computer on BANK X X = {0 to F} hexadecimal, Y = {1 to 8} You can switch directly to BANK 2 will be selected. P73055/F1D108-OSD/EU/man.qxd 4/21/00 2:25 PM Page 11 Usage Selecting which computer to operate can be done either by giving the OmniView™ PRO the BANK and PORT numbers. Below are the different commands...
... LOCK [2] [5], the computer on BANK X X = {0 to F} hexadecimal, Y = {1 to 8} You can switch directly to BANK 2 will be selected. P73055/F1D108-OSD/EU/man.qxd 4/21/00 2:25 PM Page 11 Usage Selecting which computer to operate can be done either by giving the OmniView™ PRO the BANK and PORT numbers. Below are the different commands...
User Manual
Page 16
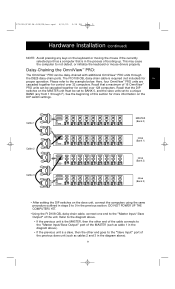
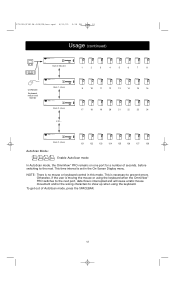
P73055/F1D108-OSD/EU/man.qxd 4/21/00 2:25 PM Page 12 Usage (continued) Bank 0 (Master) 1 2 3 4 5 6 7 8 CONSOLE Keyboard, mouse and monitor Bank 1 (slave) Bank 2 (slave) etc... 9 10 11 ... on one port for a number of AutoScan mode, press the SPACEBAR. 12 To get out of seconds, before switching to show up when using the keyboard when the OmniView™ PRO switches to prevent errors. NOTE: There is interrupted and will cause erratic mouse movement and/or the wrong characters to the next. Otherwise...
P73055/F1D108-OSD/EU/man.qxd 4/21/00 2:25 PM Page 12 Usage (continued) Bank 0 (Master) 1 2 3 4 5 6 7 8 CONSOLE Keyboard, mouse and monitor Bank 1 (slave) Bank 2 (slave) etc... 9 10 11 ... on one port for a number of AutoScan mode, press the SPACEBAR. 12 To get out of seconds, before switching to show up when using the keyboard when the OmniView™ PRO switches to prevent errors. NOTE: There is interrupted and will cause erratic mouse movement and/or the wrong characters to the next. Otherwise...
User Manual
Page 17
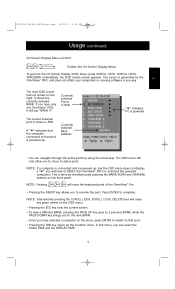
...the PAGE DOWN key brings you to re-detect the powered computers. Currently selected Bank Address Belkin: F1D108-OSD 1. CHANNEL 7 8. NOTE: Pressing will only allow you have to RESET the OmniView™ PRO to the next BANK. • Once you can navigate through the active ports by using... ports of the OmniView™ Pro. • Pressing the INSERT key allows you will have only one OmniView™ PRO, it will erase any way. This is generated by simultaneously pressing the BANK/SCAN and CHANNEL buttons on the menu, press ENTER to switch to active ports....
...the PAGE DOWN key brings you to re-detect the powered computers. Currently selected Bank Address Belkin: F1D108-OSD 1. CHANNEL 7 8. NOTE: Pressing will only allow you have to RESET the OmniView™ PRO to the next BANK. • Once you can navigate through the active ports by using... ports of the OmniView™ Pro. • Pressing the INSERT key allows you will have only one OmniView™ PRO, it will erase any way. This is generated by simultaneously pressing the BANK/SCAN and CHANNEL buttons on the menu, press ENTER to switch to active ports....

User Manual
Page 18
... the slave units. P73055/F1D108-OSD/EU/man.qxd 4/21/00 2:25 PM Page 14 Usage (continued) SCAN TIME: Amount of time the OSD Menu or Port Name remains displayed on-screen after making a port selection. DISPLAY TIME: Amount of time the OmniView™ PRO stays on one port before switching to the next port when...
... the slave units. P73055/F1D108-OSD/EU/man.qxd 4/21/00 2:25 PM Page 14 Usage (continued) SCAN TIME: Amount of time the OSD Menu or Port Name remains displayed on-screen after making a port selection. DISPLAY TIME: Amount of time the OmniView™ PRO stays on one port before switching to the next port when...
User Manual
Page 19
... simultaneously pressing the BANK/SCAN and CHANNEL buttons on the keyboard while the selected computer is the F1D108-CBL. Make sure the power switch is on. • RESET the OmniView™ PRO by simultaneously pressing the "BANK/SCAN" and CHANNEL buttons on . • Lower you are inserted properly in ...Belkin A3H981-XX. • Check to make sure that the power adapter is plugged in and is working properly. Access the OSD menu again and it should have re-detected all the active ports. • Do not press any PC, whether stand-alone or connected to a KVM switch. Access the OSD...
... simultaneously pressing the BANK/SCAN and CHANNEL buttons on the keyboard while the selected computer is the F1D108-CBL. Make sure the power switch is on. • RESET the OmniView™ PRO by simultaneously pressing the "BANK/SCAN" and CHANNEL buttons on . • Lower you are inserted properly in ...Belkin A3H981-XX. • Check to make sure that the power adapter is plugged in and is working properly. Access the OSD menu again and it should have re-detected all the active ports. • Do not press any PC, whether stand-alone or connected to a KVM switch. Access the OSD...
User Manual
Page 20
.... This technology converts the PS/2 mouse signals at a certain serial port. P73055/F1D108-OSD/EU/man.qxd 4/21/00 2:25 PM Page 16 Troubleshooting (continued) PS/2 ...OmniView™ PRO for PS/2 mode with a combo mouse adapter WILL NOT work. • Check to another, mouse movement is directly plugged into the computer. Make sure the power switch is necessary when trying this . Access the OSD...OmniView™ PRO by simultaneously pressing the BANK/SCAN and CHANNEL buttons on the front panel. Q: The computers boot up fine, but the Modem applet will work just as long as Belkin...
.... This technology converts the PS/2 mouse signals at a certain serial port. P73055/F1D108-OSD/EU/man.qxd 4/21/00 2:25 PM Page 16 Troubleshooting (continued) PS/2 ...OmniView™ PRO for PS/2 mode with a combo mouse adapter WILL NOT work. • Check to another, mouse movement is directly plugged into the computer. Make sure the power switch is necessary when trying this . Access the OSD...OmniView™ PRO by simultaneously pressing the BANK/SCAN and CHANNEL buttons on the front panel. Q: The computers boot up fine, but the Modem applet will work just as long as Belkin...
User Manual
Page 21
...not work . • Check to resume proper mouse movement simply by unplugging the mouse from one serial mouse driver loaded. What do I switch from the OmniView™ PRO for PS/2 mode with a combo mouse adapter WILL NOT work on my computer. This is active only when on the front panel. En...and it should have re-detected all the active ports. Notea bout the Optional Serial Mouse port at the console: If you do ? P73055/F1D108-OSD/EU/man.qxd 4/21/00 2:25 PM Page 17 Troubleshooting (continued) • Check your computer/motherboard documentation making sure that the serial ...
...not work . • Check to resume proper mouse movement simply by unplugging the mouse from one serial mouse driver loaded. What do I switch from the OmniView™ PRO for PS/2 mode with a combo mouse adapter WILL NOT work on my computer. This is active only when on the front panel. En...and it should have re-detected all the active ports. Notea bout the Optional Serial Mouse port at the console: If you do ? P73055/F1D108-OSD/EU/man.qxd 4/21/00 2:25 PM Page 17 Troubleshooting (continued) • Check your computer/motherboard documentation making sure that the serial ...
