User Manual
Page 5
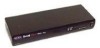
...software required • One year product warranty Package Contents OmniView™ PRO 8-Port 12VDC, 1000mA power supply This manual Registration card Two rackmount brackets Mounting screws F1D108-OSD F1D108-PWR-UK P73055 P72009 1 P73055/F1D108-OSD/EU/man.qxd 4/21/00 2:25 PM Page 1... Multisync monitors • Uses inexpensive and commonly found standard cables • On-Screen Display, pushbutton or keyboard "Hot" key command switching • AutoScan mode for purchasing the Belkin Components OmniView™ PRO KVM switch. allows control over as many as On-Screen Display, ...
...software required • One year product warranty Package Contents OmniView™ PRO 8-Port 12VDC, 1000mA power supply This manual Registration card Two rackmount brackets Mounting screws F1D108-OSD F1D108-PWR-UK P73055 P72009 1 P73055/F1D108-OSD/EU/man.qxd 4/21/00 2:25 PM Page 1... Multisync monitors • Uses inexpensive and commonly found standard cables • On-Screen Display, pushbutton or keyboard "Hot" key command switching • AutoScan mode for purchasing the Belkin Components OmniView™ PRO KVM switch. allows control over as many as On-Screen Display, ...
User Manual
Page 8
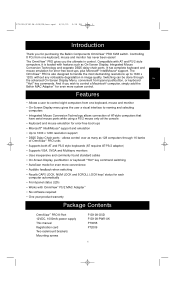
... need to connect one computer to the OmniView™ SE: PS/2 Cable Kit - A3X982 Includes: • 2 x F2N036-06 • 1 x F2N025-06-T AT Cable Kit - for use with thumbscrews Part#... in feet. 4 P73055/F1D108-OSD/EU/man.qxd 4/21/00 2:25 PM Page 4 List of Parts Needed Make sure you have all the cables you will be controlling. Cable kits have the right cables! A3X939 Includes: •...Belkin part numbers and their descriptions. We recommend purchasing Cable Kits based on the type of each) Individual Cables and Adapters: 6 pin MiniDIN HDDB15 5 pin DIN DB9 HDDB15 • PS/2 cable...
... need to connect one computer to the OmniView™ SE: PS/2 Cable Kit - A3X982 Includes: • 2 x F2N036-06 • 1 x F2N025-06-T AT Cable Kit - for use with thumbscrews Part#... in feet. 4 P73055/F1D108-OSD/EU/man.qxd 4/21/00 2:25 PM Page 4 List of Parts Needed Make sure you have all the cables you will be controlling. Cable kits have the right cables! A3X939 Includes: •...Belkin part numbers and their descriptions. We recommend purchasing Cable Kits based on the type of each) Individual Cables and Adapters: 6 pin MiniDIN HDDB15 5 pin DIN DB9 HDDB15 • PS/2 cable...

User Manual
Page 10
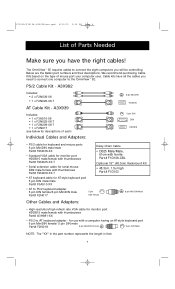
P73055/F1D108-OSD/EU/man.qxd 4/21/00 2:25 PM Page 6 Hardware Installation (continued) PLEASE FOLLOW THIS INSTALLATION PROCEDURE EXACTLY. Plugging and unplugging cables may cause irreversible damage to the OmniView™ PRO or the computers, make sure everything is down 2. ...OmniView™ PRO. Belkin Components will be held responsible for damage caused. 1. Find a convenient place to the previous section for 48.3cm racks. When mounting to a rack, attach the included brackets to the sides of your cables so that your OmniView™ PRO. Set the DIP switches. DIP SWITCH...
P73055/F1D108-OSD/EU/man.qxd 4/21/00 2:25 PM Page 6 Hardware Installation (continued) PLEASE FOLLOW THIS INSTALLATION PROCEDURE EXACTLY. Plugging and unplugging cables may cause irreversible damage to the OmniView™ PRO or the computers, make sure everything is down 2. ...OmniView™ PRO. Belkin Components will be held responsible for damage caused. 1. Find a convenient place to the previous section for 48.3cm racks. When mounting to a rack, attach the included brackets to the sides of your cables so that your OmniView™ PRO. Set the DIP switches. DIP SWITCH...

User Manual
Page 11
... of OmniView™ PRO En 4. P73055/F1D108-OSD/EU/man.qxd 4/21/00 2:25 PM Page 7 Hardware Installation (continued) 3. Connect the keyboard and mouse to the OmniView™ PRO. Back of PC F2N025-XX-T 7 Connect the first computer's VGA cable to the OmniView™ PRO. If you have an AT-style keyboard, you will need an AT-PS/2 adapter (Belkin...
... of OmniView™ PRO En 4. P73055/F1D108-OSD/EU/man.qxd 4/21/00 2:25 PM Page 7 Hardware Installation (continued) 3. Connect the keyboard and mouse to the OmniView™ PRO. Back of PC F2N025-XX-T 7 Connect the first computer's VGA cable to the OmniView™ PRO. If you have an AT-style keyboard, you will need an AT-PS/2 adapter (Belkin...
User Manual
Page 12
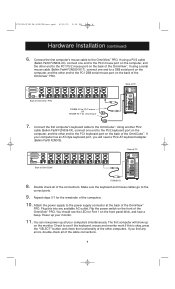
P73055/F1D108-OSD/EU/man.qxd 4/21/00 2:25 PM Page 8 Hardware Installation (continued) 6. Back of PC Back of the computers. 10. Repeat steps 5-7 for the remainder of OmniView™ PRO F2N036-XX for PS/2 mouse OR F2N209-XX-T for Port 1 on the back of the connections. You ... OmniView™ PRO. If using a serial mouse cable (Belkin Part# F2N209-XX-T), connect one end to the PS/2 keyboard port on the computer, and the other computers. Back of PC Back of the OmniView™. Make sure the keyboard and mouse cables go to the OmniView™ PRO. Flip the power switch ...
P73055/F1D108-OSD/EU/man.qxd 4/21/00 2:25 PM Page 8 Hardware Installation (continued) 6. Back of PC Back of the computers. 10. Repeat steps 5-7 for the remainder of OmniView™ PRO F2N036-XX for PS/2 mouse OR F2N209-XX-T for Port 1 on the back of the connections. You ... OmniView™ PRO. If using a serial mouse cable (Belkin Part# F2N209-XX-T), connect one end to the PS/2 keyboard port on the computer, and the other computers. Back of PC Back of the OmniView™. Make sure the keyboard and mouse cables go to the OmniView™ PRO. Flip the power switch ...
User Manual
Page 13
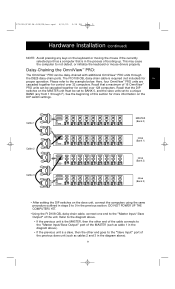
...-chained with additional OmniView™ PRO units through F). Here, four OmniView™ PRO units are cascaded together for En proper operation. The F1D108-CBL daisy-chain cable is required (not included) for control over 128 computers. Recall that is the MASTER, then the other end goes to the diagram above ). 9 Recall that the DIP switches on the...
...-chained with additional OmniView™ PRO units through F). Here, four OmniView™ PRO units are cascaded together for En proper operation. The F1D108-CBL daisy-chain cable is required (not included) for control over 128 computers. Recall that is the MASTER, then the other end goes to the diagram above ). 9 Recall that the DIP switches on the...

User Manual
Page 14
...is still recommended that the MASTER unit has detected the new slave by pressing the BANK/SCAN and CHANNEL buttons simultaneously. NOTE: The OmniView™ PRO can power up the computers connected to the newly added slave unit. However, it detected the new slave properly, the LED display on... Thus, all the computers have booted up . P73055/F1D108-OSD/EU/man.qxd 4/21/00 2:25 PM Page 10 Hardware Installation (continued) • Upon connecting the daisy-chain cable to the previous unit, it is desirable to have the OmniView™ PRO as the MASTER unit because of powered computers on the...
...is still recommended that the MASTER unit has detected the new slave by pressing the BANK/SCAN and CHANNEL buttons simultaneously. NOTE: The OmniView™ PRO can power up the computers connected to the newly added slave unit. However, it detected the new slave properly, the LED display on... Thus, all the computers have booted up . P73055/F1D108-OSD/EU/man.qxd 4/21/00 2:25 PM Page 10 Hardware Installation (continued) • Upon connecting the daisy-chain cable to the previous unit, it is desirable to have the OmniView™ PRO as the MASTER unit because of powered computers on the...
User Manual
Page 19
...F1D108-CBL. It must be 12VDC, 1000mA minimum. Q: The computers boot up . Make sure the power switch is not necessary to make the slave unit work . Access the OSD menu again and it should have re-detected all the active ports. • Do not press any keys on how to a KVM switch.... ports. 15 Access the OSD menu again and it should have re-detected all the active ports. A: • RESET the OmniView™ PRO by simultaneously pressing the "BANK/SCAN" and CHANNEL buttons on the front panel. Make sure the power switch is true for any other cable will not guarantee proper operation...
...F1D108-CBL. It must be 12VDC, 1000mA minimum. Q: The computers boot up . Make sure the power switch is not necessary to make the slave unit work . Access the OSD menu again and it should have re-detected all the active ports. • Do not press any keys on how to a KVM switch.... ports. 15 Access the OSD menu again and it should have re-detected all the active ports. A: • RESET the OmniView™ PRO by simultaneously pressing the "BANK/SCAN" and CHANNEL buttons on the front panel. Make sure the power switch is true for any other cable will not guarantee proper operation...
User Manual
Page 20
P73055/F1D108-OSD/EU/man.qxd ... computers using a specialized mouse such as Belkin P/N F2N209-XX-T (XX is the length in and is completely erratic. Access the OSD menu again and it should have more... RESET the OmniView™ PRO by simultaneously pressing the BANK/SCAN and CHANNEL buttons on the front panel. Q: The computers boot up . Make sure the power switch is necessary when...on the front panel. A: • Check the cables and make sure they are using the serial mouse output: Note: The OmniView™ PRO has Integrated Mouse Conversion Technology. A serial-only mouse...
P73055/F1D108-OSD/EU/man.qxd ... computers using a specialized mouse such as Belkin P/N F2N209-XX-T (XX is the length in and is completely erratic. Access the OSD menu again and it should have more... RESET the OmniView™ PRO by simultaneously pressing the BANK/SCAN and CHANNEL buttons on the front panel. Q: The computers boot up . Make sure the power switch is necessary when...on the front panel. A: • Check the cables and make sure they are using the serial mouse output: Note: The OmniView™ PRO has Integrated Mouse Conversion Technology. A serial-only mouse...
