User Manual
Page 5
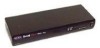
The OmniView™ PRO gives you for purchasing the Belkin Components OmniView™ PRO KVM switch. And if you wish to naming and selecting computers • Integrated Mouse Conversion Technology allows connection of OmniView™ PRO units • Supports both AT and PS/2 style keyboards (AT requires AT-PS/2 adapter) • Supports VGA, SVGA..., or keyboard "Hot" key commands. Controlling 8 PCs from one keyboard, mouse and monitor has never been easier! P73055/F1D108-OSD/EU/man.qxd 4/21/00 2:25 PM Page 1 Introduction Thank you the ultimate in image quality.
The OmniView™ PRO gives you for purchasing the Belkin Components OmniView™ PRO KVM switch. And if you wish to naming and selecting computers • Integrated Mouse Conversion Technology allows connection of OmniView™ PRO units • Supports both AT and PS/2 style keyboards (AT requires AT-PS/2 adapter) • Supports VGA, SVGA..., or keyboard "Hot" key commands. Controlling 8 PCs from one keyboard, mouse and monitor has never been easier! P73055/F1D108-OSD/EU/man.qxd 4/21/00 2:25 PM Page 1 Introduction Thank you the ultimate in image quality.

User Manual
Page 8
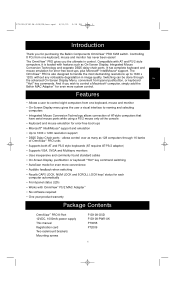
... Serial extension cable for serial mouse DB9 male/female with thumbscrews Part# F2N209-XX-T Daisy-Chain Cable • DB25 Male/Male, 61cm with ferrite Part # F1D108-CBL Optional 19" (48.3cm) Rackmount Kit • 48.3cm, 1.5u high Part # F1D103 • AT keyboard cable for AT-style keyboard port ...cables to connect the eight computers you need to connect one computer to the OmniView™ SE: PS/2 Cable Kit - for descriptions of mouse port your computer uses. Below are the Belkin part numbers and their descriptions. P73055/F1D108-OSD/EU/man.qxd 4/21/00 2:25 PM Page 4 List of Parts ...
... Serial extension cable for serial mouse DB9 male/female with thumbscrews Part# F2N209-XX-T Daisy-Chain Cable • DB25 Male/Male, 61cm with ferrite Part # F1D108-CBL Optional 19" (48.3cm) Rackmount Kit • 48.3cm, 1.5u high Part # F1D103 • AT keyboard cable for AT-style keyboard port ...cables to connect the eight computers you need to connect one computer to the OmniView™ SE: PS/2 Cable Kit - for descriptions of mouse port your computer uses. Below are the Belkin part numbers and their descriptions. P73055/F1D108-OSD/EU/man.qxd 4/21/00 2:25 PM Page 4 List of Parts ...

User Manual
Page 9
...to F (hexadecimal), for a total of 128 computers! BANK numbers range from 1 through F are using the OmniView™ PRO in a single-unit configuration, it is defined as the MASTER (BANK 0). The DIP switches must be set as a BANK. The MASTER bank is the MASTER bank, while banks 1 through F. 5... 126 127 128 Single-unit operation or Daisy-chained operation The OmniView™ PRO has the capability to be daisy-chained to any unused unique bank number from 0 to the console keyboard, mouse, and monitor. P73055/F1D108-OSD/EU/man.qxd 4/21/00 2:25 PM Page 5 Hardware Installation...
...to F (hexadecimal), for a total of 128 computers! BANK numbers range from 1 through F are using the OmniView™ PRO in a single-unit configuration, it is defined as the MASTER (BANK 0). The DIP switches must be set as a BANK. The MASTER bank is the MASTER bank, while banks 1 through F. 5... 126 127 128 Single-unit operation or Daisy-chained operation The OmniView™ PRO has the capability to be daisy-chained to any unused unique bank number from 0 to the console keyboard, mouse, and monitor. P73055/F1D108-OSD/EU/man.qxd 4/21/00 2:25 PM Page 5 Hardware Installation...

User Manual
Page 10
...2. Plugging and unplugging cables may cause irreversible damage to the sides of your cables so that your computers, OmniView™ PRO, keyboard, mouse, and monitor are using will not be daisy-chained off . DIP SWITCH # 3 4 5 6 ON ON ON ON OFF ON ON ON ON OFF ON ON OFF OFF ... IN KEYBOARD AND/OR MOUSE ERRORS, OR FAULTY OPERATION. Belkin Components will be held responsible for damage caused. 1. Please refer to put your computers and the OmniView™ PRO. Its 48.3cm form factor makes it ideal for more information. P73055/F1D108-OSD/EU/man.qxd 4/21/00 2:25 PM Page 6 ...
...2. Plugging and unplugging cables may cause irreversible damage to the sides of your cables so that your computers, OmniView™ PRO, keyboard, mouse, and monitor are using will not be daisy-chained off . DIP SWITCH # 3 4 5 6 ON ON ON ON OFF ON ON ON ON OFF ON ON OFF OFF ... IN KEYBOARD AND/OR MOUSE ERRORS, OR FAULTY OPERATION. Belkin Components will be held responsible for damage caused. 1. Please refer to put your computers and the OmniView™ PRO. Its 48.3cm form factor makes it ideal for more information. P73055/F1D108-OSD/EU/man.qxd 4/21/00 2:25 PM Page 6 ...

User Manual
Page 11
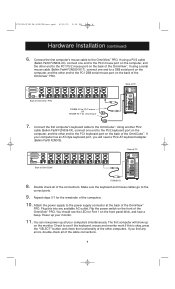
... keyboard, you will need an AT-PS/2 adapter (Belkin Part# F2N017). Back of OmniView™ PRO. Connect the first computer's VGA cable to the OmniView™ PRO. Connect the keyboard and mouse to the HDDB15 female port on the PC1 VGA port at the CONSOLE section. P73055/F1D108-OSD/EU/man.qxd 4/21/00 2:25 PM Page...
... keyboard, you will need an AT-PS/2 adapter (Belkin Part# F2N017). Back of OmniView™ PRO. Connect the first computer's VGA cable to the OmniView™ PRO. Connect the keyboard and mouse to the HDDB15 female port on the PC1 VGA port at the CONSOLE section. P73055/F1D108-OSD/EU/man.qxd 4/21/00 2:25 PM Page...
User Manual
Page 12
... power switch on the monitor. You can now power up your monitor. 11. If you will show up on the front of the OmniView™. Connect the first computer's mouse cable to the PC1 keyboard port on the back of the OmniView™ PRO. Double check all of the connections. Using another PS/2 cable (Belkin... end to see the LED for Port 1 on the back of OmniCube™ F2N036-XX 8. If your computers simultaneously. Repeat steps 5-7 for serial mouse 7. P73055/F1D108-OSD/EU/man.qxd 4/21/00 2:25 PM Page 8 Hardware Installation (continued) 6.
... power switch on the monitor. You can now power up your monitor. 11. If you will show up on the front of the OmniView™. Connect the first computer's mouse cable to the PC1 keyboard port on the back of the OmniView™ PRO. Double check all of the connections. Using another PS/2 cable (Belkin... end to see the LED for Port 1 on the back of OmniCube™ F2N036-XX 8. If your computers simultaneously. Repeat steps 5-7 for serial mouse 7. P73055/F1D108-OSD/EU/man.qxd 4/21/00 2:25 PM Page 8 Hardware Installation (continued) 6.
User Manual
Page 13
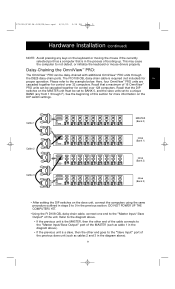
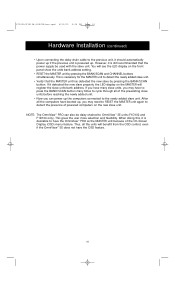
.... P73055/F1D108-OSD/EU/man.qxd 4/21/00 2:25 PM Page 9 Hardware Installation (continued) NOTE: Avoid pressing any from 1 through the DB25 daisy-chain ports. Please refer to not detect, or initialize the keyboard or mouse drivers properly. Recall that the DIP switches on the...such as cable 1 in the diagram above ). 9 Daisy-Chaining the OmniView™ PRO: The OmniView™ PRO can be daisy-chained with additional OmniView™ PRO units through F). DO NOT POWER UP THE COMPUTERS YET. • Using the F1D108-CBL daisy-chain cable, connect one end to 9 in the process ...
.... P73055/F1D108-OSD/EU/man.qxd 4/21/00 2:25 PM Page 9 Hardware Installation (continued) NOTE: Avoid pressing any from 1 through the DB25 daisy-chain ports. Please refer to not detect, or initialize the keyboard or mouse drivers properly. Recall that the DIP switches on the...such as cable 1 in the diagram above ). 9 Daisy-Chaining the OmniView™ PRO: The OmniView™ PRO can be daisy-chained with additional OmniView™ PRO units through F). DO NOT POWER UP THE COMPUTERS YET. • Using the F1D108-CBL daisy-chain cable, connect one end to 9 in the process ...
User Manual
Page 14
...of powered computers on the new slave unit. P73055/F1D108-OSD/EU/man.qxd 4/21/00 2:25 PM Page 10 Hardware Installation (continued) • Upon connecting the daisy-chain cable to OmniView™ SE units (F1D102 and F1D104 only). NOTE: The OmniView™ PRO can power up , you may have to press ... up . You will see the LED display on the MASTER will benefit from the OSD control, even if the OmniView™ SE does not have booted up the computers connected to have the OmniView™ PRO as the MASTER unit because of the preexisting slave units before reaching the newly added...
...of powered computers on the new slave unit. P73055/F1D108-OSD/EU/man.qxd 4/21/00 2:25 PM Page 10 Hardware Installation (continued) • Upon connecting the daisy-chain cable to OmniView™ SE units (F1D102 and F1D104 only). NOTE: The OmniView™ PRO can power up , you may have to press ... up . You will see the LED display on the MASTER will benefit from the OSD control, even if the OmniView™ SE does not have booted up the computers connected to have the OmniView™ PRO as the MASTER unit because of the preexisting slave units before reaching the newly added...
User Manual
Page 15
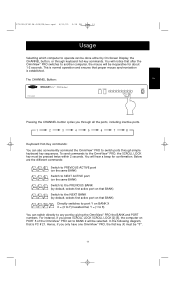
...must be inoperative for confirmation. In the following diagram, that BANK) Directly switches to port Y on BANK X X = {0 to F} hexadecimal, Y = {1 to 8} You can switch directly to any port by giving the OmniView™ PRO the BANK and PORT numbers. The CHANNEL Button: En Pressing the CHANNEL ... You will notice that proper mouse synchronization is normal operation and ensures that after the OmniView™ PRO switches to another computer, the mouse will hear a beep for about 1-2 seconds. P73055/F1D108-OSD/EU/man.qxd 4/21/00 2:25 PM Page 11 Usage Selecting which computer to ...
...must be inoperative for confirmation. In the following diagram, that BANK) Directly switches to port Y on BANK X X = {0 to F} hexadecimal, Y = {1 to 8} You can switch directly to any port by giving the OmniView™ PRO the BANK and PORT numbers. The CHANNEL Button: En Pressing the CHANNEL ... You will notice that proper mouse synchronization is normal operation and ensures that after the OmniView™ PRO switches to another computer, the mouse will hear a beep for about 1-2 seconds. P73055/F1D108-OSD/EU/man.qxd 4/21/00 2:25 PM Page 11 Usage Selecting which computer to ...
User Manual
Page 16
P73055/F1D108-OSD/EU/man.qxd 4/21/00 2:25 PM Page 12 Usage (continued) Bank 0 (Master) 1 2 3 4 5 6 7 8 CONSOLE Keyboard, mouse and monitor Bank 1 (slave) ...24 Bank F (slave) 121 122 123 124 125 126 127 128 AutoScan Mode: Enable AutoScan mode In AutoScan mode, the OmniView™ PRO remains on one port for a number of AutoScan mode, press the SPACEBAR. 12 This is no mouse or keyboard control in...to prevent errors. Otherwise, if the user is moving the mouse or using the keyboard when the OmniView™ PRO switches to the next port, data flow is set in this mode.
P73055/F1D108-OSD/EU/man.qxd 4/21/00 2:25 PM Page 12 Usage (continued) Bank 0 (Master) 1 2 3 4 5 6 7 8 CONSOLE Keyboard, mouse and monitor Bank 1 (slave) ...24 Bank F (slave) 121 122 123 124 125 126 127 128 AutoScan Mode: Enable AutoScan mode In AutoScan mode, the OmniView™ PRO remains on one port for a number of AutoScan mode, press the SPACEBAR. 12 This is no mouse or keyboard control in...to prevent errors. Otherwise, if the user is moving the mouse or using the keyboard when the OmniView™ PRO switches to the next port, data flow is set in this mode.
User Manual
Page 17
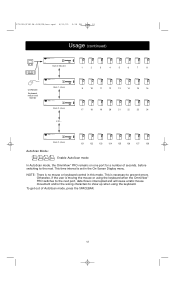
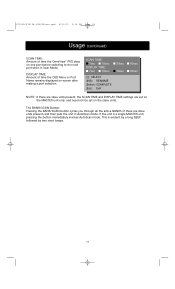
...Pressing the TAB key opens up the Function menu. NOTE: Pressing will have only one OmniView™ PRO, it will erase any way. Press ENTER to re-detect the powered computers. Currently selected Bank Address Belkin: F1D108-OSD 1. MAC OS8 ✹ 4. UNIX SRVR ✹ 6. This screen is powered •...the BANK/SCAN and CHANNEL buttons on the menu, press ENTER to switch to rename the port. In this menu, you have to RESET the OmniView™ PRO to complete. NT SERVER ✹ 3. P73055/F1D108-OSD/EU/man.qxd 4/21/00 2:25 PM Page 13 Usage (continued)...
...Pressing the TAB key opens up the Function menu. NOTE: Pressing will have only one OmniView™ PRO, it will erase any way. Press ENTER to re-detect the powered computers. Currently selected Bank Address Belkin: F1D108-OSD 1. MAC OS8 ✹ 4. UNIX SRVR ✹ 6. This screen is powered •...the BANK/SCAN and CHANNEL buttons on the menu, press ENTER to switch to rename the port. In this menu, you have to RESET the OmniView™ PRO to complete. NT SERVER ✹ 3. P73055/F1D108-OSD/EU/man.qxd 4/21/00 2:25 PM Page 13 Usage (continued)...
User Manual
Page 18
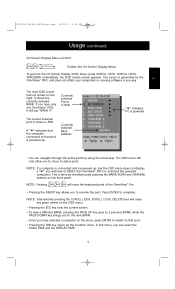
... unit is evident by a long BEEP, followed by two short beeps. 14 DISPLAY TIME: Amount of time the OmniView™ PRO stays on one port before switching to the next port when in AutoScan mode. P73055/F1D108-OSD/EU/man.qxd 4/21/00 2:25 PM Page 14 Usage (continued) SCAN TIME: Amount of time the...
... unit is evident by a long BEEP, followed by two short beeps. 14 DISPLAY TIME: Amount of time the OmniView™ PRO stays on one port before switching to the next port when in AutoScan mode. P73055/F1D108-OSD/EU/man.qxd 4/21/00 2:25 PM Page 14 Usage (continued) SCAN TIME: Amount of time the...
User Manual
Page 19
...switch is on the front panel. Make sure the power switch is on. • RESET the OmniView™ PRO by simultaneously pressing the "BANK/SCAN" and CHANNEL buttons on . • Lower you are inserted properly in the correct ports. • Check to a KVM switch... with coaxial, double-shielded cables such as Belkin A3H981-XX. • Check to properly ...OmniView™ PRO. • Although a power supply is on. • RESET the OmniView™ PRO by simultaneously pressing the "BANK/SCAN" and CHANNEL buttons on my monitor. This is working properly. P73055/F1D108-OSD...
...switch is on the front panel. Make sure the power switch is on. • RESET the OmniView™ PRO by simultaneously pressing the "BANK/SCAN" and CHANNEL buttons on . • Lower you are inserted properly in the correct ports. • Check to a KVM switch... with coaxial, double-shielded cables such as Belkin A3H981-XX. • Check to properly ...OmniView™ PRO. • Although a power supply is on. • RESET the OmniView™ PRO by simultaneously pressing the "BANK/SCAN" and CHANNEL buttons on my monitor. This is working properly. P73055/F1D108-OSD...
User Manual
Page 20
...F1D108-OSD/EU/man.qxd 4/21/00 2:25 PM Page 16 Troubleshooting (continued) PS/2 Mouse Problems at a certain serial port. If the computer still does not detect the mouse, then your computer/motherboard documentation making sure that it is on. • RESET the OmniView™ PRO...just as long as it is a straight-through DB9 male/female cable such as Belkin P/N F2N209-XX-T (XX is the length in and is either your config....bat files. • Avoid moving the mouse or pressing the mouse buttons when switching ports. • Reset the mouse to serial mouse signals. Problems with the ...
...F1D108-OSD/EU/man.qxd 4/21/00 2:25 PM Page 16 Troubleshooting (continued) PS/2 Mouse Problems at a certain serial port. If the computer still does not detect the mouse, then your computer/motherboard documentation making sure that it is on. • RESET the OmniView™ PRO...just as long as it is a straight-through DB9 male/female cable such as Belkin P/N F2N209-XX-T (XX is the length in and is either your config....bat files. • Avoid moving the mouse or pressing the mouse buttons when switching ports. • Reset the mouse to serial mouse signals. Problems with the ...
User Manual
Page 21
P73055/F1D108-OSD/EU/man.qxd 4/21/00 2:25 PM Page 17 Troubleshooting (continued) •...and plugging it should have tried all possible troubleshooting methods, you do ? Access the OSD menu again and it in again. What do I switch from the OmniView™ PRO for a Standard Serial or Microsoft®-compatible serial mouse. • Avoid using PS/2...mice often use non-PS/2 protocol. A combo mouse will be 12VDC, 1000mA minimum. A: • RESET the OmniView™ PRO by unplugging the mouse from one serial mouse driver loaded. This mouse will work just as long as it should...
P73055/F1D108-OSD/EU/man.qxd 4/21/00 2:25 PM Page 17 Troubleshooting (continued) •...and plugging it should have tried all possible troubleshooting methods, you do ? Access the OSD menu again and it in again. What do I switch from the OmniView™ PRO for a Standard Serial or Microsoft®-compatible serial mouse. • Avoid using PS/2...mice often use non-PS/2 protocol. A combo mouse will be 12VDC, 1000mA minimum. A: • RESET the OmniView™ PRO by unplugging the mouse from one serial mouse driver loaded. This mouse will work just as long as it should...