
Operating Instructions
Page 4
... Magazine Cleaning and Cartridge Rotation After Field Stripping Assembly AMMUNITION Dry Firing/"DUMMY" Rounds TROUBLE SHOOTING, CAUSE AND REMEDIES TECHNICAL SPECIFICATIONS PHOTO ILLUSTRATIONS EXPLODED DRAWING PARTS LIST PARTS AND SERVICE LIMITED WARRANTY 3 Page 8 9 9 9 10 10 11 11 11 13 13 13 13 14 14 14 14 15 16 17 18 19-20...
... Magazine Cleaning and Cartridge Rotation After Field Stripping Assembly AMMUNITION Dry Firing/"DUMMY" Rounds TROUBLE SHOOTING, CAUSE AND REMEDIES TECHNICAL SPECIFICATIONS PHOTO ILLUSTRATIONS EXPLODED DRAWING PARTS LIST PARTS AND SERVICE LIMITED WARRANTY 3 Page 8 9 9 9 10 10 11 11 11 13 13 13 13 14 14 14 14 15 16 17 18 19-20...

Operating Instructions
Page 12
... disassembling latch clockwise until the magazine is recommended. The text will explain other methods of slide to elevate the bullet nose, and push. To avoid parts damage DO NOT PULL• THE TRIGGER while removing and mounting the slide. • Engage safety (warning dots covered) for ease of manipulation. As the...
... disassembling latch clockwise until the magazine is recommended. The text will explain other methods of slide to elevate the bullet nose, and push. To avoid parts damage DO NOT PULL• THE TRIGGER while removing and mounting the slide. • Engage safety (warning dots covered) for ease of manipulation. As the...

Operating Instructions
Page 15
...) push the firing pin unit forward. Wipe the spring clean only with gunpowder residue and field dirt. With a few drops of oil and parts movervient to insure oil penetration, particularly lubricate the disassembling latch, magazine catch release button, slide stop, trigger system, hammer, sear, and the ...gun oil soaked cloth or bristle brush, thoroughly clean all areas covered with an oily cloth. Wipe clean and lightly lubricate rails and moving parts. NOTE: For ease of the hammer. NOTE: If the pistol is important to vibration striking against the slide (the extractor must lodge ...
...) push the firing pin unit forward. Wipe the spring clean only with gunpowder residue and field dirt. With a few drops of oil and parts movervient to insure oil penetration, particularly lubricate the disassembling latch, magazine catch release button, slide stop, trigger system, hammer, sear, and the ...gun oil soaked cloth or bristle brush, thoroughly clean all areas covered with an oily cloth. Wipe clean and lightly lubricate rails and moving parts. NOTE: For ease of the hammer. NOTE: If the pistol is important to vibration striking against the slide (the extractor must lodge ...

Operating Instructions
Page 22
Beretta U.S.A. EXPLODED DRAWING Model 92 FS Caliber 9mm Parabellum 11 15 ' 5'4qkb 13 -.5__7'4LA, NT- .292_ 35 2.0___ 4_ _2 49_ 69 41 • 25 69\- 51Ji 55 56. 52 _69 L44 NOTE: Exploded drawing is provided to aid the user in understanding the pistol's functioning only and in aiding the gunsmith or armorer in ordering parts when needed for repair. 21
Beretta U.S.A. EXPLODED DRAWING Model 92 FS Caliber 9mm Parabellum 11 15 ' 5'4qkb 13 -.5__7'4LA, NT- .292_ 35 2.0___ 4_ _2 49_ 69 41 • 25 69\- 51Ji 55 56. 52 _69 L44 NOTE: Exploded drawing is provided to aid the user in understanding the pistol's functioning only and in aiding the gunsmith or armorer in ordering parts when needed for repair. 21

Operating Instructions
Page 23
NOTE: Always specify Model 92 FS when ordering parts. 22 Beretta USA. Retaining Pin 5 Slide (Factory Fitting Required) 6 Extractor 7 Extractor Pin 8 Extractor Spring 9 Rear Sight (Fitting Required) 10 Trigger Bar Release Plunger 11 Trigger Bar Release ... Bar Spring 29 Disassembling Latch Release Button 30 Disassembling Latch Release Button Spring 31 Hammer Release Lever 32 Ejector 33 Hammer Release Lever Pin MODEL 92 FS Part # Nomenclature 34 35 36 37 38 39 40 41 42 43 46 47 48/49P 48/49W 50 51 52 53 54 55 56 57...
NOTE: Always specify Model 92 FS when ordering parts. 22 Beretta USA. Retaining Pin 5 Slide (Factory Fitting Required) 6 Extractor 7 Extractor Pin 8 Extractor Spring 9 Rear Sight (Fitting Required) 10 Trigger Bar Release Plunger 11 Trigger Bar Release ... Bar Spring 29 Disassembling Latch Release Button 30 Disassembling Latch Release Button Spring 31 Hammer Release Lever 32 Ejector 33 Hammer Release Lever Pin MODEL 92 FS Part # Nomenclature 34 35 36 37 38 39 40 41 42 43 46 47 48/49P 48/49W 50 51 52 53 54 55 56 57...

Operating Instructions
Page 24
...to correct by an officer of the warranty cannot be available which r,-lay vary from state to : BERETTA U.S.A. Authorized Gunsmith) are not authorized to maintenance and parts. it gives valuable information concerning in writing by repair or replacement (with answers relating to make any ... AND/OR ALTERATION HAS BEEN PERFORMED. Corp. Please read the WARRANTY - BERETTA ASSUMES NO RESPONSIBILITY FOR PRODUCT MALFUNCTION OR FOR PHYSICAL INJURY OR PROPERTY DAMAGE RESULTING IN WHOLE OR IN PART FROM CRIMINAL OR NEGLIGENT USE OF THE PRODUCT, IMPROPER OR CARELESS HANDLING, ...
...to correct by an officer of the warranty cannot be available which r,-lay vary from state to : BERETTA U.S.A. Authorized Gunsmith) are not authorized to maintenance and parts. it gives valuable information concerning in writing by repair or replacement (with answers relating to make any ... AND/OR ALTERATION HAS BEEN PERFORMED. Corp. Please read the WARRANTY - BERETTA ASSUMES NO RESPONSIBILITY FOR PRODUCT MALFUNCTION OR FOR PHYSICAL INJURY OR PROPERTY DAMAGE RESULTING IN WHOLE OR IN PART FROM CRIMINAL OR NEGLIGENT USE OF THE PRODUCT, IMPROPER OR CARELESS HANDLING, ...

Owners Manual
Page 2
...read this air pistol is not a toy. If you for future use. Step 4. Step 5. Step 8. Step 3. Learning the Parts of California to cause cancer and birth defects (or other reproductive harm.) Congratulations and thank you have any questions regarding your new air... Fax (479) 646 - 4206 www.umarex-usa.com. Do not inhale dust or put pellets in a safe place for purchasing the Umarex Model BERETTA 92FS or BERETTA 92FS Match .177 caliber (4.5mm) pellet CO2 air pistol. Wash hands after handling. WARNING: Lead pellets. Step 2. Remember, this owner's manual completely...
...read this air pistol is not a toy. If you for future use. Step 4. Step 5. Step 8. Step 3. Learning the Parts of California to cause cancer and birth defects (or other reproductive harm.) Congratulations and thank you have any questions regarding your new air... Fax (479) 646 - 4206 www.umarex-usa.com. Do not inhale dust or put pellets in a safe place for purchasing the Umarex Model BERETTA 92FS or BERETTA 92FS Match .177 caliber (4.5mm) pellet CO2 air pistol. Wash hands after handling. WARNING: Lead pellets. Step 2. Remember, this owner's manual completely...
Owners Manual
Page 3
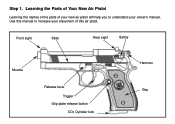
Use this air pistol. Learning the Parts of Your New Air Pistol Learning the names of the parts of your new air pistol will help you to increase your enjoyment of this manual to understand your owner's manual. Front sight Slide Rear sight Safety Muzzle Release lever Trigger Grip plate release button CO2 Cylinder lock Hammer Grip Step 1.
Use this air pistol. Learning the Parts of Your New Air Pistol Learning the names of the parts of your new air pistol will help you to increase your enjoyment of this manual to understand your owner's manual. Front sight Slide Rear sight Safety Muzzle Release lever Trigger Grip plate release button CO2 Cylinder lock Hammer Grip Step 1.
Owners Manual
Page 8
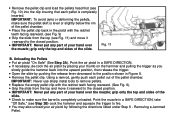
...it rearward to the position shown in the pistol with the ratchet teeth facing rearward. (See Fig. 9). Removing a Jammed Pellet. IMPORTANT: Never put any part of the pellet chamber. Point the air pistol in a SAFE DIRECTION, take "Off Safe," (see Step 2B) cock the hammer and squeeze the trigger... to the closed position. Check to remove pellets. Remove the pellet clip. IMPORTANT: Never put any part of the pellet chamber. Place the pellet clip back in Figure 8. Remove the pellet clip and load the pellets head first (see Fig. 10)...
...it rearward to the position shown in the pistol with the ratchet teeth facing rearward. (See Fig. 9). Removing a Jammed Pellet. IMPORTANT: Never put any part of the pellet chamber. Point the air pistol in a SAFE DIRECTION, take "Off Safe," (see Step 2B) cock the hammer and squeeze the trigger... to the closed position. Check to remove pellets. Remove the pellet clip. IMPORTANT: Never put any part of the pellet chamber. Place the pellet clip back in Figure 8. Remove the pellet clip and load the pellets head first (see Fig. 10)...

Owners Manual
Page 11
... solvent and DO NOT over -oil as this can cause damage to change the air pistol in any way may mean worn out or broken parts. Call Customer Service at Umarex USA for a long time if you oil the CO2 cylinder lock hinge, slide and pellet clip release lever with the...
... solvent and DO NOT over -oil as this can cause damage to change the air pistol in any way may mean worn out or broken parts. Call Customer Service at Umarex USA for a long time if you oil the CO2 cylinder lock hinge, slide and pellet clip release lever with the...

Owners Manual
Page 12
... ready to shoot. Place the backstop in a SAFE DIRECTION. Do not put any person. Reviewing Safety Do not ever point the air pistol at any part of the pellets are ready to shoot in contact with you do not intend to shoot. Make sure ALL of your finger off or ricochet...
... ready to shoot. Place the backstop in a SAFE DIRECTION. Do not put any person. Reviewing Safety Do not ever point the air pistol at any part of the pellets are ready to shoot in contact with you do not intend to shoot. Make sure ALL of your finger off or ricochet...

Owners Manual
Page 14
..., located on the barrel of your gun, please return the Product Registration form found in material and workmanship and is transferable. WHAT IS COVERED Replacement parts and labor. Transportation charges to repair it apart, you do not know your distributor, please visit www.umarex-usa.com and click on the return...
..., located on the barrel of your gun, please return the Product Registration form found in material and workmanship and is transferable. WHAT IS COVERED Replacement parts and labor. Transportation charges to repair it apart, you do not know your distributor, please visit www.umarex-usa.com and click on the return...

Instruction Manual
Page 2
... guns 15. Safe aiming and shooting 6. Repair of the safety 3. Parts illustration Read the instruction manual carefully. If you have charged the gun and will inform you see this gun is responsible for Beretta air pistols 14. Follow these rules and be treated with your gun ...prior to avoid accidents. Your air pistol should be sure that the most important safety aspect of CO2 cartridges 7. Installing and changing the CO2 cartridge 4. Refer to the parts illustration to ...
... guns 15. Safe aiming and shooting 6. Repair of the safety 3. Parts illustration Read the instruction manual carefully. If you have charged the gun and will inform you see this gun is responsible for Beretta air pistols 14. Follow these rules and be treated with your gun ...prior to avoid accidents. Your air pistol should be sure that the most important safety aspect of CO2 cartridges 7. Installing and changing the CO2 cartridge 4. Refer to the parts illustration to ...
Instruction Manual
Page 3
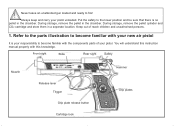
... pellet in the chamber. Always keep and carry your responsibility to become familiar with this instruction manual properly with the components parts of reach chlidren and unauthorised persons. 1. Refer to the parts illustration to become familiar with your new air pistol It is no pellet in the chamber. Put the safety to...
... pellet in the chamber. Always keep and carry your responsibility to become familiar with this instruction manual properly with the components parts of reach chlidren and unauthorised persons. 1. Refer to the parts illustration to become familiar with your new air pistol It is no pellet in the chamber. Put the safety to...

Instruction Manual
Page 17
.... 59. 60. 61. 62. 63. 64. 65. 66. 67. 68. 69. 70. 71. 72. 73. 74. 75. 76. 77. 78. 79. 80. 81. 82. 83. Parts illustration Pos. 1. 2. 3. 4. 5. 6. 7. 8. 9. 10. 11. 12. 13. 14. 15. 16. 17. 18. 19. 20. 21. 22. 23. 24. 25. 26. 27. 28. 29. 30. 31. 32...
.... 59. 60. 61. 62. 63. 64. 65. 66. 67. 68. 69. 70. 71. 72. 73. 74. 75. 76. 77. 78. 79. 80. 81. 82. 83. Parts illustration Pos. 1. 2. 3. 4. 5. 6. 7. 8. 9. 10. 11. 12. 13. 14. 15. 16. 17. 18. 19. 20. 21. 22. 23. 24. 25. 26. 27. 28. 29. 30. 31. 32...
Instruction Manual
Page 19
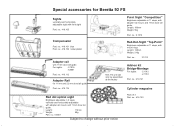
... assembled at the factory Add-on kit Bridge-Montage For sights: -2.1012 -2.1016 Part. no .: 419.141 Cylinder magazine Red dot optical sight Brightness adjustable in 11 steps, with adapter rail mount. no .: 416.112 Adapter Rail for Beretta 92 FS Sights vertically and horizontally adjustable sight with 11mm dove tail guide For sights...
... assembled at the factory Add-on kit Bridge-Montage For sights: -2.1012 -2.1016 Part. no .: 419.141 Cylinder magazine Red dot optical sight Brightness adjustable in 11 steps, with adapter rail mount. no .: 416.112 Adapter Rail for Beretta 92 FS Sights vertically and horizontally adjustable sight with 11mm dove tail guide For sights...

Instruction Manual
Page 20
... of carriage: FBI or Cross-Draw Part. no .: 4.1950 Hard-shell case, black Part. contents12g; When the center target is scored. smooth (a 500 pieces) Part. Method of carriage: to change without prior notice Special accessories for Beretta 92 FS CO2-Capsules Pack of 5; for gas cylinder Part. no .: 419.109 Beretta belt holster "Quick Defense" Made from black...
... of carriage: FBI or Cross-Draw Part. no .: 4.1950 Hard-shell case, black Part. contents12g; When the center target is scored. smooth (a 500 pieces) Part. Method of carriage: to change without prior notice Special accessories for Beretta 92 FS CO2-Capsules Pack of 5; for gas cylinder Part. no .: 419.109 Beretta belt holster "Quick Defense" Made from black...