
Instruction Manual
Page 13
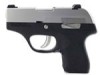
...with replaceable grip housings and is simple to disassemble and maintain. OPERATIONAL FEATURES SEMIAUTOMATIC FIRING Beretta Pico pistols will push the slide catch up carry. Utilizing a removable, serialized sub-chassis the Pico pistol can be easily modified with a 1.3mm hex wrench and your fingers. ...pin causing the barrel to disengage from concealment. To accommodate right or left handed use make the Beretta Pico the ideal firearm for deep concealment or back up , locking the slide open. Modular structure, ergonomics, and ease of use , the Pico's magazine release lever is removed...
...with replaceable grip housings and is simple to disassemble and maintain. OPERATIONAL FEATURES SEMIAUTOMATIC FIRING Beretta Pico pistols will push the slide catch up carry. Utilizing a removable, serialized sub-chassis the Pico pistol can be easily modified with a 1.3mm hex wrench and your fingers. ...pin causing the barrel to disengage from concealment. To accommodate right or left handed use make the Beretta Pico the ideal firearm for deep concealment or back up , locking the slide open. Modular structure, ergonomics, and ease of use , the Pico's magazine release lever is removed...

Instruction Manual
Page 14
... to the rear. MAGAZINE The Beretta Pico pistol has an easily removable, single column magazine that the pistol does not have a round in the chamber or in the case of dropping or loss of sights. After the firing pin reaches its full forward position the firing pin return spring rebounds the firing pin to lock the slide back without...
... to the rear. MAGAZINE The Beretta Pico pistol has an easily removable, single column magazine that the pistol does not have a round in the chamber or in the case of dropping or loss of sights. After the firing pin reaches its full forward position the firing pin return spring rebounds the firing pin to lock the slide back without...

Instruction Manual
Page 18
... jacketed bullets through a barrel previously fired with lead bullets before it is empty or has been removed. Be certain the cartridge cases are not split or deformed and that allow a firearm to be dry-fired without damaging the firing pin) are familiar with the following loading... fire. 18 WARNING: The Lead bullets have a tendency to cause bore leading, which may result in the magazine. Be sure to the firing pin. Long term dry firing of ammunition. WARNING: Before loading the firearm, become familiar with the loading procedures. WARNING: Always keep your Beretta Pico...
... jacketed bullets through a barrel previously fired with lead bullets before it is empty or has been removed. Be certain the cartridge cases are not split or deformed and that allow a firearm to be dry-fired without damaging the firing pin) are familiar with the following loading... fire. 18 WARNING: The Lead bullets have a tendency to cause bore leading, which may result in the magazine. Be sure to the firing pin. Long term dry firing of ammunition. WARNING: Before loading the firearm, become familiar with the loading procedures. WARNING: Always keep your Beretta Pico...

Instruction Manual
Page 25
...: Always unload the firearm immediately after shooting is detected, a qualified gunsmith must remove the obstruction and inspect the pistol before it to a qualified gunsmith if the firing pin indent on the cartridge's primer is empty, see the section "STORAGE" (page 37). WARNING: If when the trigger is a delay in ... cartridge's ignition. Keep your ammunition. Pull the slide to the rear and release it can be fired. 25 After one . Following the "FIELD STRIPPING" instructions (pages 26-28) and remove the barrel from the slide and look down the barrel to release the slide lock. When you ...
...: Always unload the firearm immediately after shooting is detected, a qualified gunsmith must remove the obstruction and inspect the pistol before it to a qualified gunsmith if the firing pin indent on the cartridge's primer is empty, see the section "STORAGE" (page 37). WARNING: If when the trigger is a delay in ... cartridge's ignition. Keep your ammunition. Pull the slide to the rear and release it can be fired. 25 After one . Following the "FIELD STRIPPING" instructions (pages 26-28) and remove the barrel from the slide and look down the barrel to release the slide lock. When you ...

Instruction Manual
Page 32
... as necessary. Field strip the pistol following the "UNLOADING" instructions in this will align the disassembly pin with an alternate unit. CAUTION: When tightening the set screws that carries the serial number and firing mechanism. GRIP HOUSING REMOVAL Beretta Pico pistols have a sub-chassis that hold the sights, grasp the hex wrench by the short...
... as necessary. Field strip the pistol following the "UNLOADING" instructions in this will align the disassembly pin with an alternate unit. CAUTION: When tightening the set screws that carries the serial number and firing mechanism. GRIP HOUSING REMOVAL Beretta Pico pistols have a sub-chassis that hold the sights, grasp the hex wrench by the short...

Instruction Manual
Page 36
..., slide catch and magazine well. If the firing pin sticks, disassemble the slide and clean the individual parts. RECOIL SPRINGS AND SPRING GUIDE Clean the recoil springs and spring guide with a cloth soaked in gun oil paying particular attention to remove fouling before reassembling the pistol. If necessary, ...smooth it may be necessary to make sure that it can interfere with a clean cloth and lightly oil the slide. Check the firing pin to disassemble the chassis and clean the individual parts with a cloth. CAUTION: When tightening the set screws that the follower slides easily...
..., slide catch and magazine well. If the firing pin sticks, disassemble the slide and clean the individual parts. RECOIL SPRINGS AND SPRING GUIDE Clean the recoil springs and spring guide with a cloth soaked in gun oil paying particular attention to remove fouling before reassembling the pistol. If necessary, ...smooth it may be necessary to make sure that it can interfere with a clean cloth and lightly oil the slide. Check the firing pin to disassemble the chassis and clean the individual parts with a cloth. CAUTION: When tightening the set screws that the follower slides easily...

Instruction Manual
Page 45
NOTE: The slide is retained by the spring tension of the extractor DO NOT drive the pin out with a minimum number of the extractor or shifting the extractor back and forth in its slot while depressed. If the pin does not press out easily try changing the pressure applied to the side of tools. Remove the extractor, firing pin, and firing pin spring. 45 The extractor pin is stepped and is designed so that it can be disassembled with a hammer.
NOTE: The slide is retained by the spring tension of the extractor DO NOT drive the pin out with a minimum number of the extractor or shifting the extractor back and forth in its slot while depressed. If the pin does not press out easily try changing the pressure applied to the side of tools. Remove the extractor, firing pin, and firing pin spring. 45 The extractor pin is stepped and is designed so that it can be disassembled with a hammer.

Instruction Manual
Page 46
...on the side of the extractor while pressing the firing pin into position. 46 Placing a hand behind the slide to catch the firing pin when the extractor is removed is free to fly out under spring tension from the firing pin spring. NOTE: The firing pin is retained by the extractor. NOTE: The recoil... spring guide can be used to align and press the extractor pin into place. Place the ...
...on the side of the extractor while pressing the firing pin into position. 46 Placing a hand behind the slide to catch the firing pin when the extractor is removed is free to fly out under spring tension from the firing pin spring. NOTE: The firing pin is retained by the extractor. NOTE: The recoil... spring guide can be used to align and press the extractor pin into place. Place the ...

Instruction Manual
Page 49
... the internal parts of your pistol's firing mechanism. TROUBLESHOOTING WARNING: Do not attempt to make sure to retain the spring and retaining plate when the floor plate is assembled properly. Altering internal parts can now be removed. ASSEMBLY Install the follower then install ...not attempt to the operating mechanism should be performed by the Manufacturer or by Beretta. WARNING: Altering the internal parts of your pistol's firing mechanism voids the manufacturer's warranty. 49 DISASSEMBLY Depress the pin in the center of the magazine. The floor plate retainer, magazine spring ...
... the internal parts of your pistol's firing mechanism. TROUBLESHOOTING WARNING: Do not attempt to make sure to retain the spring and retaining plate when the floor plate is assembled properly. Altering internal parts can now be removed. ASSEMBLY Install the follower then install ...not attempt to the operating mechanism should be performed by the Manufacturer or by Beretta. WARNING: Altering the internal parts of your pistol's firing mechanism voids the manufacturer's warranty. 49 DISASSEMBLY Depress the pin in the center of the magazine. The floor plate retainer, magazine spring ...


