User Guide
Page 4
Supplementary information! * Not supplied as standard with the BERNINA 330 ** Not supplied as standard with the BERNINA 350 *** Not supplied as standard with the lower thread 033301.70.04_1007_B330_B350_B380_EN Risk of material «Catches» the needle-thread loop, forming the seam together with the BERNINA 380 Glossary Balance clr LED FHS mem Bartack Satin stitching...
Supplementary information! * Not supplied as standard with the BERNINA 330 ** Not supplied as standard with the BERNINA 350 *** Not supplied as standard with the lower thread 033301.70.04_1007_B330_B350_B380_EN Risk of material «Catches» the needle-thread loop, forming the seam together with the BERNINA 380 Glossary Balance clr LED FHS mem Bartack Satin stitching...
User Guide
Page 9
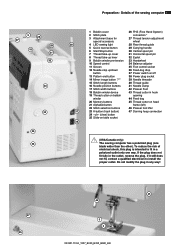
...30 37 38 1 Bobbin cover 2 Stitch plate 3 Attachment base for special accessory 4 LED sewing light 5 Quick reverse button 6 Start/Stop button 7 Thread take-up cover 8 Thread take-up lever 9 Bobbin winder pre-tension 10 Speed control 11 Screen 12 Needle stop up/down button 13 Pattern end button 14 Mirror... image button */** 15 Stitch length buttons 16 Needle position buttons 17 Stitch width buttons 18 Bobbin winder device 19 Thread cutter on bobbin winder 20 Memory buttons 21 Alphabet button 22 Stitch selection buttons 23 #-button (hash button) 24 «clr» (...
...30 37 38 1 Bobbin cover 2 Stitch plate 3 Attachment base for special accessory 4 LED sewing light 5 Quick reverse button 6 Start/Stop button 7 Thread take-up cover 8 Thread take-up lever 9 Bobbin winder pre-tension 10 Speed control 11 Screen 12 Needle stop up/down button 13 Pattern end button 14 Mirror... image button */** 15 Stitch length buttons 16 Needle position buttons 17 Stitch width buttons 18 Bobbin winder device 19 Thread cutter on bobbin winder 20 Memory buttons 21 Alphabet button 22 Stitch selection buttons 23 #-button (hash button) 24 «clr» (...

User Guide
Page 11
... large reels, add the foam pad A for sewing with your normal sitting position Raising and lowering the presser foot █ with more than one thread, i.e. Sewing 11 The FHS raises and lowers the presser foot. the feed dog is sewn Your dealer can adjust the FHS if necessary. Vertical ...pin is on the side behind the handwheel █ it clicks into the opening; le work █ raise the pin until it is raised; The thread tension is released █ the feed dog is raised as soon as the first stitch is lowered simultaneously. Presser Foot Lifter (FHS) */** Preparation - ...
... large reels, add the foam pad A for sewing with your normal sitting position Raising and lowering the presser foot █ with more than one thread, i.e. Sewing 11 The FHS raises and lowers the presser foot. the feed dog is sewn Your dealer can adjust the FHS if necessary. Vertical ...pin is on the side behind the handwheel █ it clicks into the opening; le work █ raise the pin until it is raised; The thread tension is released █ the feed dog is raised as soon as the first stitch is lowered simultaneously. Presser Foot Lifter (FHS) */** Preparation - ...

User Guide
Page 12
... spring. Sewing Winding a Bobbin █ turn clockwise. 033301.70.04_1007_B330_B350_B380_EN diameter of thread spool determines disc size █ following the direction of the arrow take thread through the thread guide and around the pre-tension stud █ then proceed as mentioned above Insert the... and cut off any excess thread on the thread cutter █ push engaging lever against bobbin, the winder works automatically █ the motor will stop automatically when the bobbin is full Inserting a Bobbin Thread cutter █ pull thread over thread cutter when removing the bobbin ...
... spring. Sewing Winding a Bobbin █ turn clockwise. 033301.70.04_1007_B330_B350_B380_EN diameter of thread spool determines disc size █ following the direction of the arrow take thread through the thread guide and around the pre-tension stud █ then proceed as mentioned above Insert the... and cut off any excess thread on the thread cutter █ push engaging lever against bobbin, the winder works automatically █ the motor will stop automatically when the bobbin is full Inserting a Bobbin Thread cutter █ pull thread over thread cutter when removing the bobbin ...

User Guide
Page 13
... █ insert the bobbin case █ take the thread over cutter A and cut it clicks into place The bobbin thread does not have to be brought up as the loose end is just the right length to «0» (off) █ open the bobbin cover &#...
... █ insert the bobbin case █ take the thread over cutter A and cut it clicks into place The bobbin thread does not have to be brought up as the loose end is just the right length to «0» (off) █ open the bobbin cover &#...
User Guide
Page 14
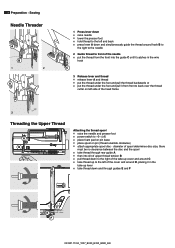
... of the cover and around D, placing it in the take-up lever █ take thread down and simultaneously guide the thread around hook B to the right to the needle 2 Guide thread to front of the needle █ put the thread from the front into the guide C until it catches in the wire hook C 3 ...Release lever and thread █ release lever A and thread █ put the thread under the foot and pull the thread backwards or █ put the thread under the foot and pull it from front to «0» (off) █ place foam pad ...
... of the cover and around D, placing it in the take-up lever █ take thread down and simultaneously guide the thread around hook B to the right to the needle 2 Guide thread to front of the needle █ put the thread from the front into the guide C until it catches in the wire hook C 3 ...Release lever and thread █ release lever A and thread █ put the thread under the foot and pull the thread backwards or █ put the thread under the foot and pull it from front to «0» (off) █ place foam pad ...
User Guide
Page 15
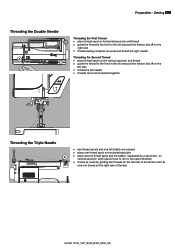
... front in the slit and past the tension disc A on the right side █ thread sewing computer as usual and thread the right needle Threading the Second Thread █ place thread spool on the vertical spool pin and thread █ guide the thread to the front in the slit and past the tension disc A on the left...
... front in the slit and past the tension disc A on the right side █ thread sewing computer as usual and thread the right needle Threading the Second Thread █ place thread spool on the vertical spool pin and thread █ guide the thread to the front in the slit and past the tension disc A on the left...

User Guide
Page 16
... On the left of the head frame █ pull both threads from front to back over the cutter █ the threads release automatically as soon as the first stitch is sewn Changing the Needle Removing the needle █ raise needle █ power switch to «0» (...
... On the left of the head frame █ pull both threads from front to back over the cutter █ the threads release automatically as soon as the first stitch is sewn Changing the Needle Removing the needle █ raise needle █ power switch to «0» (...
User Guide
Page 18
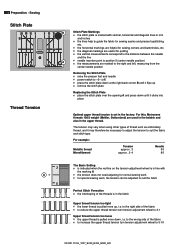
... wheel is in line with vertical, horizontal and diagonal lines in the factory. to the right side of the fabric █ to reduce the upper thread tension turn tension adjustment wheel to «0» (off) █ press the stitch plate down at the right back corner B until it may vary ...when using other types of the threads is pulled more up █ remove the stitch plate Replacing the Stitch Plate █ place the stitch plate over the opening A and press down , i.e. ...
... wheel is in line with vertical, horizontal and diagonal lines in the factory. to the right side of the fabric █ to reduce the upper thread tension turn tension adjustment wheel to «0» (off) █ press the stitch plate down at the right back corner B until it may vary ...when using other types of the threads is pulled more up █ remove the stitch plate Replacing the Stitch Plate █ place the stitch plate over the opening A and press down , i.e. ...

User Guide
Page 19
Sewing 19 Different fabrics, threads and stabilizers can be remedied with Balance to suit the fabric and produce perfect results. If the balance has been adjusted, return it to test-...
Sewing 19 Different fabrics, threads and stabilizers can be remedied with Balance to suit the fabric and produce perfect results. If the balance has been adjusted, return it to test-...

User Guide
Page 22
.... A defective needle not only damages the fabric but also the sewing computer. Skipped stitches and damage to use quality brands. Too thick thread or too fine needle The thread rubs on the edges of the groove and can occur. 22 Preparation - Checking the needle condition The needle condition should travel smoothly down...
.... A defective needle not only damages the fabric but also the sewing computer. Skipped stitches and damage to use quality brands. Too thick thread or too fine needle The thread rubs on the edges of the groove and can occur. 22 Preparation - Checking the needle condition The needle condition should travel smoothly down...

User Guide
Page 23
Sewing 23 Metafil 130/705 H-MET/75-90 Large eye Sewing with metallic threads Cordonnet (Topstitching) 130/705 H-N/80-100 Small ball point, long eye Topstitching with thick thread Leather 130/705 H-LL, H-LR/90-100 With cutting point Natural and synthetic leather and plastic films Jeans 130/705 H-J/80-110 Very fine...
Sewing 23 Metafil 130/705 H-MET/75-90 Large eye Sewing with metallic threads Cordonnet (Topstitching) 130/705 H-N/80-100 Small ball point, long eye Topstitching with thick thread Leather 130/705 H-LL, H-LR/90-100 With cutting point Natural and synthetic leather and plastic films Jeans 130/705 H-J/80-110 Very fine...

User Guide
Page 31
... again and sew second side of the zipper from bottom to the back (fewer stitches). lower presser foot and continue to sew Seam begin Hold thread firmly when starting to sew = pull fabric slightly to top Variation: Sew both sides of Application Zippers Sewing stitches - Zipper or fabric is thick or...
... again and sew second side of the zipper from bottom to the back (fewer stitches). lower presser foot and continue to sew Seam begin Hold thread firmly when starting to sew = pull fabric slightly to top Variation: Sew both sides of Application Zippers Sewing stitches - Zipper or fabric is thick or...

User Guide
Page 32
... zig-zag stitch Reverse pattern foot/sole No. 1 Automatic Buttonhole foot with slide No. 3A Darning program Quick darning of holes or worn areas Replaces threads along the lengthwise grain in the top left of the presser foot █ do not select too wide a width or too long a stitch █... side and over the edge into the air on the other side █ the edge should lie flat and not roll █ use a fine darning thread for lightweight fabric Satin stitch █ dense, short zig-zag stitch (stitch length 0.5-0.7mm, 1/5" to 1/3") █ use for a wider and/or longer darning area....
... zig-zag stitch Reverse pattern foot/sole No. 1 Automatic Buttonhole foot with slide No. 3A Darning program Quick darning of holes or worn areas Replaces threads along the lengthwise grain in the top left of the presser foot █ do not select too wide a width or too long a stitch █... side and over the edge into the air on the other side █ the edge should lie flat and not roll █ use a fine darning thread for lightweight fabric Satin stitch █ dense, short zig-zag stitch (stitch length 0.5-0.7mm, 1/5" to 1/3") █ use for a wider and/or longer darning area....

User Guide
Page 33
... damaging the loops. Closed seam Stretchy seam in knits and jerseys. Sewing Guide the open edge along the pin on the foot allows for more thread in each stitch so that the elasticity of application 33 Overlock foot/sole No. 2 Reverse pattern foot/sole No. 1 Vari-overlock stitch The Overlock foot...
... damaging the loops. Closed seam Stretchy seam in knits and jerseys. Sewing Guide the open edge along the pin on the foot allows for more thread in each stitch so that the elasticity of application 33 Overlock foot/sole No. 2 Reverse pattern foot/sole No. 1 Vari-overlock stitch The Overlock foot...
User Guide
Page 36
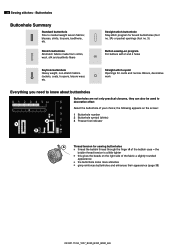
... wool, silk and synthetic fibers Straight-stitch buttonhole Stay-stitch program for sewing buttonholes █ thread the bobbin thread through the finger A of the bobbin case = the bobbin thread tension is a little tighter █ this gives the beads on program For buttons with 2...to mediumweight woven fabrics; the following appears on the screen: 1 Buttonhole number 2 Buttonhole symbol (blinks) 2 3 Presser foot indicator 1 3 A Thread tension for bound buttonholes (foot no. 3A) or pocket openings (foot no. 3) Button sewing-on the right side of your choice; blouses, ...
... wool, silk and synthetic fibers Straight-stitch buttonhole Stay-stitch program for sewing buttonholes █ thread the bobbin thread through the finger A of the bobbin case = the bobbin thread tension is a little tighter █ this gives the beads on program For buttons with 2...to mediumweight woven fabrics; the following appears on the screen: 1 Buttonhole number 2 Buttonhole symbol (blinks) 2 3 Presser foot indicator 1 3 A Thread tension for bound buttonholes (foot no. 3A) or pocket openings (foot no. 3) Button sewing-on the right side of your choice; blouses, ...

User Guide
Page 38
... is most subject to wear = where button is sewn on █ position the work accordingly Ideal cords █ Perle cotton no. 8 █ strong hand-sewing thread █ fine crochet yarn Hooking the cord in the buttonhole foot with slide no. 3A █ insert the needle at the beginning of the buttonhole...
... is most subject to wear = where button is sewn on █ position the work accordingly Ideal cords █ Perle cotton no. 8 █ strong hand-sewing thread █ fine crochet yarn Hooking the cord in the buttonhole foot with slide no. 3A █ insert the needle at the beginning of the buttonhole...

User Guide
Page 41
... Quick reverse button 2. sew the bottom bartack and securing stitches Manual keyhole buttonhole 1. The number of steps depends on the display) █ insert the lower thread in the finger of the length marking █ stop the sewing computer at the same speed. 033301.70.04_1007_B330_B350_B380_EN Manual buttonhole (all types) Sewing stitches -
... Quick reverse button 2. sew the bottom bartack and securing stitches Manual keyhole buttonhole 1. The number of steps depends on the display) █ insert the lower thread in the finger of the length marking █ stop the sewing computer at the same speed. 033301.70.04_1007_B330_B350_B380_EN Manual buttonhole (all types) Sewing stitches -
User Guide
Page 42
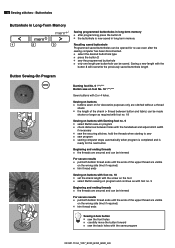
...length Darning foot No. 9 */**/*** Button sew-on program █ check distances between button and fabric) can be saved. hold the threads when starting to sew █ sew program █ sewing computer stops automatically when program is completed and is now saved in long-...sew the programmed buttonhole █ only one length per buttonhole can be trimmed For secure results █ pull both bobbin thread ends until the ends of the shank (= thread between holes with 2 or 4 holes. Buttonholes Buttonhole in Long-Term Memory 1 2 3 Button Sewing-On Program Saving programmed...
...length Darning foot No. 9 */**/*** Button sew-on program █ check distances between button and fabric) can be saved. hold the threads when starting to sew █ sew program █ sewing computer stops automatically when program is completed and is now saved in long-...sew the programmed buttonhole █ only one length per buttonhole can be trimmed For secure results █ pull both bobbin thread ends until the ends of the shank (= thread between holes with 2 or 4 holes. Buttonholes Buttonhole in Long-Term Memory 1 2 3 Button Sewing-On Program Saving programmed...

User Guide
Page 43
... Preparation █ lower the feed-dog █ pin work under the presser foot and sew one stitch and repeat the procedure Securing/fixing the thread Sew a few short basting stitches at a right angle to basting direction to the required length of a seam. Reverse pattern foot/sole No. ... position work at the beginning and end of the stitch █ sew one stitch; Test sewing █ the bobbin thread must come through to remove. Thread Use a fine darning thread for all work █ when pivoting make sure that the fabric does not become distorted Monofilament breaks █ sew more...
... Preparation █ lower the feed-dog █ pin work under the presser foot and sew one stitch and repeat the procedure Securing/fixing the thread Sew a few short basting stitches at a right angle to basting direction to the required length of a seam. Reverse pattern foot/sole No. ... position work at the beginning and end of the stitch █ sew one stitch; Test sewing █ the bobbin thread must come through to remove. Thread Use a fine darning thread for all work █ when pivoting make sure that the fabric does not become distorted Monofilament breaks █ sew more...


