
User Guide
Page 3
... a double-insulated product must be done by qualified service personnel. The symbol may deflect the needle causing it to minimize the environmental impact of manufacturing. BERNINA is being administered. 14. We strive to break. 9. Do not operate where aerosol (spray) products are provided instead of double-insulated machines. (Except USA and... remove the plug from the electrical outlet when removing covers, lubricating or when making any possible damage as threading or changing the needle, threading the bobbin or changing the presser foot. 10.
... a double-insulated product must be done by qualified service personnel. The symbol may deflect the needle causing it to minimize the environmental impact of manufacturing. BERNINA is being administered. 14. We strive to break. 9. Do not operate where aerosol (spray) products are provided instead of double-insulated machines. (Except USA and... remove the plug from the electrical outlet when removing covers, lubricating or when making any possible damage as threading or changing the needle, threading the bobbin or changing the presser foot. 10.

User Guide
Page 5
...guide 9 Reverse button 29 Spool pin (vertical, collapsible) 29 10 Thread take up cover 30 Carrying handle 11 Thread path 31 Horizontal spool pin 12 Bobbin pre-tension 32 Rear thread guide 13 Thread tension adjustment 33 Accessory box connection 14 LCD display 34 Presser foot lifter (manual) 15 Needle stop... up/down 35 Thread cutter 16 1/2 motor speed 17 Bobbin winder 18 Stitch width button 19 Needle position button 31 30 4 Back view 32 33 34 35 7 3 032622.50.04_0701_a210_EN
...guide 9 Reverse button 29 Spool pin (vertical, collapsible) 29 10 Thread take up cover 30 Carrying handle 11 Thread path 31 Horizontal spool pin 12 Bobbin pre-tension 32 Rear thread guide 13 Thread tension adjustment 33 Accessory box connection 14 LCD display 34 Presser foot lifter (manual) 15 Needle stop... up/down 35 Thread cutter 16 1/2 motor speed 17 Bobbin winder 18 Stitch width button 19 Needle position button 31 30 4 Back view 32 33 34 35 7 3 032622.50.04_0701_a210_EN

User Guide
Page 6
...• plug C into sewing computer Power switch (D) 1 the computer is switched on 0 the computer is switched off with sewing computer activa 210. Do not modify the plug in the outlet, reverse the plug. If the plug When sewing • unwind the cable Refer to ...one way. 6 Standard Accessories Accessories* Foot control *may vary from country to country Power cable D C A B • Accessory bag • 2 bobbins (+ 1 in bobbin case) • Presser feet shaft with 4 soles • Selection of electric shock, this plug is intended to fit in a polarized outlet only one blade...
...• plug C into sewing computer Power switch (D) 1 the computer is switched on 0 the computer is switched off with sewing computer activa 210. Do not modify the plug in the outlet, reverse the plug. If the plug When sewing • unwind the cable Refer to ...one way. 6 Standard Accessories Accessories* Foot control *may vary from country to country Power cable D C A B • Accessory bag • 2 bobbins (+ 1 in bobbin case) • Presser feet shaft with 4 soles • Selection of electric shock, this plug is intended to fit in a polarized outlet only one blade...

User Guide
Page 8
... the sewing computer • close the doors • push feet back into position A • attach the box to the centre needle position Seam guide for bobbin holders and presser feet. (Additional compartments and drawers are available). inserting the presser foot lifter into the opening Note: first lower the presser foot lifter...
... the sewing computer • close the doors • push feet back into position A • attach the box to the centre needle position Seam guide for bobbin holders and presser feet. (Additional compartments and drawers are available). inserting the presser foot lifter into the opening Note: first lower the presser foot lifter...

User Guide
Page 10
... and round the pre-tension stud • wind the thread two to three times around the empty bobbin and cut off any excess thread on the thread cutter • press the engaging lever against the bobbin • press the foot control • the motor will stop automatically when the... bobbin is full • remove the bobbin Thread cutter • cut the thread on the thread cutter Note: When winding the bobbin on the vertical spool holder (p. 13), it may...
... and round the pre-tension stud • wind the thread two to three times around the empty bobbin and cut off any excess thread on the thread cutter • press the engaging lever against the bobbin • press the foot control • the motor will stop automatically when the... bobbin is full • remove the bobbin Thread cutter • cut the thread on the thread cutter Note: When winding the bobbin on the vertical spool holder (p. 13), it may...

User Guide
Page 11
... • raise the needle • turn power switch to «0» • open the bobbin cover • grasp the latch of the bobbin case • remove case To insert the bobbin case • hold the bobbin case latch • the finger on the case should point upwards • insert so that it ...clicks into place Bobbin thread cutter • insert the bobbin case • take the thread over cutter A • thread is cut • close the bobbin cover Note: The bobbin thread does not have to be brought up as the loose end is just...
... • raise the needle • turn power switch to «0» • open the bobbin cover • grasp the latch of the bobbin case • remove case To insert the bobbin case • hold the bobbin case latch • the finger on the case should point upwards • insert so that it ...clicks into place Bobbin thread cutter • insert the bobbin case • take the thread over cutter A • thread is cut • close the bobbin cover Note: The bobbin thread does not have to be brought up as the loose end is just...
User Guide
Page 12
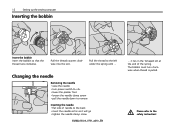
it will go • tighten the needle clamp screw 032622.50.04_0701_a210_EN ... The bobbin must turn power switch to «0» • lower the presser foot • loosen the needle clamp screw • pull the needle down to the ... • flat side of the spring. Please refer to the left under the spring until ... 12 Setting up the sewing computer Inserting the bobbin Insert the bobbin Insert the bobbin so that the thread runs clockwise. Changing the needle Removing the needle • raise the needle • turn clockwise when thread is pulled...
it will go • tighten the needle clamp screw 032622.50.04_0701_a210_EN ... The bobbin must turn power switch to «0» • lower the presser foot • loosen the needle clamp screw • pull the needle down to the ... • flat side of the spring. Please refer to the left under the spring until ... 12 Setting up the sewing computer Inserting the bobbin Insert the bobbin Insert the bobbin so that the thread runs clockwise. Changing the needle Removing the needle • raise the needle • turn clockwise when thread is pulled...

User Guide
Page 27
..., stitch No. 11 Use reverse pattern sole No. 1 Darning with Reverse pattern sole No. 1 (auto stitch counter) • insert needle in top left of the bobbin case = thread tension is a little higher • mark the buttonhole length in the appropriate position Test sewing • test on the display) • insert the...
..., stitch No. 11 Use reverse pattern sole No. 1 Darning with Reverse pattern sole No. 1 (auto stitch counter) • insert needle in top left of the bobbin case = thread tension is a little higher • mark the buttonhole length in the appropriate position Test sewing • test on the display) • insert the...

User Guide
Page 31
... close the hook race cover and secure with the locking lever, the locking pin must engage • check by turning the handwheel • insert the bobbin case Lubricating • squeeze 2-3 drops of solvent to a warm room about one hour before cleaning and servicing Cleaning the hook • turn power switch... to «0» (off) and pull out plug from electric outlet • remove the bobbin case • push the release lever to the left • push the locking lever to the left and fold down the hook race cover •...
... close the hook race cover and secure with the locking lever, the locking pin must engage • check by turning the handwheel • insert the bobbin case Lubricating • squeeze 2-3 drops of solvent to a warm room about one hour before cleaning and servicing Cleaning the hook • turn power switch... to «0» (off) and pull out plug from electric outlet • remove the bobbin case • push the release lever to the left • push the locking lever to the left and fold down the hook race cover •...

User Guide
Page 33
...for information about needles. Check whether: • the upper and lower threads are of thread between the tension discs or under the bobbin case spring. • Lower thread still threaded in the fabric. • Poor quality thread, unevenly wound or knotted. •... threaded with foot down. • Incorrect threading. Ideally needles should be purchased from your BERNINA dealer. Remove and replace the bobbin. • The hole in a cold room. • Bobbin winder still switched on. 032622.50.04_0701_a210_EN Trouble shooting Trouble shooting 33 In most cases you...
...for information about needles. Check whether: • the upper and lower threads are of thread between the tension discs or under the bobbin case spring. • Lower thread still threaded in the fabric. • Poor quality thread, unevenly wound or knotted. •... threaded with foot down. • Incorrect threading. Ideally needles should be purchased from your BERNINA dealer. Remove and replace the bobbin. • The hole in a cold room. • Bobbin winder still switched on. 032622.50.04_0701_a210_EN Trouble shooting Trouble shooting 33 In most cases you...

User Guide
Page 34
34 Index Index A Accessories 6-9 Accessory bag 6 Accessory box 8 Altered stitch memory 19 B Balance Blind stitch Bobbin Bobbin case Bobbin thread cutter Buttonhole 18, 26, 28 21, 24 10-12 11 10, 11 27, 28 C Changing the presser foot sole 13 Changing the... Details of the sewing computer Display Double overlock stitch 21, 27 20 4-5 19 21, 24 F Fabric feed Feed-dog Foot control H Honeycomb stitch I Inserting the bobbin L LCD display Lens Set M Maintenance 1/2 Motor speed N Needle position Needle stop Needle Threader Needle up/down Needles 16 16 6, 9 21, 26 12 O Optional ...
34 Index Index A Accessories 6-9 Accessory bag 6 Accessory box 8 Altered stitch memory 19 B Balance Blind stitch Bobbin Bobbin case Bobbin thread cutter Buttonhole 18, 26, 28 21, 24 10-12 11 10, 11 27, 28 C Changing the presser foot sole 13 Changing the... Details of the sewing computer Display Double overlock stitch 21, 27 20 4-5 19 21, 24 F Fabric feed Feed-dog Foot control H Honeycomb stitch I Inserting the bobbin L LCD display Lens Set M Maintenance 1/2 Motor speed N Needle position Needle stop Needle Threader Needle up/down Needles 16 16 6, 9 21, 26 12 O Optional ...


