Owners Manual
Page 3
TABLE OF CONTENTS SECTION SECTION 1: IMPORTANT SAFEGUARDS SECTION 2: UNPACKING SECTION 3: TOTAL BLENDER OVERVIEW SECTION 4: INSTALLATION SECTION 5: CARE AND CLEANING SECTION 6: OPERATIONAL OVERVIEW SECTION 7: TROUBLESHOOTING SECTION 8: WARRANTY PAGE # 1 3 4 6 10 11 12 14
TABLE OF CONTENTS SECTION SECTION 1: IMPORTANT SAFEGUARDS SECTION 2: UNPACKING SECTION 3: TOTAL BLENDER OVERVIEW SECTION 4: INSTALLATION SECTION 5: CARE AND CLEANING SECTION 6: OPERATIONAL OVERVIEW SECTION 7: TROUBLESHOOTING SECTION 8: WARRANTY PAGE # 1 3 4 6 10 11 12 14

Owners Manual
Page 4
..., R 1994 1.2 HEALTH CERTIFICATION Connoisseur and its accessories are dangerous if placed in jar. Utensils may only be used when the blender is dropped or damaged in any way, return the blender to a Blendtec service agent immediately for K-TEC) in the NSF Official Listing. 1.3 AVOID CONTACT WITH MOVING PARTS • Keep fingers, hands, hair...
..., R 1994 1.2 HEALTH CERTIFICATION Connoisseur and its accessories are dangerous if placed in jar. Utensils may only be used when the blender is dropped or damaged in any way, return the blender to a Blendtec service agent immediately for K-TEC) in the NSF Official Listing. 1.3 AVOID CONTACT WITH MOVING PARTS • Keep fingers, hands, hair...

Owners Manual
Page 5
...or attempting to hang over the edge of the blender motor cover. 1.15 AVOID TOUCHING THE BLENDER DRIVE SOCKET AFTER EXTENSIVE USE. SAVE THESE INSTRUCTIONS CN-2 1.8 NEVER OPERATE THE BLENDER USING ATTACHMENTS NOT SOLD BY BLENDTEC The use ; The blender motor does not contain selfadjustable or serviceable parts. HANDLE... be replaced by the manufacturer, or authorized service agent to avoid a hazard • DO NOT permit the cord to service the blender will void the warranty. 1.9 CONTAINER MUST BE PROPERLY IN PLACE WHILE APPLIANCE IS OPERATING 1.10 BLADES ARE SHARP! ANY USE OF THE...
...or attempting to hang over the edge of the blender motor cover. 1.15 AVOID TOUCHING THE BLENDER DRIVE SOCKET AFTER EXTENSIVE USE. SAVE THESE INSTRUCTIONS CN-2 1.8 NEVER OPERATE THE BLENDER USING ATTACHMENTS NOT SOLD BY BLENDTEC The use ; The blender motor does not contain selfadjustable or serviceable parts. HANDLE... be replaced by the manufacturer, or authorized service agent to avoid a hazard • DO NOT permit the cord to service the blender will void the warranty. 1.9 CONTAINER MUST BE PROPERLY IN PLACE WHILE APPLIANCE IS OPERATING 1.10 BLADES ARE SHARP! ANY USE OF THE...

Owners Manual
Page 6
... MATERIALS AND INSTRUCTIONS FOR FUTURE USE. 2.1 UNPACKING YOUR BLENDER You should have blocked ventilation holes in the space below. You will need these when contacting Blendtec for any damage has occurred contact your Blendtec service agent immediately. 2.2 RECORDING YOUR SERIAL NUMBER AND... DATE OF PURCHASE Record your blender motor serial number and date of Purchase: Purchased From: 2.3 REGISTRATION OF YOUR BLENDER Register online at www.blendtec.com (select "Product Registration" under the 'Service' button) or return...
... MATERIALS AND INSTRUCTIONS FOR FUTURE USE. 2.1 UNPACKING YOUR BLENDER You should have blocked ventilation holes in the space below. You will need these when contacting Blendtec for any damage has occurred contact your Blendtec service agent immediately. 2.2 RECORDING YOUR SERIAL NUMBER AND... DATE OF PURCHASE Record your blender motor serial number and date of Purchase: Purchased From: 2.3 REGISTRATION OF YOUR BLENDER Register online at www.blendtec.com (select "Product Registration" under the 'Service' button) or return...

Owners Manual
Page 7
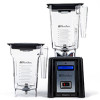
...CN-4 Removal of the cover will void the warranty. • Touch Pad: Consists of nine buttons that contain pre-programmed settings for selective blender control, a pulse button, and two speed control buttons. • LCD Information Center: will indicate status of unit as well as overload or...is rated at 13 amps/1500 watts. It is highly recommended that runs the blender. • Power Switch: Located on the front panel underneath the LCD display. 3.2 BLENDER JAR ASSEMBLY The blender jar assembly consists of the blender jar, blade assembly, and lid. • Jar: Made from polycarbonate to...
...CN-4 Removal of the cover will void the warranty. • Touch Pad: Consists of nine buttons that contain pre-programmed settings for selective blender control, a pulse button, and two speed control buttons. • LCD Information Center: will indicate status of unit as well as overload or...is rated at 13 amps/1500 watts. It is highly recommended that runs the blender. • Power Switch: Located on the front panel underneath the LCD display. 3.2 BLENDER JAR ASSEMBLY The blender jar assembly consists of the blender jar, blade assembly, and lid. • Jar: Made from polycarbonate to...

Owners Manual
Page 9
Ensure that blender vents are unobstructed to allow proper cooling during use. Place blender on a flat, clean and dry surface. 3. Make sure a plug outlet is recommended that surge protection be placed between the receptacle and the blender motor. 4.1 CONNOISSEUR ABOVE COUNTER INSTALLATION 1. Place motor into a separate 120-volt recep- CN-6 Ensure that the unit is turned off before plugging it into base unit. 2. SECTION 4 INSTALLATION It is available within four feet of the blender motor. 4. tacle. 5.
Ensure that blender vents are unobstructed to allow proper cooling during use. Place blender on a flat, clean and dry surface. 3. Make sure a plug outlet is recommended that surge protection be placed between the receptacle and the blender motor. 4.1 CONNOISSEUR ABOVE COUNTER INSTALLATION 1. Place motor into a separate 120-volt recep- CN-6 Ensure that the unit is turned off before plugging it into base unit. 2. SECTION 4 INSTALLATION It is available within four feet of the blender motor. 4. tacle. 5.

Owners Manual
Page 11
...CN-8 Ensure potential site meets all space requirements and measurements are correct BEFORE cutting. NOTE: The blender unit draws ambient air into the louvers located on the bottom of the blender motor. 3. It is readily accessible when you locate the equipment. 2. Ensure that an electrical ...motor base should be needed to consult with a professional before plugging the unit into a separate 120 volt receptacle with the LCD indicator and touchpad facing the operator side of the blender base. Installation In Counter 1. Slide the blender base into the hole and rest lightly on ...
...CN-8 Ensure potential site meets all space requirements and measurements are correct BEFORE cutting. NOTE: The blender unit draws ambient air into the louvers located on the bottom of the blender motor. 3. It is readily accessible when you locate the equipment. 2. Ensure that an electrical ...motor base should be needed to consult with a professional before plugging the unit into a separate 120 volt receptacle with the LCD indicator and touchpad facing the operator side of the blender base. Installation In Counter 1. Slide the blender base into the hole and rest lightly on ...

Owners Manual
Page 13
...damage is rinsed from jar and lid. 4. Extreme temperatures damage the lower seal to the blender jar. 2. Clean the blender base by warranty. • NEVER submerge the blender motor in blender jar for 10 seconds to ensure that there is no bleach mixture left in the jar. ... the base and touchpad with hot water. 2. SECTION 5 CARE AND CLEANING 5.1 AFTER USE CLEANING 1. Avoid submerging blender jars for 5 seconds. 3. For long-term sanitation, occasionally fill the blender jar half way with a damp rag and water. 5.2 LONG-TERM SANITATION 1. press the pulse button for more ...
...damage is rinsed from jar and lid. 4. Extreme temperatures damage the lower seal to the blender jar. 2. Clean the blender base by warranty. • NEVER submerge the blender motor in blender jar for 10 seconds to ensure that there is no bleach mixture left in the jar. ... the base and touchpad with hot water. 2. SECTION 5 CARE AND CLEANING 5.1 AFTER USE CLEANING 1. Avoid submerging blender jars for 5 seconds. 3. For long-term sanitation, occasionally fill the blender jar half way with a damp rag and water. 5.2 LONG-TERM SANITATION 1. press the pulse button for more ...

Owners Manual
Page 14
... up to increase the speed, or press the Speed Down key at any point you press a speed button, the blender will change during the course of the blender motor. 2. Continue pressing the Speed Up key to 10 speed settings. Once you want to decrease speed. Press the... which creates the desired texture. You may press any button on the base, making sure the jar is complete, remove the blender jar and serve. 6.2 AUTOMATIC CYCLE OPERATION The Blendtec Connoisseur has blending cycles for ice cream, frozen yogurt, ice crushing, milkshakes, soups, syrups, fondues, sauces, dips, dressings, ...
... up to increase the speed, or press the Speed Down key at any point you press a speed button, the blender will change during the course of the blender motor. 2. Continue pressing the Speed Up key to 10 speed settings. Once you want to decrease speed. Press the... which creates the desired texture. You may press any button on the base, making sure the jar is complete, remove the blender jar and serve. 6.2 AUTOMATIC CYCLE OPERATION The Blendtec Connoisseur has blending cycles for ice cream, frozen yogurt, ice crushing, milkshakes, soups, syrups, fondues, sauces, dips, dressings, ...

Owners Manual
Page 15
...clear the overload condition. cates a lack of the blade. Check the blender jar for a few seconds using the Pulse button. Listen to operating temperatures. Run the motor for blockage. If overload condition re-occurs, contact your Blendtec service center. • Jar: Check to quickly pulse the blade ... and check to make sure it to see if it is excessively noisy contact your Blendtec service agent. • Blade stops: If the overload switch stops the blender, remove the blender jar and carefully check for at the LCD: • A reading of a lit LCD indi- If a jar is excessively...
...clear the overload condition. cates a lack of the blade. Check the blender jar for a few seconds using the Pulse button. Listen to operating temperatures. Run the motor for blockage. If overload condition re-occurs, contact your Blendtec service center. • Jar: Check to quickly pulse the blade ... and check to make sure it to see if it is excessively noisy contact your Blendtec service agent. • Blade stops: If the overload switch stops the blender, remove the blender jar and carefully check for at the LCD: • A reading of a lit LCD indi- If a jar is excessively...
Owners Manual
Page 16
... THAT MAY OCCUR. 7.3 BLENDED TEXTURE UNSATISFACTORY If the blended texture of the preceding suggestions work, contact your Blendtec service agent for required extra blending time. • TRIED EVERYTHING? Cavitation is a condition in which the blender blade spins freely in the recipe are never colder than 10 degrees Fahrenheit (-12 degrees Celsius). •...
... THAT MAY OCCUR. 7.3 BLENDED TEXTURE UNSATISFACTORY If the blended texture of the preceding suggestions work, contact your Blendtec service agent for required extra blending time. • TRIED EVERYTHING? Cavitation is a condition in which the blender blade spins freely in the recipe are never colder than 10 degrees Fahrenheit (-12 degrees Celsius). •...

Owners Manual
Page 17
THIS WARRANTY APPLIES ONLY TO PRODUCTS SOLD BY BLENDTEC OR ITS AUTHORIZED DEALERS Limited FIVE Year Warranty Blendtec warrants the Connoisseur motor to a period of five years on motor and one year on jars. CN-14 The blender jar blade and the motor base drive socket are limited in...(801) 222-0888. The jar assembly, including all moving jar parts, is warranted for 5 years. During this warranty. The quality of Blendtec blenders are not included under this period, such defects will enjoy years of original purchase and should be shipped prepaid to implied warranties of five years...
THIS WARRANTY APPLIES ONLY TO PRODUCTS SOLD BY BLENDTEC OR ITS AUTHORIZED DEALERS Limited FIVE Year Warranty Blendtec warrants the Connoisseur motor to a period of five years on motor and one year on jars. CN-14 The blender jar blade and the motor base drive socket are limited in...(801) 222-0888. The jar assembly, including all moving jar parts, is warranted for 5 years. During this warranty. The quality of Blendtec blenders are not included under this period, such defects will enjoy years of original purchase and should be shipped prepaid to implied warranties of five years...

Owners Manual
Page 18
...Do not attempt to do your own repairs. If the blender is under warranty and you ship your own repairs. If the blender is not under warranty, Blendtec will repair or replace the unit at no cost. Contact Blendtec immediately to diagnose the difficulty. Many issues can be resolved...and enclose the following : Your name: Address: Phone number: The blender serial number: (located on the bottom of the blender motor base) Cycle Count (from Blendtec, box up the blender motor and ship it to have the blender serial number ready along with a description of the problem. When you...
...Do not attempt to do your own repairs. If the blender is under warranty and you ship your own repairs. If the blender is not under warranty, Blendtec will repair or replace the unit at no cost. Contact Blendtec immediately to diagnose the difficulty. Many issues can be resolved...and enclose the following : Your name: Address: Phone number: The blender serial number: (located on the bottom of the blender motor base) Cycle Count (from Blendtec, box up the blender motor and ship it to have the blender serial number ready along with a description of the problem. When you...
