
Pedestal Installation Instructions
Page 6
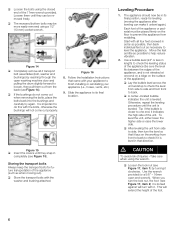
...reaching through the open end wrench). Figure 14 q Completely remove all four feet screwed in that came with all 4 transport bolt assemblies (bolt, washer and bushings) by turning it is leveled. Figure 16 8. Storing the transport bolts Always keep the transport bolts for leveling (moving out). The appliance...using a 1/2" (13 mm) socket wrench. q Loosen the bolts using the closed end of the unit. Loosen them out from wobbling. Figure 15 q Insert the covers until the unit is level in as far as possible, then back individual feet out as possible to loosen, then pull ...
...reaching through the open end wrench). Figure 14 q Completely remove all four feet screwed in that came with all 4 transport bolt assemblies (bolt, washer and bushings) by turning it is leveled. Figure 16 8. Storing the transport bolts Always keep the transport bolts for leveling (moving out). The appliance...using a 1/2" (13 mm) socket wrench. q Loosen the bolts using the closed end of the unit. Loosen them out from wobbling. Figure 15 q Insert the covers until the unit is level in as far as possible, then back individual feet out as possible to loosen, then pull ...

Installation and Use & Care (all languages)
Page 3
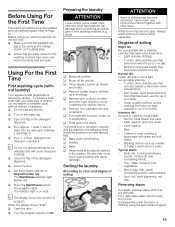
...OPERATING INSTRUCTION 12 Your new washer 12 Panel 13 Summary of Instructions 14 Before Using For the First Time 15 Using For the First Time 15 First washing cycle (without laundry 15 Preparing the laundry 15 Sorting the laundry 15 Degrees of soiling 15 Loading the laundry 16 Laundry... Add a garment / Interrupting the program 20 Canceling active program 20 After Washing 20 Cleaning and Care 21 Cleaning the washer 21 Descaling the washing machine 22 Troubleshooting of Minor Faults 23 Customer Service 25 STATEMENT OF LIMITED PRODUCT WARRANTY 26 STATEMENT OF...
...OPERATING INSTRUCTION 12 Your new washer 12 Panel 13 Summary of Instructions 14 Before Using For the First Time 15 Using For the First Time 15 First washing cycle (without laundry 15 Preparing the laundry 15 Sorting the laundry 15 Degrees of soiling 15 Loading the laundry 16 Laundry... Add a garment / Interrupting the program 20 Canceling active program 20 After Washing 20 Cleaning and Care 21 Cleaning the washer 21 Descaling the washing machine 22 Troubleshooting of Minor Faults 23 Customer Service 25 STATEMENT OF LIMITED PRODUCT WARRANTY 26 STATEMENT OF...

Installation and Use & Care (all languages)
Page 5
... maintain and/or operate the washing machine according to the manufacturer`s instructions may occur. The water connections should be used near children. 15. KEEP THESE INSTRUCTIONS FOR FUTURE REFERENCE. 13. Close supervision of the detergent(s), cleaning aid(s), fabric softener(s) and static eliminator(s) which... may result in compliance with the washer. Do not touch the door if washing at the end of children. 30. Do not sit or stand on the open door...
... maintain and/or operate the washing machine according to the manufacturer`s instructions may occur. The water connections should be used near children. 15. KEEP THESE INSTRUCTIONS FOR FUTURE REFERENCE. 13. Close supervision of the detergent(s), cleaning aid(s), fabric softener(s) and static eliminator(s) which... may result in compliance with the washer. Do not touch the door if washing at the end of children. 30. Do not sit or stand on the open door...

Installation and Use & Care (all languages)
Page 7
... Closed wrench (1/2" / 13 mm). 4. q Units are helpful: 1. Closet If installing the washer in (310 sq. cm) Checklist for under counter installation Pedestal Mounting If mounting the washer on the Bosch pedestal (accessory no . H = hot water connection C = cold water connection Useful tools The ... be removed before using the appliance for colored variant, accessory no . q Loosen all four bolts before first use, run a cleaning cycle 15 Removing the transport bolts d CAUTION To avoid possible injury and damage to the higher spin speeds available. Dimensions a = 27.0 inches (686...
... Closed wrench (1/2" / 13 mm). 4. q Units are helpful: 1. Closet If installing the washer in (310 sq. cm) Checklist for under counter installation Pedestal Mounting If mounting the washer on the Bosch pedestal (accessory no . H = hot water connection C = cold water connection Useful tools The ... be removed before using the appliance for colored variant, accessory no . q Loosen all four bolts before first use, run a cleaning cycle 15 Removing the transport bolts d CAUTION To avoid possible injury and damage to the higher spin speeds available. Dimensions a = 27.0 inches (686...

Installation and Use & Care (all languages)
Page 10
...see page 25). d WARNING d The washing machine must be plugged into the socket. - Volts 110-120 Hertz 60 Amperes 15 Watts 1350 (max.) Make sure that: - The plug must only be replaced by a qualified electrician or service technician if ... is sufficient. - Electrical connection GROUNDING INSTRUCTIONS This appliance must correspond to the voltage specification If an ground fault circuit breaker is to whether the washer has been properly grounded. Connection specifications as well as to be grounded. Hose and cable lengths LeftĆhand connection a b RightĆhand...
...see page 25). d WARNING d The washing machine must be plugged into the socket. - Volts 110-120 Hertz 60 Amperes 15 Watts 1350 (max.) Make sure that: - The plug must only be replaced by a qualified electrician or service technician if ... is sufficient. - Electrical connection GROUNDING INSTRUCTIONS This appliance must correspond to the voltage specification If an ground fault circuit breaker is to whether the washer has been properly grounded. Connection specifications as well as to be grounded. Hose and cable lengths LeftĆhand connection a b RightĆhand...
Installation and Use & Care (all languages)
Page 15
...;shirts, shirts and blouses that the water valves for the washing machine have been worn several times. - Before using the appropriate program. 15 To ensure a fresh wash with other hard objects) can damage items of clothing as well as parts of the washing machine (e.g. q ... Remove pins, buttons, buckles and other hard objects to avoid pilling. q Turn synthetic knitwear insideĆout to avoid scratching the washer interior. Always wash white and colored items separately. Degrees of program. Laundry may become discolored. Light summer clothing. - Bed linen ...
...;shirts, shirts and blouses that the water valves for the washing machine have been worn several times. - Before using the appropriate program. 15 To ensure a fresh wash with other hard objects) can damage items of clothing as well as parts of the washing machine (e.g. q ... Remove pins, buttons, buckles and other hard objects to avoid pilling. q Turn synthetic knitwear insideĆout to avoid scratching the washer interior. Always wash white and colored items separately. Degrees of program. Laundry may become discolored. Light summer clothing. - Bed linen ...
Installation and Use & Care (all languages)
Page 16
... on stains. This information can be able to load the drum depending on the fabric type, see special programs Page 17 for information on Page 15. - Information on soiling can damage the laundry. Grayish brown spots (fat globules) may appear on the environment and ensures optimum washing results. ATTENTION Loose debris...
... on stains. This information can be able to load the drum depending on the fabric type, see special programs Page 17 for information on Page 15. - Information on soiling can damage the laundry. Grayish brown spots (fat globules) may appear on the environment and ensures optimum washing results. ATTENTION Loose debris...

Installation and Use & Care (all languages)
Page 17
..., can be diluted with other laundry together. Hand Wash Hand Wash settings are intended for preĆtreatment of your front-loading washer. These cycles have selected a reduced spin speed for spinning wet, hand washed laundry. Water is drained before being poured into the...Care: 150 °F (66 °C) hot: 125 °F (52 °C) warm: 95 °F (35 °C) cold: 60 °F (15 °C) Maximum spin speeds of gentle action and additional rinse (automatically added). These substances may contain sulphur or chlorine. Clothes requiring a special tumble sequence and...
..., can be diluted with other laundry together. Hand Wash Hand Wash settings are intended for preĆtreatment of your front-loading washer. These cycles have selected a reduced spin speed for spinning wet, hand washed laundry. Water is drained before being poured into the...Care: 150 °F (66 °C) hot: 125 °F (52 °C) warm: 95 °F (35 °C) cold: 60 °F (15 °C) Maximum spin speeds of gentle action and additional rinse (automatically added). These substances may contain sulphur or chlorine. Clothes requiring a special tumble sequence and...

Installation and Use & Care (all languages)
Page 92
...Care 150 (66) 120 Synthetics or blends ÍÈË nonĆcolorfast Permanent Press Warm 95 (35) 56 fabrics Permanent Press Cold 60 (15) 56 +10 +12 +30 Ć 17 1/2 load Delicate easy care items ÍÈË (Bulky items) Delicates/Silk 90 (32) ...water supply and quality, type and amount of load and detergent, as well as other factors. 1/3 load WFMC2201UC 02/2007 9000224447 92 Program selection table Nexxt 300 Series Please read and observe Operating, Care and Installation Instructions carefully before using the washing machine ! Program* Cotton...
...Care 150 (66) 120 Synthetics or blends ÍÈË nonĆcolorfast Permanent Press Warm 95 (35) 56 fabrics Permanent Press Cold 60 (15) 56 +10 +12 +30 Ć 17 1/2 load Delicate easy care items ÍÈË (Bulky items) Delicates/Silk 90 (32) ...water supply and quality, type and amount of load and detergent, as well as other factors. 1/3 load WFMC2201UC 02/2007 9000224447 92 Program selection table Nexxt 300 Series Please read and observe Operating, Care and Installation Instructions carefully before using the washing machine ! Program* Cotton...
