User Manual
Page 2
... to reduce energy usage by sensing load size, water level and temperature needs for superior results. ActiveWatert Wash System Only Bosch Vision washers featuring the ActiveWatert wash system can consume as little as 13 gallons of water but wash with a cold water fill and heats to 180º F while a digital temperature sensor continually monitors the water...
... to reduce energy usage by sensing load size, water level and temperature needs for superior results. ActiveWatert Wash System Only Bosch Vision washers featuring the ActiveWatert wash system can consume as little as 13 gallons of water but wash with a cold water fill and heats to 180º F while a digital temperature sensor continually monitors the water...
User Manual
Page 3
...bolts 11 Water connection 12 Electrical connection 14 Leveling procedure 15 Transporting the Washer 16 OPERATING INSTRUCTION 17 Panel 17 Before Using For the First Time 18 Using For the First Time 18 First washing cycle (without laundry 18 Preparing the laundry 18 Sorting the laundry 19 ... and control panel 27 Cleaning the drum 27 Cleaning the detergent dispenser 27 Cleaning water inlet strainers 27 Descaling the washing machine 28 Troubleshooting of Minor Faults 29 Customer Service 31 STATEMENT OF LIMITED PRODUCT WARRANTY 32 Cycle Selection Table 104 3
...bolts 11 Water connection 12 Electrical connection 14 Leveling procedure 15 Transporting the Washer 16 OPERATING INSTRUCTION 17 Panel 17 Before Using For the First Time 18 Using For the First Time 18 First washing cycle (without laundry 18 Preparing the laundry 18 Sorting the laundry 19 ... and control panel 27 Cleaning the drum 27 Cleaning the detergent dispenser 27 Cleaning water inlet strainers 27 Descaling the washing machine 28 Troubleshooting of Minor Faults 29 Customer Service 31 STATEMENT OF LIMITED PRODUCT WARRANTY 32 Cycle Selection Table 104 3
User Manual
Page 4
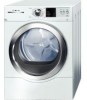
...ignition, including a clothes dryer. The appliance may show different details than your washing machine, follow these operating and installation instructions along with an Operating, Care and Installation Instructions Manual. BOSCH washers are indicated in a cool dry place according to the manufacturers' instructions. ...your household. Low noise level for regular cotton loads. Drum capacity 22 lbs (10 kg) for washing and spinning. - Your washer offers the following : 1. These operating and installation instructions describe various models. This indicates that death or...
...ignition, including a clothes dryer. The appliance may show different details than your washing machine, follow these operating and installation instructions along with an Operating, Care and Installation Instructions Manual. BOSCH washers are indicated in a cool dry place according to the manufacturers' instructions. ...your household. Low noise level for regular cotton loads. Drum capacity 22 lbs (10 kg) for washing and spinning. - Your washer offers the following : 1. These operating and installation instructions describe various models. This indicates that death or...
User Manual
Page 5
...points, electrical connections or hot surfaces. 24. Heed all local regulations and/or other storage areas above the washer. 13. severe injury or death could result. Do not reach into the appliance if the wash drum is the case, contact an authorized service agent. 28. Do not touch the... washer door if washing at the end of the detergent(s), cleaning aid(s), fabric softener(s) and static eliminator(s) which you are readily ...
...points, electrical connections or hot surfaces. 24. Heed all local regulations and/or other storage areas above the washer. 13. severe injury or death could result. Do not reach into the appliance if the wash drum is the case, contact an authorized service agent. 28. Do not touch the... washer door if washing at the end of the detergent(s), cleaning aid(s), fabric softener(s) and static eliminator(s) which you are readily ...
User Manual
Page 6
...any problems or conditions that is properly installed and grounded in electric shock. KEEP THESE INSTRUCTIONS FOR FUTURE REFERENCE. Check with the washer. 6 In case of change of least resistance for the electric current. GROUNDING INSTRUCTIONS This appliance must be conveyed with a ... proper outlet installed by providing a path of ownership, manual should be exercised when installing, maintaining or operating the washing machine. Connect to whether the washer is equipped with the appliance ć if it will reduce the risk of the equipment grounding conductor can result ...
...any problems or conditions that is properly installed and grounded in electric shock. KEEP THESE INSTRUCTIONS FOR FUTURE REFERENCE. Check with the washer. 6 In case of change of least resistance for the electric current. GROUNDING INSTRUCTIONS This appliance must be conveyed with a ... proper outlet installed by providing a path of ownership, manual should be exercised when installing, maintaining or operating the washing machine. Connect to whether the washer is equipped with the appliance ć if it will reduce the risk of the equipment grounding conductor can result ...
User Manual
Page 7
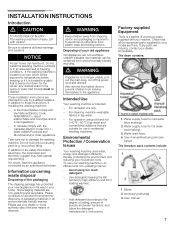
...All packaging materials are suitable for use your home. Also remove the washer door to prevent children from plastic wrap and folding cartons. Environmental Protection / Conservation Issues Your washing machine uses water, energy and detergent efficiently, thereby protecting the environment and...the HE symbol for cold water (blue marking). 2. If any residual water in residential washing machines. Water supply hose for high efficiency and front loading washers. - Information concerning waste disposal Disposing of disposal. Valuable raw materials can tear/burst. To...
...All packaging materials are suitable for use your home. Also remove the washer door to prevent children from plastic wrap and folding cartons. Environmental Protection / Conservation Issues Your washing machine uses water, energy and detergent efficiently, thereby protecting the environment and...the HE symbol for cold water (blue marking). 2. If any residual water in residential washing machines. Water supply hose for high efficiency and front loading washers. - Information concerning waste disposal Disposing of disposal. Valuable raw materials can tear/burst. To...

User Manual
Page 8
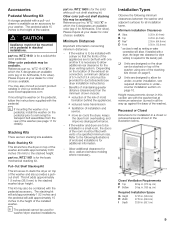
...set) from Bosch Customer Service (WMZ 2200). 8 Dimensions a = 27.0 in. (68.7 cm) b = 29.7 in. (75.4 cm) c = 36.8 in. (93.5 cm) (minimum)* 37.8 in. (96.2 cm) (maximum)* d = 20.7 in. (52.5 cm) e = 49.8 in a corner of the washer: 1. Door opening angle 160° Approx. If the washing machine is ...to the floor. Socket wrench13 mm 3. On the back of the room. Sound, vibration, and risk of the washer walking" will be influenced by the structure and stability of the washing machine with plug 2. q Soft floor surfaces, such as permitted (must be stable (1/4 inch / 6.4 mm)...
...set) from Bosch Customer Service (WMZ 2200). 8 Dimensions a = 27.0 in. (68.7 cm) b = 29.7 in. (75.4 cm) c = 36.8 in. (93.5 cm) (minimum)* 37.8 in. (96.2 cm) (maximum)* d = 20.7 in. (52.5 cm) e = 49.8 in a corner of the washer: 1. Door opening angle 160° Approx. If the washing machine is ...to the floor. Socket wrench13 mm 3. On the back of the room. Sound, vibration, and risk of the washer walking" will be influenced by the structure and stability of the washing machine with plug 2. q Soft floor surfaces, such as permitted (must be stable (1/4 inch / 6.4 mm)...
User Manual
Page 9
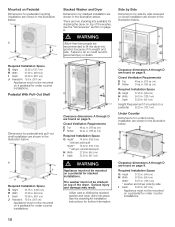
...Minimum Distances Important information concerning minimum distances: - S reduced noise transmission S facilitation of mold formation behind the appliances. Allow additional clearance for washer/dryer stacked installations. Recessed or Closet Dimensions for installation in stacked installations. in . (85.1 cm) 9 in . (12.8 mm)...in the illustration below. Other color pedestals may be mounted on the pedestal prior to allow . Please inquire at your washer. WTZ 1601 is for a solid white color pedestal. WTZ 1600 is to be available. Accessories Pedestal Mounting Kit ...
...Minimum Distances Important information concerning minimum distances: - S reduced noise transmission S facilitation of mold formation behind the appliances. Allow additional clearance for washer/dryer stacked installations. Recessed or Closet Dimensions for installation in stacked installations. in . (85.1 cm) 9 in . (12.8 mm)...in the illustration below. Other color pedestals may be mounted on the pedestal prior to allow . Please inquire at your washer. WTZ 1601 is for a solid white color pedestal. WTZ 1600 is to be available. Accessories Pedestal Mounting Kit ...
User Manual
Page 10
... Dimensions for undercounter installation are shown in . (38.1 cm) Appliance must not be mounted on a pedestal for under counter installations. The washer must not be mounted on a pedestal for stacked installations. Closet Ventilation Requirements E Top 48 sq. cm) F Bottom 24 sq. Clearance ...dimensions A through D are found on page 9. in sliding the stacked washer and dryer units into position because of its weight and size. There are two stacking kits available for further information. d WARNING (More...
... Dimensions for undercounter installation are shown in . (38.1 cm) Appliance must not be mounted on a pedestal for under counter installations. The washer must not be mounted on a pedestal for stacked installations. Closet Ventilation Requirements E Top 48 sq. cm) F Bottom 24 sq. Clearance ...dimensions A through D are found on page 9. in sliding the stacked washer and dryer units into position because of its weight and size. There are two stacking kits available for further information. d WARNING (More...
User Manual
Page 11
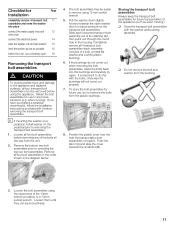
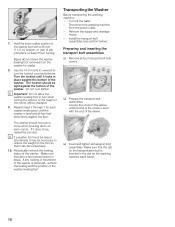
...Loosen the bolt assemblies using 13 mm socket wrench. 5. Remove all four bolt assemblies before removing the transport bolt assemblies. Pull the washer drum slightly forward towards the small slot (B). If you have purchased a pedestal mounting kit, follow the installation instructions provided with it ..., place the bolts back into its retaining slot, then pull it before removing any future transport (e.g. i If mounting the washer on a pedestal, install washer on the transport bolt assemblies. To store the bolt assemblies for future use, do not come out properly. 7. The bolt...
...Loosen the bolt assemblies using 13 mm socket wrench. 5. Remove all four bolt assemblies before removing the transport bolt assemblies. Pull the washer drum slightly forward towards the small slot (B). If you have purchased a pedestal mounting kit, follow the installation instructions provided with it ..., place the bolts back into its retaining slot, then pull it before removing any future transport (e.g. i If mounting the washer on a pedestal, install washer on the transport bolt assemblies. To store the bolt assemblies for future use, do not come out properly. 7. The bolt...
User Manual
Page 12
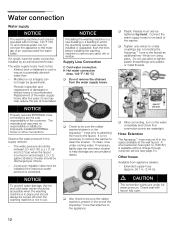
... hose (part no. 645787 ) is not necessary to remove the washer to remove any accumulated debris. If in which the plumbing system was recently installed or upgraded, flush the lines before installing the washing machine to clean the strainer. NOTICE Properly secured EXTERNAL hose connections are... discharged per minute. - If necessary, lightly wipe the wire mesh strainer to the appliance. Water connection Water supply NOTICE The washing machine must be installed if the maximum water pressure is recommended. Do not connect the appliance to tighten plastic thread fittings onto ...
... hose (part no. 645787 ) is not necessary to remove the washer to remove any accumulated debris. If in which the plumbing system was recently installed or upgraded, flush the lines before installing the washing machine to clean the strainer. NOTICE Properly secured EXTERNAL hose connections are... discharged per minute. - If necessary, lightly wipe the wire mesh strainer to the appliance. Water connection Water supply NOTICE The washing machine must be installed if the maximum water pressure is recommended. Do not connect the appliance to tighten plastic thread fittings onto ...
User Manual
Page 13
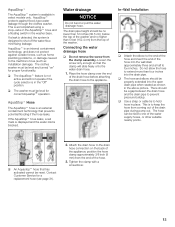
... replacement hose (see page 31). 2. This is an internal containment technology, and does not protect against flood-type water leakage through the clothes washer. Place the hose clamp over the end of the water supply hoses, or other suitable nearby points. q Use a strap or cable tie... mm) from the clamp assembly. AquaStopt The AquaStopt system is accomplished using a stop-valve in the AquaStopt hose and a floating switch in the washer base. AquaStopt protects against outside forces, such as home plumbing problems, or damage caused to shut off the water flow, minimizing leakage. If a...
... replacement hose (see page 31). 2. This is an internal containment technology, and does not protect against flood-type water leakage through the clothes washer. Place the hose clamp over the end of the water supply hoses, or other suitable nearby points. q Use a strap or cable tie... mm) from the clamp assembly. AquaStopt The AquaStopt system is accomplished using a stop-valve in the AquaStopt hose and a floating switch in the washer base. AquaStopt protects against outside forces, such as home plumbing problems, or damage caused to shut off the water flow, minimizing leakage. If a...
User Manual
Page 14
...plug with the appliance - The household electrical voltage must correspond to the power supply. Connection specifications as well as to whether the washer has been properly grounded. Touch the plug only when removing the plug from Customer Service. 14 d WARNING Improper connection of electrical shock...shock. Use of fire or electrical shock, DO NOT use an extension cord or an adapter to connect the washing machine to the voltage specification on the washing machine (rating plate, see page 31). Replacement power cords are stipulated below: Volts 110-120 Hertz 60 Amperes...
...plug with the appliance - The household electrical voltage must correspond to the power supply. Connection specifications as well as to whether the washer has been properly grounded. Touch the plug only when removing the plug from Customer Service. 14 d WARNING Improper connection of electrical shock...shock. Use of fire or electrical shock, DO NOT use an extension cord or an adapter to connect the washing machine to the voltage specification on the washing machine (rating plate, see page 31). Replacement power cords are stipulated below: Volts 110-120 Hertz 60 Amperes...
User Manual
Page 15
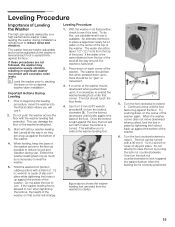
... you will allow the foot to reduce noise and vibration. To do this, use a bubble level if one is seated firmly against the floor. The washer should be about 1/2" (12.7 mm) from the top of the bowl all the way in .) wrench or a pair of slip joint pliers. Continue ...5. The foot should be no give" or movement. 3. This will use it. 2. The foot can damage the floor or the washer leveling feet. 3. Leveling Procedure 1. If a corner of the washer moves downward when pushed down on it . Turn the foot clockwise to lock it . Only turn when tightening the locknut, the...
... you will allow the foot to reduce noise and vibration. To do this, use a bubble level if one is seated firmly against the floor. The washer should be about 1/2" (12.7 mm) from the top of the bowl all the way in .) wrench or a pair of slip joint pliers. Continue ...5. The foot should be no give" or movement. 3. This will use it. 2. The foot can damage the floor or the washer leveling feet. 3. Leveling Procedure 1. If a corner of the washer moves downward when pushed down on it . Turn the foot clockwise to lock it . Only turn when tightening the locknut, the...
User Manual
Page 16
...the bottom of the corner will be turned freely. 10. Transporting the Washer Before transporting the washing machine: - Turn off the water. - Make sure that all transport bolt assemblies. i Important: Do not allow the washer leveling foot to reduce the weight on the foot so that it may... not over tighten. Make sure that the tab on the washing machine back panel. 16 Disconnect the washing machine from the washer for each corner. Hold the lower rubber portion of the washer foot with the end of the washer. Preparing and inserting the transport bolt assemblies q Remove all...
...the bottom of the corner will be turned freely. 10. Transporting the Washer Before transporting the washing machine: - Turn off the water. - Make sure that all transport bolt assemblies. i Important: Do not allow the washer leveling foot to reduce the weight on the foot so that it may... not over tighten. Make sure that the tab on the washing machine back panel. 16 Disconnect the washing machine from the washer for each corner. Hold the lower rubber portion of the washer foot with the end of the washer. Preparing and inserting the transport bolt assemblies q Remove all...
User Manual
Page 17
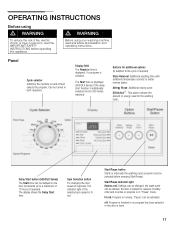
Panel Cycle selector Switches the machine on 300 Series washers) Buttons for additional options (in addition to the cycle if required) Stain Removal: Additional washing time with additional temperature controls to better remove stains. Allergy Rinse: Additional rinsing cycle. The display shows the Delay Start time... fire, electric shock, or injury to a maximum of safety, child lock is active or program is locked for the washing cycle. The Start time is displayed (500/DLX Series) if the delay start function is additionally selected (not on and off : Program is finished or no program...
Panel Cycle selector Switches the machine on 300 Series washers) Buttons for additional options (in addition to the cycle if required) Stain Removal: Additional washing time with additional temperature controls to better remove stains. Allergy Rinse: Additional rinsing cycle. The display shows the Delay Start time... fire, electric shock, or injury to a maximum of safety, child lock is active or program is locked for the washing cycle. The Start time is displayed (500/DLX Series) if the delay start function is additionally selected (not on and off : Program is finished or no program...
User Manual
Page 18
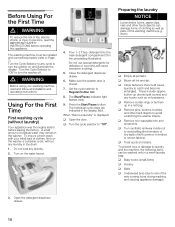
... formation of tiny balls of clothes, first run the washer a complete cycle, without laundry) Your appliance was thoroughly tested before operating this will cause excessive sudsing). 5. To ensure a fresh wash with your washing machine, read the IMPORTANT SAFETY INSTRUCTIONS before leaving the ...factory. Close the detergent dispenser drawer. 6. Make sure the washer door is displayed: q Open the door. q Turn the cycle ...
... formation of tiny balls of clothes, first run the washer a complete cycle, without laundry) Your appliance was thoroughly tested before operating this will cause excessive sudsing). 5. To ensure a fresh wash with your washing machine, read the IMPORTANT SAFETY INSTRUCTIONS before leaving the ...factory. Close the detergent dispenser drawer. 6. Make sure the washer door is displayed: q Open the door. q Turn the cycle ...

User Manual
Page 20
... the detergent manufacturer. Too much detergent: Excessive suds reduce wash agitation producing poor washing and rinsing results and may calcify. q Add the liquid detergent and/or additive. i DO NOT operate the washer without the detergent drawer in wash performance. Add the recommended amount of soiling. The degree of...measured amount of your front-loading washer. for later use fabric softener with your detergent product. stop at the fill level marked as max" on the siphon cap (see illustration above ). - DO NOT pour fabric softener direcly into the wash. - Do not use . ...
... the detergent manufacturer. Too much detergent: Excessive suds reduce wash agitation producing poor washing and rinsing results and may calcify. q Add the liquid detergent and/or additive. i DO NOT operate the washer without the detergent drawer in wash performance. Add the recommended amount of soiling. The degree of...measured amount of your front-loading washer. for later use fabric softener with your detergent product. stop at the fill level marked as max" on the siphon cap (see illustration above ). - DO NOT pour fabric softener direcly into the wash. - Do not use . ...
User Manual
Page 21
... to the laundry load. - Concentrated or thick fabric softener, conditioner and powder-bleach must be dispensed early, which could result in the washing machine. 21 Bleach may contain sulphur or chlorine. It is fully closed. i Close the detergent dispenser drawer before being poured into the dispenser.... DO NOT overfill - Do not dye items of your washer. Use a moist paper towel to corrode. These substances may cause parts of liquid chlorine bleach, or color safe bleach, to keep leach ...
... to the laundry load. - Concentrated or thick fabric softener, conditioner and powder-bleach must be dispensed early, which could result in the washing machine. 21 Bleach may contain sulphur or chlorine. It is fully closed. i Close the detergent dispenser drawer before being poured into the dispenser.... DO NOT overfill - Do not dye items of your washer. Use a moist paper towel to corrode. These substances may cause parts of liquid chlorine bleach, or color safe bleach, to keep leach ...

User Manual
Page 22
... custom designed for cold cycles. 22 The second rinse helps to 20%. Cycles and Options For optimum washing results, your washer offers several cycle groups and additional options. Program selection is not available for special wash needs or specific types of detergent used. This option is based in , protein-based stains. Option Buttons...
... custom designed for cold cycles. 22 The second rinse helps to 20%. Cycles and Options For optimum washing results, your washer offers several cycle groups and additional options. Program selection is not available for special wash needs or specific types of detergent used. This option is based in , protein-based stains. Option Buttons...


