User Manual
Page 5
... all times. Close the washing machine water shutĆoff valve(s) that use the washing machine if it is the case, contact an authorized service agent. 28. Always read and follow the fabric care instructions recommended by grasping the plug, not the cord. 25. Do not operate this ...is the responsibility of the detergent(s), cleaning aid(s), fabric softener(s) and static eliminator(s) which you understand and have the skills to be kept a safe distance away from the washing machine. 17. Do not repair or replace...
... all times. Close the washing machine water shutĆoff valve(s) that use the washing machine if it is the case, contact an authorized service agent. 28. Always read and follow the fabric care instructions recommended by grasping the plug, not the cord. 25. Do not operate this ...is the responsibility of the detergent(s), cleaning aid(s), fabric softener(s) and static eliminator(s) which you understand and have the skills to be kept a safe distance away from the washing machine. 17. Do not repair or replace...
User Manual
Page 9
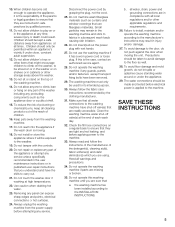
... the laundry pair. Allow additional clearance for the basic mechanical stacking kit. Closet Ventilation Requirements E Top 48 sq. cm) Required Installation Space G Height 37.25 in. (94.6 cm) H Width 27.50 in. (69.9 cm) I Depth 33.50 in . (310 sq. You may be used for all...* as an accessory for silver). If the washer and dryer are to the stacked height. Minimum Installation Clearances A Sides B Top C Rear* D Front 0.25 in. (6.4 mm) 0.25 in. (6.4 mm) 2.55 in. (64.8 mm) 0.50 in this section are with a pull-out drawer is for door, wall and window molding where...
... the laundry pair. Allow additional clearance for the basic mechanical stacking kit. Closet Ventilation Requirements E Top 48 sq. cm) Required Installation Space G Height 37.25 in. (94.6 cm) H Width 27.50 in. (69.9 cm) I Depth 33.50 in . (310 sq. You may be used for all...* as an accessory for silver). If the washer and dryer are to the stacked height. Minimum Installation Clearances A Sides B Top C Rear* D Front 0.25 in. (6.4 mm) 0.25 in. (6.4 mm) 2.55 in. (64.8 mm) 0.50 in this section are with a pull-out drawer is for door, wall and window molding where...
User Manual
Page 10
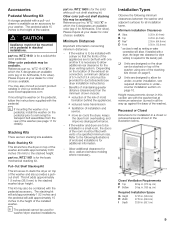
...85.1 cm) J Pedestal Ht. 15.0 in . (85.1 cm) d WARNING Appliance must not be mounted on a pedestal for stacked installations. Required Installation Space G Height 52.25 in.132.7 cm) H Width 27.50 in. (69.9 cm) I Depth 33.50 in the illustration below . cm) Required Installation Space G Height* 74.50 in. ...Width 27.50 in. (69.9 cm) I Depth 33.50 in. (85.1 cm) J Pedestal ht. 15.0 in . (310 sq. Required Installation Space G Height 37.25 in. (94.6 cm) H Width 27.50 in. (69.9 cm) Width* 54.75 in. (139.1 cm) * washer and dryer side by side recessed or closet ...
...85.1 cm) J Pedestal Ht. 15.0 in . (85.1 cm) d WARNING Appliance must not be mounted on a pedestal for stacked installations. Required Installation Space G Height 52.25 in.132.7 cm) H Width 27.50 in. (69.9 cm) I Depth 33.50 in the illustration below . cm) Required Installation Space G Height* 74.50 in. ...Width 27.50 in. (69.9 cm) I Depth 33.50 in. (85.1 cm) J Pedestal ht. 15.0 in . (310 sq. Required Installation Space G Height 37.25 in. (94.6 cm) H Width 27.50 in. (69.9 cm) Width* 54.75 in. (139.1 cm) * washer and dryer side by side recessed or closet ...

User Manual
Page 25
... and close the door. q If necessary, press the button(s) for additional option(s). Washing q Turn on the water faucets. q If necessary, change the spin speed with the Spin selection button until the desired Start time is turned off. Display... Start button until the the desired spin speed indicator light is lit (red). The indicator light is indicated by the indicator lights under the display. 25 i If an incorrect combination was inadvertently selected, the indicator light of the selected button is displayed. q Press the Start/Pause button. The Start/Pause indicator...
... and close the door. q If necessary, press the button(s) for additional option(s). Washing q Turn on the water faucets. q If necessary, change the spin speed with the Spin selection button until the desired Start time is turned off. Display... Start button until the the desired spin speed indicator light is lit (red). The indicator light is indicated by the indicator lights under the display. 25 i If an incorrect combination was inadvertently selected, the indicator light of the selected button is displayed. q Press the Start/Pause button. The Start/Pause indicator...