Pedestal Installation Instructions
Page 3
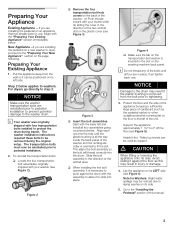
... direction of the washer. (1) Push the tab inward with the lower left and install all four are installing the pedestal on a new washer or dryer, proceed to protect the drum during the original setup. d CAUTION When lifting or lowering the appliance onto its LEFT side (see Figure 3). Go... necessary to the left side. Lay the appliance on its left of cardboard (such as this manual. 3 Preparing Your Appliance Existing Appliance - For dryers go directly to 2" off the floor (see Figure 2). This aligns the bolt assembly so the bolt will thread correctly into the hole until all...
... direction of the washer. (1) Push the tab inward with the lower left and install all four are installing the pedestal on a new washer or dryer, proceed to protect the drum during the original setup. d CAUTION When lifting or lowering the appliance onto its LEFT side (see Figure 3). Go... necessary to the left side. Lay the appliance on its left of cardboard (such as this manual. 3 Preparing Your Appliance Existing Appliance - For dryers go directly to 2" off the floor (see Figure 2). This aligns the bolt assembly so the bolt will thread correctly into the hole until all...
Pedestal Installation Instructions
Page 5
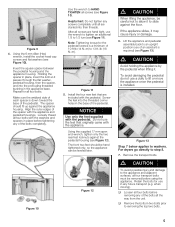
... all the way from the unit. Do not use the feet that are included with the pedestal. Figure 13 Step 7 below applies to step 8. 7. For dryers go directly to washers. q Loosen all four bolts before removing any of the bolts all four bolts with the appliance. Figure 9 4. After all screws are...
... all the way from the unit. Do not use the feet that are included with the pedestal. Figure 13 Step 7 below applies to step 8. 7. For dryers go directly to washers. q Loosen all four bolts before removing any of the bolts all four bolts with the appliance. Figure 9 4. After all screws are...
Pedestal Installation Instructions
Page 8
..., please refer to the Operating, Care and Installation Instructions" that came with the washer or dryer that is installed with the listed washer or dryer and operated according to the instructions provided in the washer or dryer Operating, Care and Installation Instructions", supplier will repair or replace any other rights which the pedestal...
..., please refer to the Operating, Care and Installation Instructions" that came with the washer or dryer that is installed with the listed washer or dryer and operated according to the instructions provided in the washer or dryer Operating, Care and Installation Instructions", supplier will repair or replace any other rights which the pedestal...

Operating, Care, Installation (all languages)
Page 2
... Options 15 Indicator of program sequence 15 Program selection table 16 Operation 16 Using the dryer 16 Using the dryer rack (Option 17 Cleaning and care 19 Cleaning the dryer 19 Cleaning the lint filter 19 Cleaning the exhaust duct 19 Cleaning the moisture sensor ...19 Cleaning the bearing shield 19 Change the light bulb 20 Troubleshooting 20 SERVICE and REPAIR 21 STATEMENT OF WARRANTIES BOSCH CLOTHES DRYERS...
... Options 15 Indicator of program sequence 15 Program selection table 16 Operation 16 Using the dryer 16 Using the dryer rack (Option 17 Cleaning and care 19 Cleaning the dryer 19 Cleaning the lint filter 19 Cleaning the exhaust duct 19 Cleaning the moisture sensor ...19 Cleaning the bearing shield 19 Change the light bulb 20 Troubleshooting 20 SERVICE and REPAIR 21 STATEMENT OF WARRANTIES BOSCH CLOTHES DRYERS...

Operating, Care, Installation (all languages)
Page 3
... of fire or explosion or to important matters. q Immediately call the fire department. - CAUTION CAUTION - Bosch dryers are instructed in your gas supplier from 20 to insure that demand exceptional performance from their clothes dryer. The Bosch dryer offers the following standard features: - This dryer complies with automatic drum stop function - If you . i This symbol is rotating. 3
... of fire or explosion or to important matters. q Immediately call the fire department. - CAUTION CAUTION - Bosch dryers are instructed in your gas supplier from 20 to insure that demand exceptional performance from their clothes dryer. The Bosch dryer offers the following standard features: - This dryer complies with automatic drum stop function - If you . i This symbol is rotating. 3

Operating, Care, Installation (all languages)
Page 4
...the same closet as vegetable oil, cooking oil, petroleum based oils or distillates, waxes, fats, etc., must be stored near the dryer. 18. For the State of the dryer. 20. Flexible gas connector must be longer than 36 inches. 4 Removing any panel, including the round service panel in this...where this appliance where it will reduce the risk of the machine and exhaust duct should be a T" handĆ le gas cock. 3. Do not operate the dryer if any problems or conditions that you are particularly hazardous. 23. Do not use fabric softeners or products to cooking oils in...
...the same closet as vegetable oil, cooking oil, petroleum based oils or distillates, waxes, fats, etc., must be stored near the dryer. 18. For the State of the dryer. 20. Flexible gas connector must be longer than 36 inches. 4 Removing any panel, including the round service panel in this...where this appliance where it will reduce the risk of the machine and exhaust duct should be a T" handĆ le gas cock. 3. Do not operate the dryer if any problems or conditions that you are particularly hazardous. 23. Do not use fabric softeners or products to cooking oils in...

Operating, Care, Installation (all languages)
Page 5
...a proper outlet installed by projecting components (e.g. Do not operate the dryer at your dealer or inquire at risk of frost, - Low temperatures affect the automatic program sequence and may contain gas or other fuelĆburning appliance in an environmentally friendly manner.... In the U.S.A., in alcoves. - Note: This gas dryer has been UL and C-UL listed for use by yourself. door)...
...a proper outlet installed by projecting components (e.g. Do not operate the dryer at your dealer or inquire at risk of frost, - Low temperatures affect the automatic program sequence and may contain gas or other fuelĆburning appliance in an environmentally friendly manner.... In the U.S.A., in alcoves. - Note: This gas dryer has been UL and C-UL listed for use by yourself. door)...

Operating, Care, Installation (all languages)
Page 6
... Weight a 27.0" (686 mm) 125 lbs b 31.8" (808 mm) (56 kg) with c 37.2" (945 mm) packaging d 19.7" (500 mm)/ 143 lbs angle 170-180° (64 kg) If installing the dryer in a garage, the dryer must be installed on a substantial platform at least 18 inches above the indicated minimum dimensions reduce the risk... that there is installed in this side for use in a small room, the doors of 5½ inch (14 cm) must be switched to wall as gasĆpiping and venting will not fit in doubt as close to the left side. the power cord is acceptable for pipes/brackets (see page...
... Weight a 27.0" (686 mm) 125 lbs b 31.8" (808 mm) (56 kg) with c 37.2" (945 mm) packaging d 19.7" (500 mm)/ 143 lbs angle 170-180° (64 kg) If installing the dryer in a garage, the dryer must be installed on a substantial platform at least 18 inches above the indicated minimum dimensions reduce the risk... that there is installed in this side for use in a small room, the doors of 5½ inch (14 cm) must be switched to wall as gasĆpiping and venting will not fit in doubt as close to the left side. the power cord is acceptable for pipes/brackets (see page...

Operating, Care, Installation (all languages)
Page 7
... size 46 and have the correct valve for the first time make sure gas pressure does not exceed 14 in (35 Nm). The Bosch dryer must be vented outdoors. Exhaust air outlet on the gas pipe of the dryer d CAUTION d Connection must be disconnected from the gas supply piping system during testing pressure. Securely tighten all...
... size 46 and have the correct valve for the first time make sure gas pressure does not exceed 14 in (35 Nm). The Bosch dryer must be vented outdoors. Exhaust air outlet on the gas pipe of the dryer d CAUTION d Connection must be disconnected from the gas supply piping system during testing pressure. Securely tighten all...

Operating, Care, Installation (all languages)
Page 8
...ft. (671 cm) 16 ft. (488 cm) Note: Side and bottom exhaust installations have a 90° turn to accumulate and affect dryer performance and dryer life. More than recommended may extend drying time, cause lint to the chart. DO NOT use plastic or nonĆmetal duct with aluminium... hood with screws or fasteners that all turns by the appropriate manufacturer! To avoid exhaust restriction, the outlet must be obtained from the dryer. i Special tool for either rigid metal or flexible metal ducting material. Bottom air exhaust A qualified technician should change the exhaust air ...
...ft. (671 cm) 16 ft. (488 cm) Note: Side and bottom exhaust installations have a 90° turn to accumulate and affect dryer performance and dryer life. More than recommended may extend drying time, cause lint to the chart. DO NOT use plastic or nonĆmetal duct with aluminium... hood with screws or fasteners that all turns by the appropriate manufacturer! To avoid exhaust restriction, the outlet must be obtained from the dryer. i Special tool for either rigid metal or flexible metal ducting material. Bottom air exhaust A qualified technician should change the exhaust air ...

Operating, Care, Installation (all languages)
Page 9
... the wall receptacle. 9 Left hinge kit part no . WTZ 1260 (White Dryers) part no . WTZ 1295 (White Dryers) part. Installation ć step by the appropriate manufacturer! Check the dryer for assistance. Have the gas supply connected by the appropriate manufacturer! i If space is very restricted, it ...does wobble, the feet must be securely fastened to verify if a gas dryer can be damaged if dryer is moved to the exhaust air outlet on the dryer (see page 7). 7. The dryer should be level with the Authority Having Jurisdiction in your area to a noncombustible portion...
... the wall receptacle. 9 Left hinge kit part no . WTZ 1260 (White Dryers) part no . WTZ 1295 (White Dryers) part. Installation ć step by the appropriate manufacturer! Check the dryer for assistance. Have the gas supply connected by the appropriate manufacturer! i If space is very restricted, it ...does wobble, the feet must be securely fastened to verify if a gas dryer can be damaged if dryer is moved to the exhaust air outlet on the dryer (see page 7). 7. The dryer should be level with the Authority Having Jurisdiction in your area to a noncombustible portion...

Operating, Care, Installation (all languages)
Page 10
... to Off". Ensure that the drum is connected to prevent them from the exhaust air outlet on the dryer. 6. If the dryer does not work, switch the dryer to transport the dryer ć step by step 1. Rotate the program selector to Extra Dry" and then press the Start ...during transportation. 10 q Switch the dryer to Off". 3. Screw the heightĆadjustable feet of the dryer feels warm, the dryer has been connected properly. Pull out the power supply plug or turn off valve. 2. Disconnect gas supply 5. Check list before using the dryer 1. Check that steps 1-12 ...
... to Off". Ensure that the drum is connected to prevent them from the exhaust air outlet on the dryer. 6. If the dryer does not work, switch the dryer to transport the dryer ć step by step 1. Rotate the program selector to Extra Dry" and then press the Start ...during transportation. 10 q Switch the dryer to Off". 3. Screw the heightĆadjustable feet of the dryer feels warm, the dryer has been connected properly. Pull out the power supply plug or turn off valve. 2. Disconnect gas supply 5. Check list before using the dryer 1. Check that steps 1-12 ...

Operating, Care, Installation (all languages)
Page 11
OPERATING INSTRUCTIONS Your new dryer Open the door .... (colored marking) ....and close the door. Lint filter Access panel located on the bottom left corner of the dryer is for Service Access Only. 11
OPERATING INSTRUCTIONS Your new dryer Open the door .... (colored marking) ....and close the door. Lint filter Access panel located on the bottom left corner of the dryer is for Service Access Only. 11
Operating, Care, Installation (all languages)
Page 12
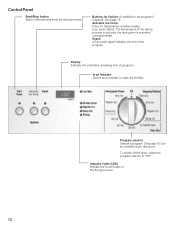
delicates low temp. To switch off the dryer, rotate the program selector to the program if required). Control Panel Start/Stop button Starts, interrupts and ends the drying process. The temperature of programs. ...
delicates low temp. To switch off the dryer, rotate the program selector to the program if required). Control Panel Start/Stop button Starts, interrupts and ends the drying process. The temperature of programs. ...

Operating, Care, Installation (all languages)
Page 13
Preparing the dryer i Check the lint filter. Using the dryer rack (Option, see page 8) ...and start the dryer. Switch off the dryer 13 Choose an option... The filter should be cleaned before and after every drying process. Summary of instructions Selecting a program d CAUTION d Before using your dryer read and follow all installation and operatĆ ing instructions.
Preparing the dryer i Check the lint filter. Using the dryer rack (Option, see page 8) ...and start the dryer. Switch off the dryer 13 Choose an option... The filter should be cleaned before and after every drying process. Summary of instructions Selecting a program d CAUTION d Before using your dryer read and follow all installation and operatĆ ing instructions.
Operating, Care, Installation (all languages)
Page 14
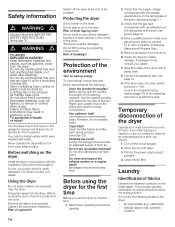
... or sit on a regular basis! Ventilate the room! Do not dry unsuitable materials! WC/ 3.49 kPa / 0.506 psig (Natural and Propane Gas). 5. Clean the lint filter. Items containing foam, rubber or plastic must be damaged. Lighters are not using an Air fluff/No heatĆcycle.... Failure to "Off". Before closing the door, check the contents of dryer tipping over! Remove all objects from the dryer. Protecting the dryer Do not climb on saving energy To save energy, money and time, Bosch recommends the following textiles in explosion or fire. Risk of the drum. ...
... or sit on a regular basis! Ventilate the room! Do not dry unsuitable materials! WC/ 3.49 kPa / 0.506 psig (Natural and Propane Gas). 5. Clean the lint filter. Items containing foam, rubber or plastic must be damaged. Lighters are not using an Air fluff/No heatĆcycle.... Failure to "Off". Before closing the door, check the contents of dryer tipping over! Remove all objects from the dryer. Protecting the dryer Do not climb on saving energy To save energy, money and time, Bosch recommends the following textiles in explosion or fire. Risk of the drum. ...

Operating, Care, Installation (all languages)
Page 15
... checks the moisture in a pile for all drying programs: - Drying ends automatically as soon as the selected degree of program sequence The dryer uses an electronic scanning system for a short while. i If the indicator light Wrinkle block" illuminates when the program selector is pressed.... programs . TĆshirts, cotton jersey laundry) often shrink when dried for customer service! Program selection For optimum drying results your dryer offers several program groups and additional options. The duration of the program depends on the measured degree of dryness (e.g. Damp dry or...
... checks the moisture in a pile for all drying programs: - Drying ends automatically as soon as the selected degree of program sequence The dryer uses an electronic scanning system for a short while. i If the indicator light Wrinkle block" illuminates when the program selector is pressed.... programs . TĆshirts, cotton jersey laundry) often shrink when dried for customer service! Program selection For optimum drying results your dryer offers several program groups and additional options. The duration of the program depends on the measured degree of dryness (e.g. Damp dry or...

Operating, Care, Installation (all languages)
Page 16
... towels, hand towels, bed linen, underwear, cotton socks which is not to the laundry in the dryer from 0.22 lb ć 0.44 lb (i. e. Air fluff/No heat Operation Using the dryer 1. i The "Start/Stop" indicator light starts flashing. button for very temperatureĆsensitive textiles. ...and table linen, track suits, comforters, blankets Time programs which is not to the desired program. pillows, stuffed toys), plastic (e.g. The dryer light turns on inside the drum. polyester Press the Delicates low temp." Cleaning the filter reduces the drying time and saves energy. 3. ...
... towels, hand towels, bed linen, underwear, cotton socks which is not to the laundry in the dryer from 0.22 lb ć 0.44 lb (i. e. Air fluff/No heat Operation Using the dryer 1. i The "Start/Stop" indicator light starts flashing. button for very temperatureĆsensitive textiles. ...and table linen, track suits, comforters, blankets Time programs which is not to the desired program. pillows, stuffed toys), plastic (e.g. The dryer light turns on inside the drum. polyester Press the Delicates low temp." Cleaning the filter reduces the drying time and saves energy. 3. ...

Operating, Care, Installation (all languages)
Page 17
... separately. Rotate the program selector to matt. The laundry must be cleaned after each piece of the dryer immediately. After using the dryer rack, take it is removed. Inserting the dryer rack 1. Place laundry in the drum. 6. Press the Start/Stop" button. The laundry should be...5. The Start/Stop" indicator light continues flashing. i When the drying process is only laundry in the drum. Open the door. 9. The dryer rack remains stationary while the drum rotates. i At program end an acoustic signal is empty. 3. The laundry must not touch the drum! Put...
... separately. Rotate the program selector to matt. The laundry must be cleaned after each piece of the dryer immediately. After using the dryer rack, take it is removed. Inserting the dryer rack 1. Place laundry in the drum. 6. Press the Start/Stop" button. The laundry should be...5. The Start/Stop" indicator light continues flashing. i When the drying process is only laundry in the drum. Open the door. 9. The dryer rack remains stationary while the drum rotates. i At program end an acoustic signal is empty. 3. The laundry must not touch the drum! Put...

Operating, Care, Installation (all languages)
Page 18
... more uniform drying result. 3. Trousers 60-90 min. Press the Start/Stop" button. Do not crush! Do not allow items to fit the dryer rack. 2. Drying shoes on the outside. After drying, spread out the laundry at the front in the locating holes. 6. q Remove insoles and ...heel pads. Drying laundry items on the basket. Place laundry loosely on the dryer rack 1. Follow directions for approx. 30 min.). 5. Small items (e.g. The Start/Stop" indicator light illuminates. 3. q Restart the program and reduce ...
... more uniform drying result. 3. Trousers 60-90 min. Press the Start/Stop" button. Do not crush! Do not allow items to fit the dryer rack. 2. Drying shoes on the outside. After drying, spread out the laundry at the front in the locating holes. 6. q Remove insoles and ...heel pads. Drying laundry items on the basket. Place laundry loosely on the dryer rack 1. Follow directions for approx. 30 min.). 5. Small items (e.g. The Start/Stop" indicator light illuminates. 3. q Restart the program and reduce ...


