

Owner's guide
Page 2
TAB 4 TAB 3 TAB 2 English 2 This will help you operate your system. TAB 8 TAB 7 TAB 6 TAB 5 IMPORTANT SAFETY INFORMATION Please review the important safety information in your VideoWave® Entertainment System Setup Guide before using your system properly and safely.
TAB 4 TAB 3 TAB 2 English 2 This will help you operate your system. TAB 8 TAB 7 TAB 6 TAB 5 IMPORTANT SAFETY INFORMATION Please review the important safety information in your VideoWave® Entertainment System Setup Guide before using your system properly and safely.

Owner's guide
Page 3
English TAB 2 TAB 3 TAB 4 INTRODUCTION 5 Welcome 5 Product Overview 5 System overview 6 Bose® click pad remote control overview . . . . . 7 Control frame overview 8 Click pad overview 9 System updates 10 Registering your product 10 Important safety information 10 BASIC SYSTEM ... to the front analog A/V inputs 22 Controlling front A/V sources 22 CHANGING SOURCE AND SYSTEM OPTIONS 23 Changing settings 24 Available settings 24 Exit 24 Play Bose® demonstration 24 Program Language 25 Channel Number 25 Control Frame Sounds 25 Video Settings 25 3
English TAB 2 TAB 3 TAB 4 INTRODUCTION 5 Welcome 5 Product Overview 5 System overview 6 Bose® click pad remote control overview . . . . . 7 Control frame overview 8 Click pad overview 9 System updates 10 Registering your product 10 Important safety information 10 BASIC SYSTEM ... to the front analog A/V inputs 22 Controlling front A/V sources 22 CHANGING SOURCE AND SYSTEM OPTIONS 23 Changing settings 24 Available settings 24 Exit 24 Play Bose® demonstration 24 Program Language 25 Channel Number 25 Control Frame Sounds 25 Video Settings 25 3

Owner's guide
Page 4
...; system overview 27 Using the Unify menu 27 Unify system functions 27 Resume initial setup 27 Restart initial setup 27 Language 27 ADAPTiQ 27 Play Bose® demonstration 27 Source setup 28 Add a new device 28 Homewide 28 Update 28 Teach mode 28 Exit Unify 28 Customizing the control frame 29...
...; system overview 27 Using the Unify menu 27 Unify system functions 27 Resume initial setup 27 Restart initial setup 27 Language 27 ADAPTiQ 27 Play Bose® demonstration 27 Source setup 28 Add a new device 28 Homewide 28 Update 28 Teach mode 28 Exit Unify 28 Customizing the control frame 29...

Owner's guide
Page 5
...system, the sound should be calibrated for iPod Monitor and stand 5 If you how to the VideoWave system setup guide. Control console Bose® click pad remote control Dock for your home. TAB 5 TAB 6 TAB 7 TAB 8 INTRODUCTION Product Overview... The VideoWave system features an HD monitor, and comes with a control console, a remote control, and a dock for your room. English TAB 2 TAB 3 TAB 4 Welcome Thank you for choosing the Bose® VideoWave® entertainment...
...system, the sound should be calibrated for iPod Monitor and stand 5 If you how to the VideoWave system setup guide. Control console Bose® click pad remote control Dock for your home. TAB 5 TAB 6 TAB 7 TAB 8 INTRODUCTION Product Overview... The VideoWave system features an HD monitor, and comes with a control console, a remote control, and a dock for your room. English TAB 2 TAB 3 TAB 4 Welcome Thank you for choosing the Bose® VideoWave® entertainment...

Owner's guide
Page 6
... itself . Controls that is different and will present only the controls needed to leave the screen. TAB 8 TAB 7 TAB 6 TAB 5 INTRODUCTION System overview The VideoWave® entertainment system offers a unique approach to controlling external devices like a cable set -top box. Control frame • Your eyes don't have to operate the DVD player...
... itself . Controls that is different and will present only the controls needed to leave the screen. TAB 8 TAB 7 TAB 6 TAB 5 INTRODUCTION System overview The VideoWave® entertainment system offers a unique approach to controlling external devices like a cable set -top box. Control frame • Your eyes don't have to operate the DVD player...

Owner's guide
Page 7
... the system audio. Source selection Selects connected devices from the source menu. Click pad Displays and selects source and system functions. English TAB 2 TAB 3 TAB 4 Bose® click pad remote control overview TAB 5 TAB 6 TAB 7 TAB 8 INTRODUCTION Power on/off Turns the system on page 14.
... the system audio. Source selection Selects connected devices from the source menu. Click pad Displays and selects source and system functions. English TAB 2 TAB 3 TAB 4 Bose® click pad remote control overview TAB 5 TAB 6 TAB 7 TAB 8 INTRODUCTION Power on/off Turns the system on page 14.

Owner's guide
Page 8
... for entering channel, DVD chapter, music track, or disc number. These replace the buttons on page 29. Source and system options menu (page 23) and Bose Demonstration (page 24) Playback controls used by the source you have selected. TAB 4 TAB 3 TAB 2 English Note: The content of functions or controls used for...
... for entering channel, DVD chapter, music track, or disc number. These replace the buttons on page 29. Source and system options menu (page 23) and Bose Demonstration (page 24) Playback controls used by the source you have selected. TAB 4 TAB 3 TAB 2 English Note: The content of functions or controls used for...

Owner's guide
Page 9
English TAB 2 TAB 3 TAB 4 Click pad overview 1 TOUCH Place your thumb along the click pad to highlight a control. 3 CLICK Press down on the click pad to select the highlighted control. 9 TAB 5 TAB 6 TAB 7 TAB 8 INTRODUCTION 2 GLIDE Glide your thumb on the click pad to see the control frame.
English TAB 2 TAB 3 TAB 4 Click pad overview 1 TOUCH Place your thumb along the click pad to highlight a control. 3 CLICK Press down on the click pad to select the highlighted control. 9 TAB 5 TAB 6 TAB 7 TAB 8 INTRODUCTION 2 GLIDE Glide your thumb on the click pad to see the control frame.

Owner's guide
Page 10
... a system update, because you to receive notifications of trying to control external sources in a world where there are no consistent industry standards for free from Bose. We believe that our approach is a vast improvement over using multiple, complex remote controls.
... a system update, because you to receive notifications of trying to control external sources in a world where there are no consistent industry standards for free from Bose. We believe that our approach is a vast improvement over using multiple, complex remote controls.
Owner's guide
Page 11
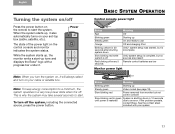
... shutting system down in a very low power state when it also automatically turns on the remote to start the system. If the problem persists, contact Bose. See the contact sheet included with a progress bar under it will always select and turn off . While the system starts up, the monitor emits a ...was started, but no sources are present Remote control batteries are low Monitor power light Status Meaning Blinking green Starting up tone and displays the Bose® logo with your system 11 This is off the system, including the connected source, press the power button.
... shutting system down in a very low power state when it also automatically turns on the remote to start the system. If the problem persists, contact Bose. See the contact sheet included with a progress bar under it will always select and turn off . While the system starts up, the monitor emits a ...was started, but no sources are present Remote control batteries are low Monitor power light Status Meaning Blinking green Starting up tone and displays the Bose® logo with your system 11 This is off the system, including the connected source, press the power button.

Owner's guide
Page 12
Press the Source button on the types of sources you can also move the highlight down navigation buttons. TAB 4 TAB 3 TAB 2 English Note: You can select any of sources using the up and down the list of your system during setup. • Your iPod must be docked for it to appear in the SOURCE menu. 12 To select a source: 1. The source that you want. Pressing OK selects the highlighted source. Continue pressing the Source select button to move the highlight up and down the list and select the source you last selected is the selected source Notes: • The items ...
Press the Source button on the types of sources you can also move the highlight down navigation buttons. TAB 4 TAB 3 TAB 2 English Note: You can select any of sources using the up and down the list of your system during setup. • Your iPod must be docked for it to appear in the SOURCE menu. 12 To select a source: 1. The source that you want. Pressing OK selects the highlighted source. Continue pressing the Source select button to move the highlight up and down the list and select the source you last selected is the selected source Notes: • The items ...

Owner's guide
Page 13
For instructions on page 16. English TAB 2 TAB 3 TAB 4 Controlling the volume Press volume plus (+) or minus (-) to a specific channel number, see "Entering channel numbers" on moving to raise or lower the volume. Press again to move up /down one channel. Press the Last button to restore. Volume Mute TAB 5 TAB 6 TAB 7 TAB 8 BASIC SYSTEM OPERATION Moving through channels Press CH or CH to suspend the system audio. Press the mute button to move back and forth between two channels. Channel up or down Last 13
For instructions on page 16. English TAB 2 TAB 3 TAB 4 Controlling the volume Press volume plus (+) or minus (-) to a specific channel number, see "Entering channel numbers" on moving to raise or lower the volume. Press again to move up /down one channel. Press the Last button to restore. Volume Mute TAB 5 TAB 6 TAB 7 TAB 8 BASIC SYSTEM OPERATION Moving through channels Press CH or CH to suspend the system audio. Press the mute button to move back and forth between two channels. Channel up or down Last 13

Owner's guide
Page 14
... DVR, DVD, CD, and MP3 players.* *For more information on using these controls, refer to use. 14 Source and system options menu (page 23) and Bose Demonstration (page 24). These replace the buttons on the remote control that came with the source you have selected to the owner's guide that came...
... DVR, DVD, CD, and MP3 players.* *For more information on using these controls, refer to use. 14 Source and system options menu (page 23) and Bose Demonstration (page 24). These replace the buttons on the remote control that came with the source you have selected to the owner's guide that came...

Owner's guide
Page 15
Place your thumb anywhere on the click pad 3. Highlighted function corresponds with your thumb along the click pad to activate the control frame, which provides onscreen controls for the source you want. Press down on the click pad to fit within the control frame. TAB 5 TAB 6 TAB 7 TAB 8 CONTROLLING YOUR SOURCES 2. Glide your thumb position on the click pad to highlight the control you are using. Note: When the control frame is activated, the picture is resized to select the highlighted control. 15 English TAB 2 TAB 3 TAB 4 Selecting source controls 1.
Place your thumb anywhere on the click pad 3. Highlighted function corresponds with your thumb along the click pad to activate the control frame, which provides onscreen controls for the source you want. Press down on the click pad to fit within the control frame. TAB 5 TAB 6 TAB 7 TAB 8 CONTROLLING YOUR SOURCES 2. Glide your thumb position on the click pad to highlight the control you are using. Note: When the control frame is activated, the picture is resized to select the highlighted control. 15 English TAB 2 TAB 3 TAB 4 Selecting source controls 1.

Owner's guide
Page 16
When you enter a number, it appears in the Options menu (page 25). TAB 4 TAB 3 TAB 2 English 3. If your set -top box, you can use them to send the numbers immediately. The number of digits the queue can hold is set the number of 3 digits. For example, if you need to enter channel numbers as high as 9999, you should set at the factory to a maximum of digits to channel 99, then you will need to 4. Channel number queue 16 TAB 8 TAB 7 TAB 6 TAB 5 CONTROLLING YOUR SOURCES Entering channel numbers The numbers along the top of the control frame appear for any ...
When you enter a number, it appears in the Options menu (page 25). TAB 4 TAB 3 TAB 2 English 3. If your set -top box, you can use them to send the numbers immediately. The number of digits the queue can hold is set the number of 3 digits. For example, if you need to enter channel numbers as high as 9999, you should set at the factory to a maximum of digits to channel 99, then you will need to 4. Channel number queue 16 TAB 8 TAB 7 TAB 6 TAB 5 CONTROLLING YOUR SOURCES Entering channel numbers The numbers along the top of the control frame appear for any ...

Owner's guide
Page 17
Using the navigation pad on -screen item you can access this guide using the Guide control in the control frame. The selected function appears within the control frame. Lift your thumb off the click pad (the control frame disappears) and use the navigation pad to move the highlight to the on the remote, you want. 3. Navigation pad Provides up, down, left, right movement and select functions for navigating onscreen menus and program guides. Press the OK button to 1:00am: Major League Baseball Boston Red Sox at Oakland Athletics Live 9:30 10:00 10:30 11:00 11:30 002 Public ...
Using the navigation pad on -screen item you can access this guide using the Guide control in the control frame. The selected function appears within the control frame. Lift your thumb off the click pad (the control frame disappears) and use the navigation pad to move the highlight to the on the remote, you want. 3. Navigation pad Provides up, down, left, right movement and select functions for navigating onscreen menus and program guides. Press the OK button to 1:00am: Major League Baseball Boston Red Sox at Oakland Athletics Live 9:30 10:00 10:30 11:00 11:30 002 Public ...

Owner's guide
Page 18
Places vertical gray bars on your TV screen without being distracted by video, or if you just want to fade away. Press and hold the remote control power button until the picture starts to conserve energy, you select a format. The picture format will automatically enter screen-saver mode in order to prevent the risk of screen burn-in the control frame to music without cropping any button on the video screen, press and release the power button. Auto-Wide Tries to make the video image fill the entire width of a standard definition video image. 18 TAB 4 TAB 3 TAB 2 ...
Places vertical gray bars on your TV screen without being distracted by video, or if you just want to fade away. Press and hold the remote control power button until the picture starts to conserve energy, you select a format. The picture format will automatically enter screen-saver mode in order to prevent the risk of screen burn-in the control frame to music without cropping any button on the video screen, press and release the power button. Auto-Wide Tries to make the video image fill the entire width of a standard definition video image. 18 TAB 4 TAB 3 TAB 2 ...

Owner's guide
Page 19
The track you dock it. 2. The iPod interface is displayed. iPod interface Your iPod menus and content appear on the right. It will not appear in the following example. TAB 5 TAB 6 TAB 7 TAB 8 USING THE iPOD SOURCE Controlling iPod Use the click pad remote and the playback controls on the control frame to operate your screen as shown in the SOURCE menu until you have selected appears on the left side of your iPod. Remote control navigation pad OK Page Page On-screen control frame Up one menu item (press and hold to scroll quickly) Down one menu item (press and ...
The track you dock it. 2. The iPod interface is displayed. iPod interface Your iPod menus and content appear on the right. It will not appear in the following example. TAB 5 TAB 6 TAB 7 TAB 8 USING THE iPOD SOURCE Controlling iPod Use the click pad remote and the playback controls on the control frame to operate your screen as shown in the SOURCE menu until you have selected appears on the left side of your iPod. Remote control navigation pad OK Page Page On-screen control frame Up one menu item (press and hold to scroll quickly) Down one menu item (press and ...

Owner's guide
Page 20
Refer to "Control console power light" on /off Source Source selection Mute/ unmute Volume down Setup Volume Unify® up to control devices connected to the front A/V or HDMI inputs. 20 Note: The click pad remote cannot be set by the volume buttons on the remote control or control console. 4 Control buttons Power on page 11. 3 Headphone output Accepts stereo headphones with a 3.5 mm stereo plug. Volume level is set up menu (page 27) 2 Front A/V inputs Used for viewing photo files from a USB device or a digital camera, and updating the system. TAB 8 TAB 7 TAB 6 TAB 5 ...
Refer to "Control console power light" on /off Source Source selection Mute/ unmute Volume down Setup Volume Unify® up to control devices connected to the front A/V or HDMI inputs. 20 Note: The click pad remote cannot be set by the volume buttons on the remote control or control console. 4 Control buttons Power on page 11. 3 Headphone output Accepts stereo headphones with a 3.5 mm stereo plug. Volume level is set up menu (page 27) 2 Front A/V inputs Used for viewing photo files from a USB device or a digital camera, and updating the system. TAB 8 TAB 7 TAB 6 TAB 5 ...

Owner's guide
Page 21
Press the source button on the left followed by single image files. Selecting a folder displays its contents. Remote control OK Page Page EXIT On-screen control frame Up one menu item (press and hold to repeat) Down one menu item (press and hold to repeat) Up one folder level, or exit and return to browsing folders (if viewing a slideshow) Down one folder level Down one folder level (if a folder is highlighted), or Play slideshow (if a photo file is displayed. TAB 5 TAB 6 TAB 7 TAB 8 USING THE USB SOURCE Photo viewing controls Use the click pad remote control and control frame ...
Press the source button on the left followed by single image files. Selecting a folder displays its contents. Remote control OK Page Page EXIT On-screen control frame Up one menu item (press and hold to repeat) Down one menu item (press and hold to repeat) Up one folder level, or exit and return to browsing folders (if viewing a slideshow) Down one folder level Down one folder level (if a folder is highlighted), or Play slideshow (if a photo file is displayed. TAB 5 TAB 6 TAB 7 TAB 8 USING THE USB SOURCE Photo viewing controls Use the click pad remote control and control frame ...
