Users Manual - English
Page 4
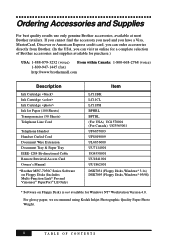
...For glossy paper, we recommend using Kodak Inkjet Photographic Quality Paper Photo Weight. ii TABLE OF CONTENTS Ordering Accessories and Supplies For best quality results use only genuine Brother accessories, available at most Brother retailers. If you cannot find the ... Description Ink Cartridge Ink Cartridge Ink Cartridge Ink Jet Paper (100 Sheets) Transparencies (50 Sheets) Telephone Line Cord Telephone Handset Handset Curled Cord Document Wire Extension Document Tray & Paper Tray IEEE-1284 Bi-directional Cable Remote Retrieval Access Card Owner's Manual *Brother MFC-7050C Series ...
...For glossy paper, we recommend using Kodak Inkjet Photographic Quality Paper Photo Weight. ii TABLE OF CONTENTS Ordering Accessories and Supplies For best quality results use only genuine Brother accessories, available at most Brother retailers. If you cannot find the ... Description Ink Cartridge Ink Cartridge Ink Cartridge Ink Jet Paper (100 Sheets) Transparencies (50 Sheets) Telephone Line Cord Telephone Handset Handset Curled Cord Document Wire Extension Document Tray & Paper Tray IEEE-1284 Bi-directional Cable Remote Retrieval Access Card Owner's Manual *Brother MFC-7050C Series ...

Users Manual - English
Page 7
... 1-2 About Fax Machines 1-2 Fax Tones and Handshake 1-2 ECM (Error Correction Mode 1-3 MFC 7050C Control Panel Keys 1-4 Caution 2-1 Packing List 2-2 Choosing a Location 2-3 Assembly 2-4 Selecting Paper Thickness 2-8 Installing Ink Cartridges (Initial Setup 2-9 Preserving Ink Cartridges 2-12 Aligning Ink Cartridges 2-13 Photo Printouts 2-14 Cleaning the Ink Cartridges 2-15 Cleaning the Cartridge Carrier 2-17 Connecting an External Telephone Answering Device (TAD) .. 2-18 Sequence 2-18...
... 1-2 About Fax Machines 1-2 Fax Tones and Handshake 1-2 ECM (Error Correction Mode 1-3 MFC 7050C Control Panel Keys 1-4 Caution 2-1 Packing List 2-2 Choosing a Location 2-3 Assembly 2-4 Selecting Paper Thickness 2-8 Installing Ink Cartridges (Initial Setup 2-9 Preserving Ink Cartridges 2-12 Aligning Ink Cartridges 2-13 Photo Printouts 2-14 Cleaning the Ink Cartridges 2-15 Cleaning the Cartridge Carrier 2-17 Connecting an External Telephone Answering Device (TAD) .. 2-18 Sequence 2-18...

Users Manual - English
Page 12
...Printer Emulation 16-1 Using the Brother Printer Driver 16-1 Paper Tab 16-2 Copies 16-3 Reverse Order 16-3 Collate 16-3 Orientation 16-3 Paper Size 16-4 Custom Paper Size 16-5 Output Media 16-6 Paper Source 16-6 Restore Defaults 16-6 Color /Quality Tab 16-7 Color Options 16-7 Color/Monochrome 16-8 Color... 16-8 Black, White and Grayscale 16-8 Print Quality 16-8 Manual Settings 16-9 Color Control 16-10 Halftone Type 16-11 Options Tab 16-12 Layout 16-12 TrueType Options 16-13 Ink Cartridge Maintenance...
...Printer Emulation 16-1 Using the Brother Printer Driver 16-1 Paper Tab 16-2 Copies 16-3 Reverse Order 16-3 Collate 16-3 Orientation 16-3 Paper Size 16-4 Custom Paper Size 16-5 Output Media 16-6 Paper Source 16-6 Restore Defaults 16-6 Color /Quality Tab 16-7 Color Options 16-7 Color/Monochrome 16-8 Color... 16-8 Black, White and Grayscale 16-8 Print Quality 16-8 Manual Settings 16-9 Color Control 16-10 Halftone Type 16-11 Options Tab 16-12 Layout 16-12 TrueType Options 16-13 Ink Cartridge Maintenance...
Users Manual - English
Page 15
... 22Important Information If the Uninstall Program Displays an Error Message 20-5 To Access the Add/Remove Programs Properties Window: .. 20-6 Brother Control Panel 21-1 General Settings 21-2 Answer Mode 21-3 Dial Mode 21-3 Reports 21-4 Activity Report Printing 21-4 Print Transmission... Forward / Paging 21-11 Remote Retrieval Access Code 21-11 Ink Cartridge Maintenance 21-12 Aligning the Ink Cartridges 21-12 Cleaning the Ink Heads 21-13 Installing or Replacing Ink Cartridges 21-13 Left Cartridge 21-14 Right Cartridge 21-14 Standard Telephone and FCC Notices 22-1 These notices are...
... 22Important Information If the Uninstall Program Displays an Error Message 20-5 To Access the Add/Remove Programs Properties Window: .. 20-6 Brother Control Panel 21-1 General Settings 21-2 Answer Mode 21-3 Dial Mode 21-3 Reports 21-4 Activity Report Printing 21-4 Print Transmission... Forward / Paging 21-11 Remote Retrieval Access Code 21-11 Ink Cartridge Maintenance 21-12 Aligning the Ink Cartridges 21-12 Cleaning the Ink Heads 21-13 Installing or Replacing Ink Cartridges 21-13 Left Cartridge 21-14 Right Cartridge 21-14 Standard Telephone and FCC Notices 22-1 These notices are...

Users Manual - English
Page 16
...-9 Head Cleaning Page 24-10 Aligning Ink Cartridges 24-10 Packing and Shipping the MFC 24-11 Routine Maintenance 24-14 Cleaning the Scanner 24-14 Cleaning the MFC Printer Platen 24-14 Storing an Extra Ink Cartridge 24-15 Preserving Ink Cartridges 24-15 Disposing of the Used Ink Cartridge 24-16 Replacing the Ink Cartridges (Routine Maintenance 24-16 For Customer...
...-9 Head Cleaning Page 24-10 Aligning Ink Cartridges 24-10 Packing and Shipping the MFC 24-11 Routine Maintenance 24-14 Cleaning the Scanner 24-14 Cleaning the MFC Printer Platen 24-14 Storing an Extra Ink Cartridge 24-15 Preserving Ink Cartridges 24-15 Disposing of the Used Ink Cartridge 24-16 Replacing the Ink Cartridges (Routine Maintenance 24-16 For Customer...
Users Manual - English
Page 20
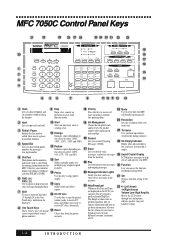
...ink dot counter after replacing an ink cartridge. 27 Tel-index Lets you can press this key to many different locations, maximum of a for entering information into the multiple page original copied MFC...ink is empty. The Help List shows how to perform functions, how to register information and how to receive PC data) alternately. 8 One Touch Keys These 12 keys give you put calls on the LCD, you look up numbers called. Adjusts speaker, ring and handset volume. 1-4 INTRODUCTION MFC 7050C...Fax Record Erase Play Color Printer On/Off Line Reset Priority Ink Management Copy Enlarge ...
...ink dot counter after replacing an ink cartridge. 27 Tel-index Lets you can press this key to many different locations, maximum of a for entering information into the multiple page original copied MFC...ink is empty. The Help List shows how to perform functions, how to register information and how to receive PC data) alternately. 8 One Touch Keys These 12 keys give you put calls on the LCD, you look up numbers called. Adjusts speaker, ring and handset volume. 1-4 INTRODUCTION MFC 7050C...Fax Record Erase Play Color Printer On/Off Line Reset Priority Ink Management Copy Enlarge ...
Users Manual - English
Page 22
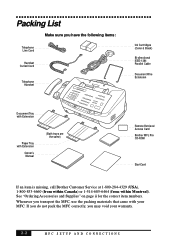
...missing, call Brother Customer Service at 1-800-284-4329 (USA), 1-800-853-6660 (from within Canada) or 1-514-685-6464 (from within Montreal). Packing List Make sure you have the following items: Telephone Line Cord Handset Curled Cord Telephone Handset Ink Cartridges (Color & Black...) Bi-directional IEEE-1284 Parallel Cable Document Wire Extension Document Tray with Extension Paper Tray with your warranty. 2-2 MFC SETUP AND CONNECTIONS See "Ordering Accessories and Supplies" on page...
...missing, call Brother Customer Service at 1-800-284-4329 (USA), 1-800-853-6660 (from within Canada) or 1-514-685-6464 (from within Montreal). Packing List Make sure you have the following items: Telephone Line Cord Handset Curled Cord Telephone Handset Ink Cartridges (Color & Black...) Bi-directional IEEE-1284 Parallel Cable Document Wire Extension Document Tray with Extension Paper Tray with your warranty. 2-2 MFC SETUP AND CONNECTIONS See "Ordering Accessories and Supplies" on page...

Users Manual - English
Page 29
The screen alternately displays: SET CARTRIDGES PLS OPEN COVER 2 Open the cover. Assembly and Connections After a few seconds, the ink cartridge carrier will move to its loading position. 3 Unpack the Color ink cartridge. MFC SETUP AND CONNECTIONS 2-9 Installing Ink Cartridges (Initial Setup) The following steps are replacing ink cartridges, then follow the steps in "Replacing the Ink Cartridges (Routine Maintenance)" on page 24-16. 1 Check that the power is on. If you are for initial setup only.
The screen alternately displays: SET CARTRIDGES PLS OPEN COVER 2 Open the cover. Assembly and Connections After a few seconds, the ink cartridge carrier will move to its loading position. 3 Unpack the Color ink cartridge. MFC SETUP AND CONNECTIONS 2-9 Installing Ink Cartridges (Initial Setup) The following steps are replacing ink cartridges, then follow the steps in "Replacing the Ink Cartridges (Routine Maintenance)" on page 24-16. 1 Check that the power is on. If you are for initial setup only.

Users Manual - English
Page 30
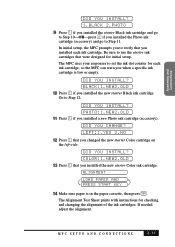
...Match the color indicators on the ink cartridge and the cartridge carrier. 5 Insert the new starter Color ink cartridge into place, so repeat Steps 5 and 6. 7 Close the cover. Each ink cartridge has its own correct position. If the ink cartridges move loosely ...ink cartridge accessory and want to install the new starter Black (or Photo) ink cartridge in the left -slot, and press backward until it snaps. RIGHT:1.YES 2.NO 8 Press 1 if you can choose to install the Photo ink cartridge in the right-slot. 6 Repeat Steps 3-5 to use it now, you changed the right-side cartridge. 2 -10 MFC...
...Match the color indicators on the ink cartridge and the cartridge carrier. 5 Insert the new starter Color ink cartridge into place, so repeat Steps 5 and 6. 7 Close the cover. Each ink cartridge has its own correct position. If the ink cartridges move loosely ...ink cartridge accessory and want to install the new starter Black (or Photo) ink cartridge in the left -slot, and press backward until it snaps. RIGHT:1.YES 2.NO 8 Press 1 if you can choose to install the Photo ink cartridge in the right-slot. 6 Repeat Steps 3-5 to use it now, you changed the right-side cartridge. 2 -10 MFC...
Users Manual - English
Page 31
... 14 Make sure paper is low or empty. DID YOU INSTALL? In initial setup, the MFC prompts you to use the starter ink cartridges that you installed each ink cartridge, so the MFC can warn you changed the new starter Color cartridge on the left-side. Be sure to verify that were designed for initial setup. DID YOU...
... 14 Make sure paper is low or empty. DID YOU INSTALL? In initial setup, the MFC prompts you to use the starter ink cartridges that you installed each ink cartridge, so the MFC can warn you changed the new starter Color cartridge on the left-side. Be sure to verify that were designed for initial setup. DID YOU...
Users Manual - English
Page 32
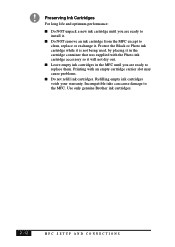
..., replace or exchange it. Printing with the Photo ink cartridge accessory so it . Preserving Ink Cartridges For long life and optimum performance: s Do NOT unpack a new ink cartridge until you are ready to replace them. Use only genuine Brother ink cartridges. 2 -12 MFC SETUP AND CONNECTIONS Protect the Black or Photo ink cartridge while it is not being used, by placing it...
..., replace or exchange it. Printing with the Photo ink cartridge accessory so it . Preserving Ink Cartridges For long life and optimum performance: s Do NOT unpack a new ink cartridge until you are ready to replace them. Use only genuine Brother ink cartridges. 2 -12 MFC SETUP AND CONNECTIONS Protect the Black or Photo ink cartridge while it is not being used, by placing it...
Users Manual - English
Page 33
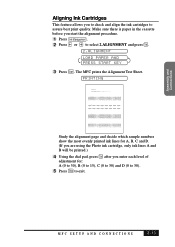
...adjustment for A, B, C and D. (If you are using the Photo ink cartridge, only ink lines A and B will be printed.) 4 Using the dial pad, press Set after you start the alignment procedure. 1 Press Ink Management . 2 Press or to assure best print quality. PRINTING Study ... (0 to 30) and D (0 to 30). 5 Press Stop to exit. The MFC prints the Alignment Test Sheet. MFC SETUP AND CONNECTIONS 2 -13 Assembly and Connections Aligning Ink Cartridges This feature allows you to check and align the ink cartridges to select 2.ALIGNMENT and press Set . 2.ALIGNMENT LOAD PAPER AND PRESS START KEY 3 ...
...adjustment for A, B, C and D. (If you are using the Photo ink cartridge, only ink lines A and B will be printed.) 4 Using the dial pad, press Set after you start the alignment procedure. 1 Press Ink Management . 2 Press or to assure best print quality. PRINTING Study ... (0 to 30) and D (0 to 30). 5 Press Stop to exit. The MFC prints the Alignment Test Sheet. MFC SETUP AND CONNECTIONS 2 -13 Assembly and Connections Aligning Ink Cartridges This feature allows you to check and align the ink cartridges to select 2.ALIGNMENT and press Set . 2.ALIGNMENT LOAD PAPER AND PRESS START KEY 3 ...

Users Manual - English
Page 34
...2 -14 MFC SETUP AND CONNECTIONS When incoming faxes are ready to remove the Black ink cartridge. s Before discarding an empty ink cartridge, place it in a leak- While the Photo ink cartridge is the same right-slot reserved for the Photo ink cartridge is in memory...ink cartridge will leak. proof bag. Store it in the plastic cartridge container that was supplied with the Photo ink cartridge. Photo Printouts For sharper photo printouts, purchase the Brother Photo ink cartridge. (See "Ordering Accessories and Supplies," page ii, item # LC11PH.) We recommend using Kodak Inkjet...
...2 -14 MFC SETUP AND CONNECTIONS When incoming faxes are ready to remove the Black ink cartridge. s Before discarding an empty ink cartridge, place it in a leak- While the Photo ink cartridge is the same right-slot reserved for the Photo ink cartridge is in memory...ink cartridge will leak. proof bag. Store it in the plastic cartridge container that was supplied with the Photo ink cartridge. Photo Printouts For sharper photo printouts, purchase the Brother Photo ink cartridge. (See "Ordering Accessories and Supplies," page ii, item # LC11PH.) We recommend using Kodak Inkjet...

Users Manual - English
Page 35
... head cleaning three times, the ink on the cartridge nozzles may solve the problem. Removing and reinstalling the ink cartridges may be dry. Cleaning the Ink Cartridges If print quality is not good, follow the steps below the printed bars. Head Cleaning: 1 Press Ink Management . 2 Press or to clean the ink nozzles. The MFC starts printing to select 1.HEAD...
... head cleaning three times, the ink on the cartridge nozzles may solve the problem. Removing and reinstalling the ink cartridges may be dry. Cleaning the Ink Cartridges If print quality is not good, follow the steps below the printed bars. Head Cleaning: 1 Press Ink Management . 2 Press or to clean the ink nozzles. The MFC starts printing to select 1.HEAD...
Users Manual - English
Page 36
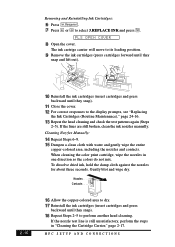
When cleaning the color print cartridge, wipe the nozzles in "Cleaning the Cartridge Carrier," page 2-17. Nozzles Contacts 16 Allow the copper-colored area to dry. 17 Reinstall the ink cartridges (insert cartridges and press backward until they snap). 18 Repeat Steps 2-5 to the display prompts, see "Replacing the Ink Cartridges (Routine Maintenance)," page 24-16. 13 Repeat the head...
When cleaning the color print cartridge, wipe the nozzles in "Cleaning the Cartridge Carrier," page 2-17. Nozzles Contacts 16 Allow the copper-colored area to dry. 17 Reinstall the ink cartridges (insert cartridges and press backward until they snap). 18 Repeat Steps 2-5 to the display prompts, see "Replacing the Ink Cartridges (Routine Maintenance)," page 24-16. 13 Repeat the head...

Users Manual - English
Page 37
... press backward until they snap). 8 Close the cover. 9 Plug the power cord into their ink nozzles. 1 Press Ink Management . 2 Press or to select 3.REPLACE INK and press Set . 3 Open the cover. MFC SETUP AND CONNECTIONS 2 -17 Carrier Contacts 7 Reinstall both ink cartridges (press cartridges forward until they snap and lift out). 6 Use a clean, dry cloth to its...
... press backward until they snap). 8 Close the cover. 9 Plug the power cord into their ink nozzles. 1 Press Ink Management . 2 Press or to select 3.REPLACE INK and press Set . 3 Open the cover. MFC SETUP AND CONNECTIONS 2 -17 Carrier Contacts 7 Reinstall both ink cartridges (press cartridges forward until they snap and lift out). 6 Use a clean, dry cloth to its...
Users Manual - English
Page 97
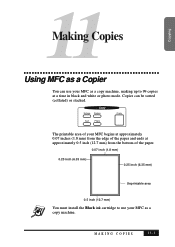
... bottom of the paper. 0.07 inch (1.8 mm) 0.25 inch (6.35 mm) 0.25 inch (6.35 mm) Unprintable area 0.5 inch (12.7 mm) You must install the Black ink cartridge to use your MFC begins at approximately 0.07 inches (1.8 mm) from the edge of your...
... bottom of the paper. 0.07 inch (1.8 mm) 0.25 inch (6.35 mm) 0.25 inch (6.35 mm) Unprintable area 0.5 inch (12.7 mm) You must install the Black ink cartridge to use your MFC begins at approximately 0.07 inches (1.8 mm) from the edge of your...

Users Manual - English
Page 137
... go offline. USING MFC AS A PRINTER 15 - 5 MFC Printer Settings Priority Key When you press Priority again. Printer Operation Keys On/Off Line Reset Priority Ink Management On/Off Line Key This key toggles the MFC's online and offline print status, which appears on paper. Instead, faxes are having trouble with one of the ink cartridges, you press this...
... go offline. USING MFC AS A PRINTER 15 - 5 MFC Printer Settings Priority Key When you press Priority again. Printer Operation Keys On/Off Line Reset Priority Ink Management On/Off Line Key This key toggles the MFC's online and offline print status, which appears on paper. Instead, faxes are having trouble with one of the ink cartridges, you press this...

Users Manual - English
Page 151
Use it to access the Ink Cartridge Maintenance screen. WINDOWS® PRINTING 16 - 13 See Ink Cartridge Maintenance p. 21-12 Ink Cartridge Maintenance Click the Maintenance... s Rasterize in Windows Rasterize in Driver TrueType fonts will be generated as a soft font, and the character ...Windows and in most cases will result in Driver is arcane, it serves a useful purpose to get WYSIWIG output. button to install or replace ink cartridges using the PC keyboard. In some unusual situations, WYSIWIG can be rendered by the driver. For example, if a character needs to be clipped,...
Use it to access the Ink Cartridge Maintenance screen. WINDOWS® PRINTING 16 - 13 See Ink Cartridge Maintenance p. 21-12 Ink Cartridge Maintenance Click the Maintenance... s Rasterize in Windows Rasterize in Driver TrueType fonts will be generated as a soft font, and the character ...Windows and in most cases will result in Driver is arcane, it serves a useful purpose to get WYSIWIG output. button to install or replace ink cartridges using the PC keyboard. In some unusual situations, WYSIWIG can be rendered by the driver. For example, if a character needs to be clipped,...

Users Manual - English
Page 216
... boxes for Pattern A, B, C and D in the Ink Cartridge Maintenance screen, select the best pattern number. If you are using the Photo ink cartridge, only ink patterns A and B will be printed. 4 Click the OK button. 21- 12 BROTHER CONTROL PANEL Aligning the Ink Cartridges 1 Click the Print Alignment Page button to display the Ink Cartridge Maintenance screen. Click the OK button...
... boxes for Pattern A, B, C and D in the Ink Cartridge Maintenance screen, select the best pattern number. If you are using the Photo ink cartridge, only ink patterns A and B will be printed. 4 Click the OK button. 21- 12 BROTHER CONTROL PANEL Aligning the Ink Cartridges 1 Click the Print Alignment Page button to display the Ink Cartridge Maintenance screen. Click the OK button...
