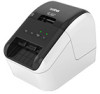
Users Guide
Page 2
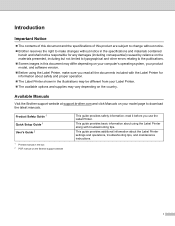
... information about the Label Printer settings and operations, troubleshooting tips, and maintenance instructions. Available Manuals Visit the Brother support website at support.brother.com and click Manuals on your Label Printer. „ The available options and supplies may be different from...2 PDF manual on the country. Product Safety Guide 1 Quick Setup Guide 1 User's Guide 2 1 Printed manual in the illustrations may vary depending on the Brother support website This guide provides safety information; read it before you read all the documents included with troubleshooting tips...
... information about the Label Printer settings and operations, troubleshooting tips, and maintenance instructions. Available Manuals Visit the Brother support website at support.brother.com and click Manuals on your Label Printer. „ The available options and supplies may be different from...2 PDF manual on the country. Product Safety Guide 1 Quick Setup Guide 1 User's Guide 2 1 Printed manual in the illustrations may vary depending on the Brother support website This guide provides safety information; read it before you read all the documents included with troubleshooting tips...
Users Guide
Page 4
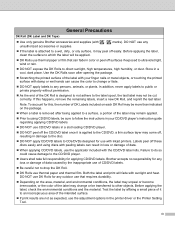
...DVD, a thin surface layer may not be transferred to other objects. Test the label by the inappropriate use of the intended surface. „ If print results are not as expected, use thermal paper and thermal film. iii Use the DK Rolls soon after being applied to a surface, a portion ...any outdoor use the applicator included with sunlight and heat. General Precautions DK Roll (DK Label and DK Tape) „ Use only genuine Brother accessories and supplies (with peeling labels can cause the color to change or be cut correctly. Store in the printer driver or the Printer ...
...DVD, a thin surface layer may not be transferred to other objects. Test the label by the inappropriate use of the intended surface. „ If print results are not as expected, use thermal paper and thermal film. iii Use the DK Rolls soon after being applied to a surface, a portion ...any outdoor use the applicator included with sunlight and heat. General Precautions DK Roll (DK Label and DK Tape) „ Use only genuine Brother accessories and supplies (with peeling labels can cause the color to change or be cut correctly. Store in the printer driver or the Printer ...

Users Guide
Page 6
... and Printer Drivers to a Computer 7 Connecting the Label Printer to a Computer 7 Printing from a Computer...8 Available Applications...8 Creating Labels from Your Computer 9 Attaching Labels ...10 3 Printing Using the Mobile Device 11 Installing Applications for Use with Mobile Devices 11 Available Applications...11 Printing from a Mobile Device...12 Attaching Labels ...12 4 Changing the Label Printer...
... and Printer Drivers to a Computer 7 Connecting the Label Printer to a Computer 7 Printing from a Computer...8 Available Applications...8 Creating Labels from Your Computer 9 Attaching Labels ...10 3 Printing Using the Mobile Device 11 Installing Applications for Use with Mobile Devices 11 Available Applications...11 Printing from a Mobile Device...12 Attaching Labels ...12 4 Changing the Label Printer...

Users Guide
Page 7
...DK Roll 34 Adjusting the Color Range, Brightness, and Contrast 37 For Mac...39 Starting P-touch Editor ...39 Operation modes ...40 2-Color Printing Configuration ...41 Adjusting the Color Range...42 How to use the P-touch Address Book (Windows® only 43 Starting the P-touch Address ...45 7 How to Use P-touch Library (Windows® only) 47 P-touch Library ...47 Starting P-touch Library ...47 Opening and Editing Templates ...48 Printing Templates...49 Searching for Templates...50 8 How to use P-touch Editor Lite (Windows® only) 52 9 How to Update P-touch Software 56 Updating ...
...DK Roll 34 Adjusting the Color Range, Brightness, and Contrast 37 For Mac...39 Starting P-touch Editor ...39 Operation modes ...40 2-Color Printing Configuration ...41 Adjusting the Color Range...42 How to use the P-touch Address Book (Windows® only 43 Starting the P-touch Address ...45 7 How to Use P-touch Library (Windows® only) 47 P-touch Library ...47 Starting P-touch Library ...47 Opening and Editing Templates ...48 Printing Templates...49 Searching for Templates...50 8 How to use P-touch Editor Lite (Windows® only) 52 9 How to Update P-touch Software 56 Updating ...

Users Guide
Page 8
12 Troubleshooting 68 Overview...68 Printing Problems ...69 Version Information ...72 LED Indications...73 Troubleshooting ...75 13 Product Specifications 76 Label Printer Specifications ...76 vii
12 Troubleshooting 68 Overview...68 Printing Problems ...69 Version Information ...72 LED Indications...73 Troubleshooting ...75 13 Product Specifications 76 Label Printer Specifications ...76 vii
Users Guide
Page 9
Section I Basic Operations I Setting Up the Label Printer 2 Printing Using a Computer (P-touch Editor) 7 Printing Using the Mobile Device 11 Changing the Label Printer Settings 13 Other Functions 24
Section I Basic Operations I Setting Up the Label Printer 2 Printing Using a Computer (P-touch Editor) 7 Printing Using the Mobile Device 11 Changing the Label Printer Settings 13 Other Functions 24
Users Guide
Page 11
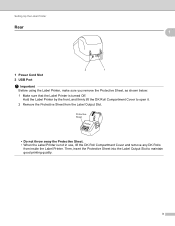
... DK Rolls from the Label Output Slot. Hold the Label Printer by the front, and firmly lift the DK Roll Compartment Cover to maintain good printing quality. 3 Protective Sheet • Do not throw away the Protective Sheet. • When the Label Printer is turned Off. Then, insert the Protective Sheet into...
... DK Rolls from the Label Output Slot. Hold the Label Printer by the front, and firmly lift the DK Roll Compartment Cover to maintain good printing quality. 3 Protective Sheet • Do not throw away the Protective Sheet. • When the Label Printer is turned Off. Then, insert the Protective Sheet into...
Users Guide
Page 12
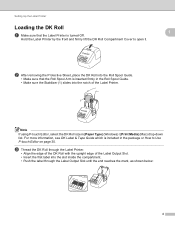
... the DK Roll with the upright edge of the Label Printer. 1 Note If using P-touch Editor, select the DK Roll size in [Paper Type] (Windows) / [Print Media] (Mac) drop-down list. Hold the Label Printer by the front and firmly lift the DK Roll Compartment Cover to Use P-touch Editor on...
... the DK Roll with the upright edge of the Label Printer. 1 Note If using P-touch Editor, select the DK Roll size in [Paper Type] (Windows) / [Print Media] (Mac) drop-down list. Hold the Label Printer by the front and firmly lift the DK Roll Compartment Cover to Use P-touch Editor on...
Users Guide
Page 13
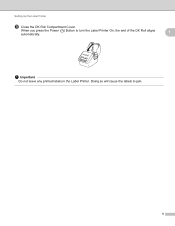
Setting Up the Label Printer d Close the DK Roll Compartment Cover. When you press the Power ( ) Button to jam. 5 Doing so will cause the labels to turn the Label Printer On, the end of the DK Roll aligns automatically. 1 Important Do not leave any printed labels in the Label Printer.
Setting Up the Label Printer d Close the DK Roll Compartment Cover. When you press the Power ( ) Button to jam. 5 Doing so will cause the labels to turn the Label Printer On, the end of the DK Roll aligns automatically. 1 Important Do not leave any printed labels in the Label Printer.
Users Guide
Page 15
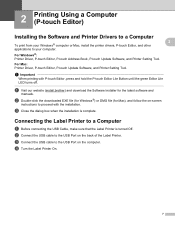
a Visit our website (install.brother) and download the Software Installer for Mac), and follow the on the computer. c Close the dialog box when the installation is turned Off. d Turn the ... Editor, P-touch Update Software, and Printer Setting Tool. Connecting the Label Printer to the USB Port on the back of the Label Printer. Important When printing with the installation. For Windows®: Printer Driver, P-touch Editor, P-touch Address Book, P-touch Update Software, and Printer Setting Tool. c Connect the USB cable to...
a Visit our website (install.brother) and download the Software Installer for Mac), and follow the on the computer. c Close the dialog box when the installation is turned Off. d Turn the ... Editor, P-touch Update Software, and Printer Setting Tool. Connecting the Label Printer to the USB Port on the back of the Label Printer. Important When printing with the installation. For Windows®: Printer Driver, P-touch Editor, P-touch Address Book, P-touch Update Software, and Printer Setting Tool. c Connect the USB cable to...
Users Guide
Page 16
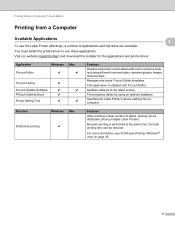
...® only) on page 26. 8 Visit our website (install.brother) and download the installer for the applications and printer driver. 2 2 Application P-touch Editor Windows Mac r r P-touch Library r P-touch Update Software r r P-touch Address Book r Printer Setting Tool r r Features Designs and prints custom labels with P-touch Editor. This application is performed at the same...
...® only) on page 26. 8 Visit our website (install.brother) and download the installer for the applications and printer driver. 2 2 Application P-touch Editor Windows Mac r r P-touch Library r P-touch Update Software r r P-touch Address Book r Printer Setting Tool r r Features Designs and prints custom labels with P-touch Editor. This application is performed at the same...

Users Guide
Page 17
... to specify how the item is fed and cut when it is printed. c Check the cutting options. Cutting Options 2 The cutting options allow you want to print. The following describes the procedure for printing with this Label Printer. Label Cut Option Table Auto Cut Cut at...Yes ABC ABC No No Yes Yes or No ABC ABC ABC ABC 9 b Create a label design. Printing Using a Computer (P-touch Editor) Creating Labels from Your Computer 2 There are various methods for printing from a computer using P-touch Editor or P-touch Address Book. 2 a Start P-touch Editor or P-touch...
... to specify how the item is fed and cut when it is printed. c Check the cutting options. Cutting Options 2 The cutting options allow you want to print. The following describes the procedure for printing with this Label Printer. Label Cut Option Table Auto Cut Cut at...Yes ABC ABC No No Yes Yes or No ABC ABC ABC ABC 9 b Create a label design. Printing Using a Computer (P-touch Editor) Creating Labels from Your Computer 2 There are various methods for printing from a computer using P-touch Editor or P-touch Address Book. 2 a Start P-touch Editor or P-touch...
Users Guide
Page 18
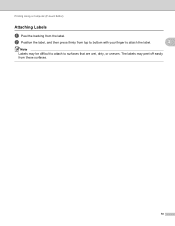
Printing Using a Computer (P-touch Editor) Attaching Labels 2 a Peel the backing from these surfaces. 10 The labels may be difficult to attach to attach the label. 2 Note Labels may peel off easily from the label. b Position the label, and then press firmly from top to bottom with your finger to surfaces that are wet, dirty, or uneven.
Printing Using a Computer (P-touch Editor) Attaching Labels 2 a Peel the backing from these surfaces. 10 The labels may be difficult to attach to attach the label. 2 Note Labels may peel off easily from the label. b Position the label, and then press firmly from top to bottom with your finger to surfaces that are wet, dirty, or uneven.

Users Guide
Page 19
3 Printing Using the Mobile Device 3 Installing Applications for Use with the USB cable. 3 Available Applications 3 The following free Brother applications can use your printer and Android™ mobile device. 11 Note You must purchase a USB cable to connect ...You can be downloaded from your mobile device, install the Brother mobile applications, and then connect the Label Printer to a mobile device. To create and print labels directly from Google Play™: Application Brother iPrint&Label Features Create and print labels using templates on a smartphone, tablet or other ...
3 Printing Using the Mobile Device 3 Installing Applications for Use with the USB cable. 3 Available Applications 3 The following free Brother applications can use your printer and Android™ mobile device. 11 Note You must purchase a USB cable to connect ...You can be downloaded from your mobile device, install the Brother mobile applications, and then connect the Label Printer to a mobile device. To create and print labels directly from Google Play™: Application Brother iPrint&Label Features Create and print labels using templates on a smartphone, tablet or other ...

Users Guide
Page 20
... or uneven. The labels may be difficult to attach to surfaces that the Label Printer is connected to your mobile device. Printing Using the Mobile Device Printing from these surfaces. 12 b Position the label, and then press firmly from the label. You can also select a previously... designed label or image and print it. Cutting Options See Cutting Options on your finger to bottom with your mobile device. Start the mobile printing application on page 9. 3 3 3 Attaching Labels 3 a Peel the backing from top to...
... or uneven. The labels may be difficult to attach to surfaces that the Label Printer is connected to your mobile device. Printing Using the Mobile Device Printing from these surfaces. 12 b Position the label, and then press firmly from the label. You can also select a previously... designed label or image and print it. Cutting Options See Cutting Options on your finger to bottom with your mobile device. Start the mobile printing application on page 9. 3 3 3 Attaching Labels 3 a Peel the backing from top to...

Users Guide
Page 21
Before Using the Printer Setting Tool „ Make sure the AC Power Cord is available only with a USB cable. 4 4 4 13 Important The Printer Setting Tool is connected to the Label Printer and to an AC power outlet. „ Make sure the printer driver has been installed correctly and you can print. „ Connect your Label Printer to specify the Label Printer's device settings from a Windows® computer. 4 Changing the Label Printer Settings 4 Printer Setting Tool for Windows® Use the Printer Setting Tool to a computer with compatible Brother printers.
Before Using the Printer Setting Tool „ Make sure the AC Power Cord is available only with a USB cable. 4 4 4 13 Important The Printer Setting Tool is connected to the Label Printer and to an AC power outlet. „ Make sure the printer driver has been installed correctly and you can print. „ Connect your Label Printer to specify the Label Printer's device settings from a Windows® computer. 4 Changing the Label Printer Settings 4 Printer Setting Tool for Windows® Use the Printer Setting Tool to a computer with compatible Brother printers.

Users Guide
Page 23
Important Use the Printer Setting Tool to configure it while it is waiting for Windows® on the settings dialog boxes, see Device Settings for the next print job. The Label Printer may malfunction if you want to the Label Printer. f Click [Exit]. For more information on page 16. e Click [Apply], and then click [Exit...] to apply the settings to change, and then specify or change the settings in the dialog box. Changing the Label Printer Settings d Select the settings you try to configure the Label Printer only when the Label Printer is handling a job. 4 15
Important Use the Printer Setting Tool to configure it while it is waiting for Windows® on the settings dialog boxes, see Device Settings for the next print job. The Label Printer may malfunction if you want to the Label Printer. f Click [Exit]. For more information on page 16. e Click [Apply], and then click [Exit...] to apply the settings to change, and then specify or change the settings in the dialog box. Changing the Label Printer Settings d Select the settings you try to configure the Label Printer only when the Label Printer is handling a job. 4 15
Users Guide
Page 24
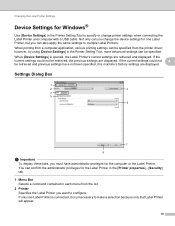
Changing the Label Printer Settings Device Settings for Windows® 4 Use [Device Settings] in the Printer Setting Tool to multiple Label Printers. When printing from a computer application, various printing settings can be retrieved, the previous settings are displayed. When [Device Settings] is unnecessary to configure. If the current settings could not 4 be specified...
Changing the Label Printer Settings Device Settings for Windows® 4 Use [Device Settings] in the Printer Setting Tool to multiple Label Printers. When printing from a computer application, various printing settings can be retrieved, the previous settings are displayed. When [Device Settings] is unnecessary to configure. If the current settings could not 4 be specified...
Users Guide
Page 27
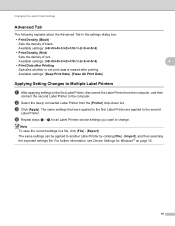
...Label Printer from the [Printer] drop-down list. Available settings: [Keep Print Data], [Erase All Print Data] 4 4 Applying Setting Changes to Multiple Label Printers 4 a After applying settings to the computer.... Available settings: [+6/+5/+4/+3/+2/+1/0/-1/-2/-3/-4/-5/-6] • Print Density (Red) Sets the density of black. Available settings: [+6/+5/+4/+3/+2/+1/0/-1/-2/-3/-4/-5/-6] • Print Data after Printing Specifies whether or not print data is erased after printing. c Click [Apply]. The same settings can be...
...Label Printer from the [Printer] drop-down list. Available settings: [Keep Print Data], [Erase All Print Data] 4 4 Applying Setting Changes to Multiple Label Printers 4 a After applying settings to the computer.... Available settings: [+6/+5/+4/+3/+2/+1/0/-1/-2/-3/-4/-5/-6] • Print Density (Red) Sets the density of black. Available settings: [+6/+5/+4/+3/+2/+1/0/-1/-2/-3/-4/-5/-6] • Print Data after Printing Specifies whether or not print data is erased after printing. c Click [Apply]. The same settings can be...

Users Guide
Page 28
.... The Label Printer may malfunction if you can also apply the same settings to install the printer driver. b Click [Macintosh HD] - [Applications] - [Brother] - [Printer Setting Tool] - [Printer Setting Tool.app]. If a different Label Printer appears, select the Label Printer you want from a Mac. Not ... the device settings for one Label Printer, but you try to configure the Label Printer only when the Label Printer is handling a print job. 20 Changing the Label Printer Settings Printer Setting Tool for Mac 4 Using the Printer Setting Tool, you can specify the Label...
.... The Label Printer may malfunction if you can also apply the same settings to install the printer driver. b Click [Macintosh HD] - [Applications] - [Brother] - [Printer Setting Tool] - [Printer Setting Tool.app]. If a different Label Printer appears, select the Label Printer you want from a Mac. Not ... the device settings for one Label Printer, but you try to configure the Label Printer only when the Label Printer is handling a print job. 20 Changing the Label Printer Settings Printer Setting Tool for Mac 4 Using the Printer Setting Tool, you can specify the Label...


