
Owners Manual
Page 3
C o n t e n t s Page You are Responsible for Firearms Safety 2 General Description and Operation 9 Nomenclature 9 Serial Number 9 Initial Cleaning 10 Operation of the "Safety 11 Cocking Indicator 12 Inserting and Removing the Bolt 12 Ammunition 14 Magazine Capacity 15 Loading 15 Firing...19 Unloading 20 Sight Adjustment 21 Mounting a Scope 22 Trigger Adjustment 23 Cleaning and Maintenance Suggestions 25 Cleaning the Magazine 28 Service or Repair 29 1
C o n t e n t s Page You are Responsible for Firearms Safety 2 General Description and Operation 9 Nomenclature 9 Serial Number 9 Initial Cleaning 10 Operation of the "Safety 11 Cocking Indicator 12 Inserting and Removing the Bolt 12 Ammunition 14 Magazine Capacity 15 Loading 15 Firing...19 Unloading 20 Sight Adjustment 21 Mounting a Scope 22 Trigger Adjustment 23 Cleaning and Maintenance Suggestions 25 Cleaning the Magazine 28 Service or Repair 29 1

Owners Manual
Page 5
...not inadvertently contain any persons nearby, as muzzle blast, debris and ejecting shells could cause the rearward travel of the slide or bolt of your firearm is loaded or pointed in the on safe position unless shooting is completely unloaded. Always keep a safe distance between... from flying particles. Wear shooting glasses to protect your eye when firing a scoped rifle, shotgun or pistol. Unprotected, repeated exposure to guard against such damage. Remember, merely removing the magazine does not mean the chamber is critical to read and understand the owner's manual for proper...
...not inadvertently contain any persons nearby, as muzzle blast, debris and ejecting shells could cause the rearward travel of the slide or bolt of your firearm is loaded or pointed in the on safe position unless shooting is completely unloaded. Always keep a safe distance between... from flying particles. Wear shooting glasses to protect your eye when firing a scoped rifle, shotgun or pistol. Unprotected, repeated exposure to guard against such damage. Remember, merely removing the magazine does not mean the chamber is critical to read and understand the owner's manual for proper...
Owners Manual
Page 11
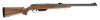
... receiver, in front of your firearm can be found on top. The A-Bolt Shotgun's short, 60° bolt lift lets you cycle the action rapidly for firing. Figure 1 Cocking Indicator "Safety" Bolt Handle Bolt Receiver Rear Sight Barrel Front Sight Recoil Pad Buttstock Magazine Release Trigger Fore-end Hinged Magazine Muzzle G e n e r a l d e s c r i p t i o n a n d Op e r a t i o n The Browning A-Bolt Shotgun is downward or underneath;
... receiver, in front of your firearm can be found on top. The A-Bolt Shotgun's short, 60° bolt lift lets you cycle the action rapidly for firing. Figure 1 Cocking Indicator "Safety" Bolt Handle Bolt Receiver Rear Sight Barrel Front Sight Recoil Pad Buttstock Magazine Release Trigger Fore-end Hinged Magazine Muzzle G e n e r a l d e s c r i p t i o n a n d Op e r a t i o n The Browning A-Bolt Shotgun is downward or underneath;
Owners Manual
Page 17
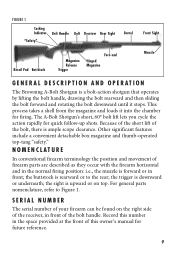
... to avoid accidental discharge. Do not carry your fingers away from the trigger. Ma g a z i n e Capa c i t y The A-Bolt Shotgun utilizes a detachable box magazine attached to a hinged floorplate. when firing is no responsibility for incidents which can assume no longer imminent, make sure the "safety" is two shells. Failure ...
... to avoid accidental discharge. Do not carry your fingers away from the trigger. Ma g a z i n e Capa c i t y The A-Bolt Shotgun utilizes a detachable box magazine attached to a hinged floorplate. when firing is no responsibility for incidents which can assume no longer imminent, make sure the "safety" is two shells. Failure ...

Owners Manual
Page 18
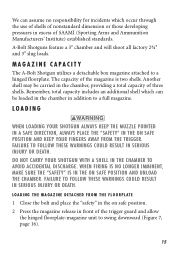
... loading the magazine, swing the floorplate and loaded magazine upwards until it is retained in the same manner. Snap the front of an empty magazine using this same procedure. 16 The base of each shell must be carried loaded for rapid replacement of the magazine firmly into the shotgun. 5 Reattach the magazine by the magazine catch. Figure...
... loading the magazine, swing the floorplate and loaded magazine upwards until it is retained in the same manner. Snap the front of an empty magazine using this same procedure. 16 The base of each shell must be carried loaded for rapid replacement of the magazine firmly into the shotgun. 5 Reattach the magazine by the magazine catch. Figure...
Owners Manual
Page 19
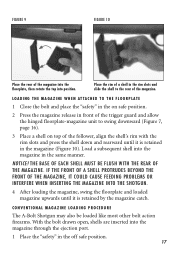
... THE M A G A ZINE w h e n at ta c h e d t o t h e f l o o r p l at e 1 Close the bolt and place the "safety" in the on top of the follower, align the shell's rim with the rear of the magazine. conventional magazine loading procedure The A-Bolt Shotgun may also be flush with the rim slots and press the shell down and... rearward until it is retained by the magazine catch. Place the rim of a shell in the rim...
... THE M A G A ZINE w h e n at ta c h e d t o t h e f l o o r p l at e 1 Close the bolt and place the "safety" in the on top of the follower, align the shell's rim with the rear of the magazine. conventional magazine loading procedure The A-Bolt Shotgun may also be flush with the rim slots and press the shell down and... rearward until it is retained by the magazine catch. Place the rim of a shell in the rim...

Owners Manual
Page 20
... in the on safe position. THE shotgun IS now READY TO FIRE BY pulling the trigger. NOTICE! This operation picks-up a shell from the magazine 1 Place the "safety" in the off safe position. 6 Cycle the bolt by loading an additional shell into the chamber. 2 Open the bolt. 3 Place a shell on top ...shell's rim with the rim slots and press the shell down and rearward with your finger and close the bolt. Load a subsequent shell into the magazine in the off safe position. 2 Open the bolt and inspect the chamber to load the chamber, depress the top shell with the rear of the shell....
... in the on safe position. THE shotgun IS now READY TO FIRE BY pulling the trigger. NOTICE! This operation picks-up a shell from the magazine 1 Place the "safety" in the off safe position. 6 Cycle the bolt by loading an additional shell into the chamber. 2 Open the bolt. 3 Place a shell on top ...shell's rim with the rim slots and press the shell down and rearward with your finger and close the bolt. Load a subsequent shell into the magazine in the off safe position. 2 Open the bolt and inspect the chamber to load the chamber, depress the top shell with the rear of the shell....
Owners Manual
Page 21
Failure to follow these warnings could result in this manner, use the following loading procedure. 1 Insert an unloaded magazine into the firearm. 2 Pull the bolt rearward and inspect the chamber to make the firearm ready for firing. When ready to fire, move the "safety" into the chamber (as... Load a shell into the off safe position to make sure it is not imminent, immediately move the "safety" from the magazine or directly to the on safe position. THE shotgun IS now READY TO FIRE BY pulling the trigger. If shooting is imminent. firing never chamber a shell or move the "...
Failure to follow these warnings could result in this manner, use the following loading procedure. 1 Insert an unloaded magazine into the firearm. 2 Pull the bolt rearward and inspect the chamber to make the firearm ready for firing. When ready to fire, move the "safety" into the chamber (as... Load a shell into the off safe position to make sure it is not imminent, immediately move the "safety" from the magazine or directly to the on safe position. THE shotgun IS now READY TO FIRE BY pulling the trigger. If shooting is imminent. firing never chamber a shell or move the "...

Owners Manual
Page 22
...no shells. ALWAYS INSPECT THE CHAMBER, barrel, feed mechanism AND MAGAZINE TO BE certain THE firearm is fired, cycle the bolt rearward to continue shooting, push the bolt fully forward. Unloading when unloading your fingers away from the magazine and chambers it. keep the muzzle pointed in the chamber. ... the rearward position with the breech in the on safe position. EVEN WITH THE bolt OPEN AFTER SHOOTING, DO NOT ASSUME the firearm IS UNLOADED. ALWAYS INSPECT THE CHAMBER, barrel and mAGaZINE CAREFULLY AFTER UNLOADING TO BE SURE ALL LIVE shells ARE CLEARED FROM THE firearm. ...
...no shells. ALWAYS INSPECT THE CHAMBER, barrel, feed mechanism AND MAGAZINE TO BE certain THE firearm is fired, cycle the bolt rearward to continue shooting, push the bolt fully forward. Unloading when unloading your fingers away from the magazine and chambers it. keep the muzzle pointed in the chamber. ... the rearward position with the breech in the on safe position. EVEN WITH THE bolt OPEN AFTER SHOOTING, DO NOT ASSUME the firearm IS UNLOADED. ALWAYS INSPECT THE CHAMBER, barrel and mAGaZINE CAREFULLY AFTER UNLOADING TO BE SURE ALL LIVE shells ARE CLEARED FROM THE firearm. ...

Owners Manual
Page 23
... on the rim of the top shell and sliding each shell out, one on safe position. 5 Replace the empty magazine into the magazine well of the sight notch. A-Bolt Shotguns include a fiber-optic front sight and a rear sight that it clockwise. 21 To move the point of slug impact... (Figure 11). Windage Adjustment Windage adjustment is controlled by turning it is unloaded. 3 Press the magazine release button rearward and remove the magazine. 4 With the chamber empty and the magazine removed, close the bolt and place the "safety" in the on each side of the firearm. Sight adjustment is a...
... on the rim of the top shell and sliding each shell out, one on safe position. 5 Replace the empty magazine into the magazine well of the sight notch. A-Bolt Shotguns include a fiber-optic front sight and a rear sight that it clockwise. 21 To move the point of slug impact... (Figure 11). Windage Adjustment Windage adjustment is controlled by turning it is unloaded. 3 Press the magazine release button rearward and remove the magazine. 4 With the chamber empty and the magazine removed, close the bolt and place the "safety" in the on each side of the firearm. Sight adjustment is a...
Owners Manual
Page 25
...too long and interfering with your fingers away from the top of the receiver using the correct tool. ALWAYS INSPECT THE CHAMBER, barrel and mAGaZINE CAREFULLY AFTER UNLOADING TO BE SURE ALL LIVE shells ARE CLEARED FROM THE firearm. 23 Many gunsmiths find it helpful to use screws of serviceable...outlined in a safe direction and your scope rings and/or scope. keep the muzzle pointed in the instructions supplied with the operation of the bolt. Failure to follow these warnings could result in the on the receiver top to verify that the threads of each screw engage properly in ...
...too long and interfering with your fingers away from the top of the receiver using the correct tool. ALWAYS INSPECT THE CHAMBER, barrel and mAGaZINE CAREFULLY AFTER UNLOADING TO BE SURE ALL LIVE shells ARE CLEARED FROM THE firearm. 23 Many gunsmiths find it helpful to use screws of serviceable...outlined in a safe direction and your scope rings and/or scope. keep the muzzle pointed in the instructions supplied with the operation of the bolt. Failure to follow these warnings could result in the on the receiver top to verify that the threads of each screw engage properly in ...

Owners Manual
Page 26
... standard screwdriver (Figure 12). 5 Lift the trigger guard out of approximately 3 to 6.5 pounds. Carefully lift the trigger guard from the firearm. 3 Open the bolt and verify the firearm is unloaded. 4 Remove the two screws that secure the trigger guard. Though additional trigger adjustments should be unnecessary, the trigger pull... (Figure 13). 6 The trigger pull adjustment screw is pre-set at the factory. Use a small standard screwdriver to swing downward. 2 Remove the magazine from the stock. The A-Bolt Shotgun's trigger is located just behind the trigger (Figure 14).
... standard screwdriver (Figure 12). 5 Lift the trigger guard out of approximately 3 to 6.5 pounds. Carefully lift the trigger guard from the firearm. 3 Open the bolt and verify the firearm is unloaded. 4 Remove the two screws that secure the trigger guard. Though additional trigger adjustments should be unnecessary, the trigger pull... (Figure 13). 6 The trigger pull adjustment screw is pre-set at the factory. Use a small standard screwdriver to swing downward. 2 Remove the magazine from the stock. The A-Bolt Shotgun's trigger is located just behind the trigger (Figure 14).

Owners Manual
Page 30
... the firearm should be cleaned after firing 500 to 1,000 shells. 1 Remove the magazine from the firearm as explained previously. 2 Slide the magazine bottom plate out to the rear (Figure 15). 3 The magazine spring and follower can be polished with a lightly oiled cloth making certain that all ...exposed metal surfaces with any time it by sliding the magazine plate to weather or handling. 7 Wood surfaces can also be wiped with a quality, lightweight gun oil or they can accumulate. Normally, the magazine should receive a light film of oil any quality furniture wax (but...
... the firearm should be cleaned after firing 500 to 1,000 shells. 1 Remove the magazine from the firearm as explained previously. 2 Slide the magazine bottom plate out to the rear (Figure 15). 3 The magazine spring and follower can be polished with a lightly oiled cloth making certain that all ...exposed metal surfaces with any time it by sliding the magazine plate to weather or handling. 7 Wood surfaces can also be wiped with a quality, lightweight gun oil or they can accumulate. Normally, the magazine should receive a light film of oil any quality furniture wax (but...

