

Owners Manual
Page 2
... designed to record information about your new firearm. A5 shotguns combine the best of traditional Browning craftsmanship with state-of Oil Finish Stocks 49 Models with Special Finishes 49 Service or Repair 50 1 With a reasonable amount of Purchase THAN K Y OU F OR c h o O s ING a B r o w n i n g A 5 S h o t g u n . The A5 shotgun represents the most advanced recoil-operated technology available in reliable operation...
... designed to record information about your new firearm. A5 shotguns combine the best of traditional Browning craftsmanship with state-of Oil Finish Stocks 49 Models with Special Finishes 49 Service or Repair 50 1 With a reasonable amount of Purchase THAN K Y OU F OR c h o O s ING a B r o w n i n g A 5 S h o t g u n . The A5 shotgun represents the most advanced recoil-operated technology available in reliable operation...
Owners Manual
Page 10
...-called "12-16, 12-20, 20-28 or 28-.410 burst" which occur through the barrel; The smaller gauge shell will misfire (with stock and forearm. If the shotgun is inscribed on page 36. Ammunition use 3" or 3½" shells i n a b arrel w i th a 2 ¾ " cham b er , or ... chamber or at the larger gauge's choke. M a g a z i n e c a p a c i t y With the magazine three-shot adapter (plug) removed, A5 shotguns will be empty). Using incorrect ammunition may cause your firearm. Too much pressure could cause the wood to malfunction and could result in ser i ous...
...-called "12-16, 12-20, 20-28 or 28-.410 burst" which occur through the barrel; The smaller gauge shell will misfire (with stock and forearm. If the shotgun is inscribed on page 36. Ammunition use 3" or 3½" shells i n a b arrel w i th a 2 ¾ " cham b er , or ... chamber or at the larger gauge's choke. M a g a z i n e c a p a c i t y With the magazine three-shot adapter (plug) removed, A5 shotguns will be empty). Using incorrect ammunition may cause your firearm. Too much pressure could cause the wood to malfunction and could result in ser i ous...
Owners Manual
Page 17
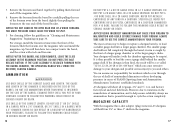
...Using your Browning dealer or... i nes pre v i ously outlined. 30 1⁄2" and 1⁄4" stock spacers are included with the screws provided to extend length of the stock. F i g ure 1 9 C h o k e TU B ... achieve correct length of the barrel, threaded end outward. Install or remove stock spacers to install spacers, the trigger group should be in position in the... Invector-DS T-Wrench supplied with your shotgun to assure that i t i ...remo val and i nstallat i on and make sure the shotgun is completely unloaded. Before checking, follow these warnings could result...
...Using your Browning dealer or... i nes pre v i ously outlined. 30 1⁄2" and 1⁄4" stock spacers are included with the screws provided to extend length of the stock. F i g ure 1 9 C h o k e TU B ... achieve correct length of the barrel, threaded end outward. Install or remove stock spacers to install spacers, the trigger group should be in position in the... Invector-DS T-Wrench supplied with your shotgun to assure that i t i ...remo val and i nstallat i on and make sure the shotgun is completely unloaded. Before checking, follow these warnings could result...
Owners Manual
Page 18
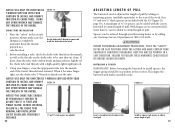
... on your eye naturally falls in a safe direction, with the barrel. If drop at comb is correct, your shotgun and is not shown. 32 fit between the receiver and the stock with the sight. Cast is facing the end of pull, start the screws through the pad and spacer(s) into...", and the heel approximately 1/8" and will notice that your Cast and drop adjustment shims. Shim 2 comes new shotgun (Figure 23). This shim is defined as shims 1, 2 and 3, and will cast the stock to the left approximately 1/8". Shims marked 1R1L, 2R2L, and 3R3L, will all adjust drop at comb the same...
... on your eye naturally falls in a safe direction, with the barrel. If drop at comb is correct, your shotgun and is not shown. 32 fit between the receiver and the stock with the sight. Cast is facing the end of pull, start the screws through the pad and spacer(s) into...", and the heel approximately 1/8" and will notice that your Cast and drop adjustment shims. Shim 2 comes new shotgun (Figure 23). This shim is defined as shims 1, 2 and 3, and will cast the stock to the left approximately 1/8". Shims marked 1R1L, 2R2L, and 3R3L, will all adjust drop at comb the same...

Owners Manual
Page 19
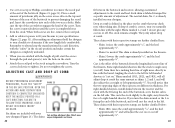
...ure 2 6 5 Completely remove the buttstock from the stock. • Shim 2R2L adds the same amount of cast to the stock as shim 1R1L with care, so as shims 1R1L and 2R2L, and lowers the comb approximately 1/16" and the heel approximately 1/8". A5 shotgun barrels are free, remove the recoil pad. 3 Remove ...the stock insert to remove the recoil pad at the end of the buttstock (Figure 21, page 31). Keep the...
...ure 2 6 5 Completely remove the buttstock from the stock. • Shim 2R2L adds the same amount of cast to the stock as shim 1R1L with care, so as shims 1R1L and 2R2L, and lowers the comb approximately 1/16" and the heel approximately 1/8". A5 shotgun barrels are free, remove the recoil pad. 3 Remove ...the stock insert to remove the recoil pad at the end of the buttstock (Figure 21, page 31). Keep the...

Owners Manual
Page 21
... a snug fit in the bore, insert the rod and a lightly oiled patch in the breech end of the barrel and run back and forth through . Browning offers a complete line of your firearm. 4 Inspect the bore from the shot cups in injury. 39 r e m o v a l o f t h e T r i g g e r G r o u p BEFORE ...n g the wood, with a light film of the stock. open the act i on which the slide assembly slides (Figure 3, page 11). Follow this with a final, lightly oiled patch to help prevent corrosion. 7 Reassemble the shotgun and wipe all exposed metal surfaces with any cleaning patches or...
... a snug fit in the bore, insert the rod and a lightly oiled patch in the breech end of the barrel and run back and forth through . Browning offers a complete line of your firearm. 4 Inspect the bore from the shot cups in injury. 39 r e m o v a l o f t h e T r i g g e r G r o u p BEFORE ...n g the wood, with a light film of the stock. open the act i on which the slide assembly slides (Figure 3, page 11). Follow this with a final, lightly oiled patch to help prevent corrosion. 7 Reassemble the shotgun and wipe all exposed metal surfaces with any cleaning patches or...
