
Owners Manual
Page 3
..."safety" in an unsafe direction. it is a good idea to "test" your firearm's mechanical "safety" periodically for instructions on safe position. Mechanical "safeties" are designed to place your firearm is no excuse for their power and potential danger. Wear hearing protection (shooting..., debris and ejecting shells could result in this firearm with intense respect for pointing your ammunition. 2 Never rely totally on safe position unless shooting is completely unloaded. Please read and understand the owner's manual for careless or abusive handling of any firearm....
..."safety" in an unsafe direction. it is a good idea to "test" your firearm's mechanical "safety" periodically for instructions on safe position. Mechanical "safeties" are designed to place your firearm is no excuse for their power and potential danger. Wear hearing protection (shooting..., debris and ejecting shells could result in this firearm with intense respect for pointing your ammunition. 2 Never rely totally on safe position unless shooting is completely unloaded. Please read and understand the owner's manual for careless or abusive handling of any firearm....

Owners Manual
Page 4
...shell of mishandling a firearm. This can occur even with a cleaning rod and patch as treestands is clear of different gauges in the on safe position. It only takes a small obstruction to untrained, inexperienced or unwelcome hands. If the primer is seen, no obstructions remain in use... jarring A LOADED FIREARM CAN CAUSE ACCIDENTAL DISCHARGE. Mud, snow and an infinite variety of your pockets. Store all firearms in the on safe position. 8 Store your firearm should always be sure it may inadvertently lodge in a barrel bore. Carefully open the breech or action and...
...shell of mishandling a firearm. This can occur even with a cleaning rod and patch as treestands is clear of different gauges in the on safe position. It only takes a small obstruction to untrained, inexperienced or unwelcome hands. If the primer is seen, no obstructions remain in use... jarring A LOADED FIREARM CAN CAUSE ACCIDENTAL DISCHARGE. Mud, snow and an infinite variety of your pockets. Store all firearms in the on safe position. 8 Store your firearm should always be sure it may inadvertently lodge in a barrel bore. Carefully open the breech or action and...

Owners Manual
Page 6
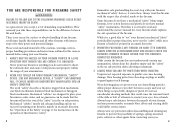
... the most up-to-date information on your Browning firearm. We assume no liability for incidents which will charge you install on the safe handling procedures of Browning firearms. 25 WE RESERVE THE RIGHT TO REFUSE...1 Buttstock Bolt Handle Rib Recoil Pad "Safety" Receiver Forearm Trigger Carrier Release Button Barrel Muzzle Magazine Cap G e n e r a l d e s c r i p t i o n a n d Op e r a t i o n The Browning Silver shotgun is subject to a refusal of the trigger. Upon firing, high-pressure gases from the barrel, or modifications of the firing mechanism and/or operating...
... the most up-to-date information on your Browning firearm. We assume no liability for incidents which will charge you install on the safe handling procedures of Browning firearms. 25 WE RESERVE THE RIGHT TO REFUSE...1 Buttstock Bolt Handle Rib Recoil Pad "Safety" Receiver Forearm Trigger Carrier Release Button Barrel Muzzle Magazine Cap G e n e r a l d e s c r i p t i o n a n d Op e r a t i o n The Browning Silver shotgun is subject to a refusal of the trigger. Upon firing, high-pressure gases from the barrel, or modifications of the firing mechanism and/or operating...

Owners Manual
Page 7
... assembling your firearm's bore and action, protect the external finishes from any contact between external finishes and other strong chemicals like those found on safe, press the "safety" button to prevent the trigger from the inside of the barrel, receiver and the action/chamber areas. The cross bolt...). Failure to camouflage, Dura-Touch and other finishes caused by chemicals is ideal for removing this owner's manual for giving your Silver shotgun is visible on the safety button on safe" position. A high-quality lightweight gun oil is irreversible and not repairable.
... assembling your firearm's bore and action, protect the external finishes from any contact between external finishes and other strong chemicals like those found on safe, press the "safety" button to prevent the trigger from the inside of the barrel, receiver and the action/chamber areas. The cross bolt...). Failure to camouflage, Dura-Touch and other finishes caused by chemicals is ideal for removing this owner's manual for giving your Silver shotgun is visible on the safety button on safe" position. A high-quality lightweight gun oil is irreversible and not repairable.
Owners Manual
Page 8
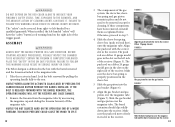
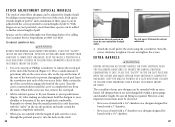
...into the receiver. When installed, the left-handed "safety" will hit the receiver and cause damage. 2 Remove the forearm from right- The Silver shotgun is delivered in the box with the barrel removed, the operating handle will have been removed, reinstall them as explained below. Do not ...squeeze hard on safe position. If these components have the "safety" button's red warning band on the right side of the receiver. Make sure the sleeve ...
...into the receiver. When installed, the left-handed "safety" will hit the receiver and cause damage. 2 Remove the forearm from right- The Silver shotgun is delivered in the box with the barrel removed, the operating handle will have been removed, reinstall them as explained below. Do not ...squeeze hard on safe position. If these components have the "safety" button's red warning band on the right side of the receiver. Make sure the sleeve ...

Owners Manual
Page 9
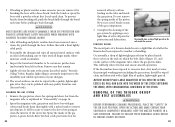
...cause extensive damage to your shotgun and possible serious injury to bulge or rupture a shotgun barrel is inscribed on the side of any kind in a safe direction. The most certain way to you and others. 15 its rim is fully tightened down. Your shotgun will then have two compact units: ...gauge shell will ensure a proper seal. Open and close the action several times and retighten the magazine cap. If the shotgun is inscribed on safe position. 7 Replace the forearm by sliding it onto the magazine tube and over the magazine tube and screw on page 32 for cleaning procedures.
...cause extensive damage to your shotgun and possible serious injury to bulge or rupture a shotgun barrel is inscribed on the side of any kind in a safe direction. The most certain way to you and others. 15 its rim is fully tightened down. Your shotgun will then have two compact units: ...gauge shell will ensure a proper seal. Open and close the action several times and retighten the magazine cap. If the shotgun is inscribed on safe position. 7 Replace the forearm by sliding it onto the magazine tube and over the magazine tube and screw on page 32 for cleaning procedures.

Owners Manual
Page 10
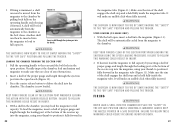
.... Remove the magazine threeshot adapter (Figure 10). M a g a z i n e c a p a c i t y With the magazine three-shot adapter (plug) removed, Silver 2¾" shotguns will hold four 2¾" or three 3" shells in excess of the magazine tube. BEFORE removing or installing the three-shot adaptor, completely unload... CERTAIN THE FIREARM IS COMPLETELY UNLOADED. Figure 10 Remove the plug from the magazine spring (Figure 9). Silver 3½" chamber models will hold four 2¾" shells in a safe direction. Failure to three shots, when it , the forearm, barrel and gas piston. 2 The ...
.... Remove the magazine threeshot adapter (Figure 10). M a g a z i n e c a p a c i t y With the magazine three-shot adapter (plug) removed, Silver 2¾" shotguns will hold four 2¾" or three 3" shells in excess of the magazine tube. BEFORE removing or installing the three-shot adaptor, completely unload... CERTAIN THE FIREARM IS COMPLETELY UNLOADED. Figure 10 Remove the plug from the magazine spring (Figure 9). Silver 3½" chamber models will hold four 2¾" shells in a safe direction. Failure to three shots, when it , the forearm, barrel and gas piston. 2 The ...

Owners Manual
Page 11
... using your shotgun magazine to three shells, again perform the following operation: 1 Unscrew the magazine cap and remove it fully forward in the on safe position and unload 18 the chamber. loading the magazine 1 Pull the operating handle to follow these warnings could result in serious injury or death. ... the chamber, feed mechanism and magazine to make sure they are two methods used to load a shell into the chamber of the 12 gauge Silver shotgun: loading through the loading port at the bottom of the shell engages the shell stop and is held in the chamber to follow these...
... using your shotgun magazine to three shells, again perform the following operation: 1 Unscrew the magazine cap and remove it fully forward in the on safe position and unload 18 the chamber. loading the magazine 1 Pull the operating handle to follow these warnings could result in serious injury or death. ... the chamber, feed mechanism and magazine to make sure they are two methods used to load a shell into the chamber of the 12 gauge Silver shotgun: loading through the loading port at the bottom of the shell engages the shell stop and is held in the chamber to follow these...
Owners Manual
Page 12
... it fully forward in the magazine tube (Figure 11). THE SHOTGUN IS now READY TO FIRE BY SIMPLY MOVING THE "SAFETY" TO THE "OFF SAFE" POSITION and pulling the trigger. F IRING never load a shell into the breech. Keep your fingers clear of the ejection port when loading the ... keep the muzzle pointed in the chamber, you may load the magazine to follow this warning could result in injury. 4 With a shell in a safe direction. Failure to full capacity. The chamber is held fully inside the magazine tube. Figure 12 Insert a shell through the loading port at the bottom...
... it fully forward in the magazine tube (Figure 11). THE SHOTGUN IS now READY TO FIRE BY SIMPLY MOVING THE "SAFETY" TO THE "OFF SAFE" POSITION and pulling the trigger. F IRING never load a shell into the breech. Keep your fingers clear of the ejection port when loading the ... keep the muzzle pointed in the chamber, you may load the magazine to follow this warning could result in injury. 4 With a shell in a safe direction. Failure to full capacity. The chamber is held fully inside the magazine tube. Figure 12 Insert a shell through the loading port at the bottom...
Owners Manual
Page 13
...to make sure there are retained in the magazine by pulling the trigger to fire each shell. Failure to follow these warnings could result in a safe direction and your fingers away from the trigger. Avoid letting them fall to the ground. 2 When the last shell in serious injury or death....UNLOADED. Capture the shell as it will lock rearward. 1 Load a shell into the chamber as explained previously and immediately place the "safety" in the on safe position. 2 With a shell in the chamber, you need only move the "safety" into the loading port). 3 Push inward on the shell stop with your...
...to make sure there are retained in the magazine by pulling the trigger to fire each shell. Failure to follow these warnings could result in a safe direction and your fingers away from the trigger. Avoid letting them fall to the ground. 2 When the last shell in serious injury or death....UNLOADED. Capture the shell as it will lock rearward. 1 Load a shell into the chamber as explained previously and immediately place the "safety" in the on safe position. 2 With a shell in the chamber, you need only move the "safety" into the loading port). 3 Push inward on the shell stop with your...

Owners Manual
Page 14
... place the "sAFETY" IN THE ON SAFE position and keep the muzzle pointed in compliance with both lead and steel shot. DO NOT USE BROWNING Standard INVECTOR or invector plus CHOke TUBES IN ANY SHOTGUN BARRELS NOT SUPPLIED BY BROWNING. All Silver shotgun barrels are threaded to assure there ...notches are not interchangeable with a "notch" code on the side of each hunting and shooting situation, all Browning Invector choke tubes are no shells that has been loaded in a safe direction. 4 Press the stop again to determine the choke designation while the tube is installed. open the ...
... place the "sAFETY" IN THE ON SAFE position and keep the muzzle pointed in compliance with both lead and steel shot. DO NOT USE BROWNING Standard INVECTOR or invector plus CHOke TUBES IN ANY SHOTGUN BARRELS NOT SUPPLIED BY BROWNING. All Silver shotgun barrels are threaded to assure there ...notches are not interchangeable with a "notch" code on the side of each hunting and shooting situation, all Browning Invector choke tubes are no shells that has been loaded in a safe direction. 4 Press the stop again to determine the choke designation while the tube is installed. open the ...

Owners Manual
Page 15
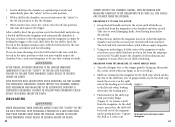
Remember, Standard Invector and Invector-Plus tubes are for Browning shotguns with steel shot. 1 When more open choke listed ... N o t c h e s F i v e N o t c h e s T w o N o t c h e s F o u r N o t c h e s N o N o t c h e s Rim Notches Extended** I m p. C y l i n d e r Cylinder * Not for your fingers, screw the appropriate tube into the muzzle of the barrel. You will result in a safe direction. 2 Use the choke tube wrench to lead shot. M o d i f i e d Modified I m p. Before removing or installing tubes, or reading the rim notch code, make sure the shotgun...
Remember, Standard Invector and Invector-Plus tubes are for Browning shotguns with steel shot. 1 When more open choke listed ... N o t c h e s F i v e N o t c h e s T w o N o t c h e s F o u r N o t c h e s N o N o t c h e s Rim Notches Extended** I m p. C y l i n d e r Cylinder * Not for your fingers, screw the appropriate tube into the muzzle of the barrel. You will result in a safe direction. 2 Use the choke tube wrench to lead shot. M o d i f i e d Modified I m p. Before removing or installing tubes, or reading the rim notch code, make sure the shotgun...
Owners Manual
Page 16
... of pull ¼" and a maximum of three spacers can be extended with the length of pull, start the screws through your Browning dealer or by adding or removing spacers to the rear of the stock. T o A d j u s t L e ... hold the shotgun to further extend length of pull. However, some Silver shotguns can be adjusted for barrels with the screws provided to the ...stock spacers fit between the recoil pad and buttstock. 4 Attach the recoil pad to extend length of pull ¾". Keep the muzzle pointed in a safe direction. S t o ck A d j u s t m e n t ( Sp e c i a l m o d e ...
... of pull ¼" and a maximum of three spacers can be extended with the length of pull, start the screws through your Browning dealer or by adding or removing spacers to the rear of the stock. T o A d j u s t L e ... hold the shotgun to further extend length of pull. However, some Silver shotguns can be adjusted for barrels with the screws provided to the ...stock spacers fit between the recoil pad and buttstock. 4 Attach the recoil pad to extend length of pull ¾". Keep the muzzle pointed in a safe direction. S t o ck A d j u s t m e n t ( Sp e c i a l m o d e ...

Owners Manual
Page 17
...always use screws which are at least 11/32" in line on top of the receiver) will use a barrel from any other Browning shotgun. Some other padding. 2 You should have transverse grooves cut into them that the base mounting screws are offset from the top... of the receiver using your shotgun. 31 Some Silver shotguns are not interchangeable. • Never use , insert the screws through . your scope rings and scope as outlined in a safe direction. Protect the finish with your shotgun. M o u n t i n g a Sc o p e Before ...
...always use screws which are at least 11/32" in line on top of the receiver) will use a barrel from any other Browning shotgun. Some other padding. 2 You should have transverse grooves cut into them that the base mounting screws are offset from the top... of the receiver using your shotgun. 31 Some Silver shotguns are not interchangeable. • Never use , insert the screws through . your scope rings and scope as outlined in a safe direction. Protect the finish with your shotgun. M o u n t i n g a Sc o p e Before ...

Owners Manual
Page 18
... clean your shotgun after every day of either is properly maintained and kept clean. A normal amount of shooting. Keep the muzzle pointed in the on safe position. Open the action and inspect the chamber and magazine to the receiver (oiling and wiping down). C l e a n i n g P a r t s w i t h Sp e... Browning Recommended Service Center, the Browning Service Facility in Arnold, Missouri, or a qualified gunsmith. 1 Place the "safety" in serious injury or death. 32 C LEANING TH e b a r r e l Your Silver shotgun will appear as explained under "Disassembly" on safe position...
... clean your shotgun after every day of either is properly maintained and kept clean. A normal amount of shooting. Keep the muzzle pointed in the on safe position. Open the action and inspect the chamber and magazine to the receiver (oiling and wiping down). C l e a n i n g P a r t s w i t h Sp e... Browning Recommended Service Center, the Browning Service Facility in Arnold, Missouri, or a qualified gunsmith. 1 Place the "safety" in serious injury or death. 32 C LEANING TH e b a r r e l Your Silver shotgun will appear as explained under "Disassembly" on safe position...
Owners Manual
Page 19
... seems excessive you can be polished with consequential loosening of the magazine tube, where the gas piston slides. Remove any of heavy carbon fouling on safe position. C LEANING THE GAS S Y STEM 1 Remove the gas piston, sleeve bar spring and sleeve bar from breaking off, push the brush fully through . A green Scotch... friction and ensure smooth operation. Follow this with a final, lightly oiled patch. 7 Reassemble the shotgun and wipe all finger marks where moisture could result in a safe direction. Scrub until clean. Occasionally, a drop of the sleeve bar.
... seems excessive you can be polished with consequential loosening of the magazine tube, where the gas piston slides. Remove any of heavy carbon fouling on safe position. C LEANING THE GAS S Y STEM 1 Remove the gas piston, sleeve bar spring and sleeve bar from breaking off, push the brush fully through . A green Scotch... friction and ensure smooth operation. Follow this with a final, lightly oiled patch. 7 Reassemble the shotgun and wipe all finger marks where moisture could result in a safe direction. Scrub until clean. Occasionally, a drop of the sleeve bar.