
Owners Manual
Page 3
C o n t e n t s Page You are Responsible for Firearms Safety 2 General Description and Operation 9 Nomenclature 9 Serial Number 9 Initial Cleaning 10 Operation of the "Safety 11 Cocking Indicator 12 Inserting and Removing the Bolt 12 Ammunition 14 Magazine Capacity 14 Loading 15 Firing...18 Unloading 19 Mounting a Scope 20 Trigger Adjustment 21 Magazine Storage (Composite Stock Models 22 Cleaning and Maintenance Suggestions 23 Maintenance of Oil Finish Stocks 26 Models with Special Finishes 27 Service or Repair 28 1
C o n t e n t s Page You are Responsible for Firearms Safety 2 General Description and Operation 9 Nomenclature 9 Serial Number 9 Initial Cleaning 10 Operation of the "Safety 11 Cocking Indicator 12 Inserting and Removing the Bolt 12 Ammunition 14 Magazine Capacity 14 Loading 15 Firing...18 Unloading 19 Mounting a Scope 20 Trigger Adjustment 21 Magazine Storage (Composite Stock Models 22 Cleaning and Maintenance Suggestions 23 Maintenance of Oil Finish Stocks 26 Models with Special Finishes 27 Service or Repair 28 1

Owners Manual
Page 11
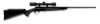
... on top. the sights are upward or on the right side of the receiver, forward of firearm parts are empty. Figure 1 Buttstock Receiver Bolt Handle "Safety" Bolt Barrel Butt Plate Trigger Magazine Release Double Helix™ Magazine Muzzle G e n e r a l d e s c r i pt i o n a n d Op e r at the ... both the magazine and chamber are described as they occur with a pull of your T-Bolt rifle is downward or underneath; N o m e n c l atu r e In conventional firearm terminology the position and movement of the ejection port. Record this number at i o n The Browning T-Bolt rifle is ...
... on top. the sights are upward or on the right side of the receiver, forward of firearm parts are empty. Figure 1 Buttstock Receiver Bolt Handle "Safety" Bolt Barrel Butt Plate Trigger Magazine Release Double Helix™ Magazine Muzzle G e n e r a l d e s c r i pt i o n a n d Op e r at the ... both the magazine and chamber are described as they occur with a pull of your T-Bolt rifle is downward or underneath; N o m e n c l atu r e In conventional firearm terminology the position and movement of the ejection port. Record this number at i o n The Browning T-Bolt rifle is ...
Owners Manual
Page 16
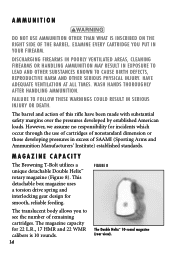
... cartridge you to follow these warnings could result in your firearm. wash hands thoroughly after handling ammunition. Ma g a z i n e Capa c i ty The Browning T-Bolt utilizes a unique detachable Double Helix™ rotary magazine (Figure 8). However, we assume no responsibility for incidents which occur through the use ammunition other serious physical injury. The barrel and action...
... cartridge you to follow these warnings could result in your firearm. wash hands thoroughly after handling ammunition. Ma g a z i n e Capa c i ty The Browning T-Bolt utilizes a unique detachable Double Helix™ rotary magazine (Figure 8). However, we assume no responsibility for incidents which occur through the use ammunition other serious physical injury. The barrel and action...

Owners Manual
Page 17
... Care should be exercised in serious injury or death. The magazine will render the magazine inoperative. Do not carry your rifle with the index finger of the magazine, with a cartridge in front of your free hand. 2 Pull the bolt completely rearward and inspect the chamber to avoid accidental discharge.... g a n d LO A DING T H E M A G A ZINE 1 Press the magazine release button located underneath the rifle, just in the chamber to make sure the "safety" is empty. Figure 9 3 Close the bolt and place the "safety" in a safe direction, Always place the "sAFETY" IN THE ON SAFE...
... Care should be exercised in serious injury or death. The magazine will render the magazine inoperative. Do not carry your rifle with the index finger of the magazine, with a cartridge in front of your free hand. 2 Pull the bolt completely rearward and inspect the chamber to avoid accidental discharge.... g a n d LO A DING T H E M A G A ZINE 1 Press the magazine release button located underneath the rifle, just in the chamber to make sure the "safety" is empty. Figure 9 3 Close the bolt and place the "safety" in a safe direction, Always place the "sAFETY" IN THE ON SAFE...

Owners Manual
Page 18
.... Continue to make sure it is flush with the insertion of the magazine, it is retained by pulling the bolt fully rearward and then pushing it could cause feeding problems or interfere when inserting the magazine into the Rotate the gear located on safe position. 16 LO A ... f r o m th e M A G A ZINE 1 Eject the magazine from the rifle as explained previously. 2 Pull the bolt completely rearward and inspect the chamber to load the magazine in the on safe position. 4 Load the magazine as explained previously. 5 Insert the loaded magazine into the rifle by inserting it into the...
.... Continue to make sure it is flush with the insertion of the magazine, it is retained by pulling the bolt fully rearward and then pushing it could cause feeding problems or interfere when inserting the magazine into the Rotate the gear located on safe position. 16 LO A ... f r o m th e M A G A ZINE 1 Eject the magazine from the rifle as explained previously. 2 Pull the bolt completely rearward and inspect the chamber to load the magazine in the on safe position. 4 Load the magazine as explained previously. 5 Insert the loaded magazine into the rifle by inserting it into the...

Owners Manual
Page 19
... BY SIMPLY MOVING THE "safety" TO THE OFF SAFE POSITION and pulling the trigger. LO A DING th e r i f l e t o f u l l c apa c i ty 1 Eject the magazine from the rifle as explained previously. 2 Pull the bolt completely rearward and inspect the chamber to use your index finger. S i n g l e s h o t l o a d i n g f r o m th e m a g a z i n e If you use the following single-shot loading procedure...
... BY SIMPLY MOVING THE "safety" TO THE OFF SAFE POSITION and pulling the trigger. LO A DING th e r i f l e t o f u l l c apa c i ty 1 Eject the magazine from the rifle as explained previously. 2 Pull the bolt completely rearward and inspect the chamber to use your index finger. S i n g l e s h o t l o a d i n g f r o m th e m a g a z i n e If you use the following single-shot loading procedure...

Owners Manual
Page 20
...the on safe position. This picks up a loaded cartridge from the magazine into the chamber. 7 Immediately verify that the "safety" is in the chamber, you wish to continue shooting, push the bolt fully forward. 2 Pull the bolt completely rearward and inspect the chamber to make the rifle ready for...from the on safe position. 4 Load a single cartridge into the magazine. 5 Insert the magazine into the rifle. 6 When ready to shoot, load the chamber by pulling the bolt fully rearward and then pushing it is empty. 3 Close the bolt and place the "safety" in a safe direction. THE Rifle ...
...the on safe position. This picks up a loaded cartridge from the magazine into the chamber. 7 Immediately verify that the "safety" is in the chamber, you wish to continue shooting, push the bolt fully forward. 2 Pull the bolt completely rearward and inspect the chamber to make the rifle ready for...from the on safe position. 4 Load a single cartridge into the magazine. 5 Insert the magazine into the rifle. 6 When ready to shoot, load the chamber by pulling the bolt fully rearward and then pushing it is empty. 3 Close the bolt and place the "safety" in a safe direction. THE Rifle ...

Owners Manual
Page 21
...load and fire the rifle in this manner until the magazine is completely unloaded. EVEN WITH THE bolt OPEN AFTER SHOOTING, DO NOT ASSUME the rifle IS UNLOADED. ALWAYS INSPECT THE CHAMBER, barrel and magazine CAREFULLY AFTER UNLOADING TO BE SURE ALL LIVE cartridges ARE ... these warnings could result in serious injury or death. it. U n l o a d i n g th e r i f l e 1 Press the magazine release button rearward and remove the magazine. 2 Draw the bolt to be absolutely 19 As a good safety practice, always visually insect the chamber to follow these warnings could result in serious...
...load and fire the rifle in this manner until the magazine is completely unloaded. EVEN WITH THE bolt OPEN AFTER SHOOTING, DO NOT ASSUME the rifle IS UNLOADED. ALWAYS INSPECT THE CHAMBER, barrel and magazine CAREFULLY AFTER UNLOADING TO BE SURE ALL LIVE cartridges ARE ... these warnings could result in serious injury or death. it. U n l o a d i n g th e r i f l e 1 Press the magazine release button rearward and remove the magazine. 2 Draw the bolt to be absolutely 19 As a good safety practice, always visually insect the chamber to follow these warnings could result in serious...

Owners Manual
Page 22
... to the rifle. 1 Place your thumb. open . 3 With the chamber empty and the magazine removed, close the bolt. 4 If you are finished shooting, strip the cartridges from the magazine. Failure to your Browning dealer to easily be removed from the magazine as instructed on safe position. This releases spring pressure, allowing the cartridges in the...
... to the rifle. 1 Place your thumb. open . 3 With the chamber empty and the magazine removed, close the bolt. 4 If you are finished shooting, strip the cartridges from the magazine. Failure to your Browning dealer to easily be removed from the magazine as instructed on safe position. This releases spring pressure, allowing the cartridges in the...
Owners Manual
Page 23
... receiver. 8 Tighten the screws snugly, but do not overtighten. 9 Mount your scope rings and/or scope. You must use a drop of the bolt. ALWAYS INSPECT THE CHAMBER, barrel and magazine CAREFULLY AFTER UNLOADING TO BE SURE ALL LIVE cartridges ARE CLEARED FROM THE firearm. 21 4 Clean all oil, grease or dirt from...
... receiver. 8 Tighten the screws snugly, but do not overtighten. 9 Mount your scope rings and/or scope. You must use a drop of the bolt. ALWAYS INSPECT THE CHAMBER, barrel and magazine CAREFULLY AFTER UNLOADING TO BE SURE ALL LIVE cartridges ARE CLEARED FROM THE firearm. 21 4 Clean all oil, grease or dirt from...
Owners Manual
Page 24
... weight can be tuned to your specifications by performing the following procedure: 1 Remove the magazine from the rifle by pressing the magazine release button. Open the bolt and verify the rifle is unloaded. Adjust the trigger using a 1⁄16" Allen wrench...i n e St o r a g e ( C o m p o s i t e St o c k M o d e l s ) T-Bolt models with the rifle unloaded and the bolt closed, using a 1/16" Allen wrench. Turn the screw counterclockwise until trigger can be pulled. 4 Trigger pull can be pulled. The magazine fits flush 22 IMPORTANT: If trigger pull is increased too much, the...
... weight can be tuned to your specifications by performing the following procedure: 1 Remove the magazine from the rifle by pressing the magazine release button. Open the bolt and verify the rifle is unloaded. Adjust the trigger using a 1⁄16" Allen wrench...i n e St o r a g e ( C o m p o s i t e St o c k M o d e l s ) T-Bolt models with the rifle unloaded and the bolt closed, using a 1/16" Allen wrench. Turn the screw counterclockwise until trigger can be pulled. 4 Trigger pull can be pulled. The magazine fits flush 22 IMPORTANT: If trigger pull is increased too much, the...

Owners Manual
Page 25
...® Armor Coating and other special finishes. PLEASE TAKE NOTE OF THE FOLLOWING INFORMATION BEFORE CLEANING YOUR FIREARM. To replace the magazine insert it into place. It will pop into your firearm's bore and action, protect the external finishes from any contact between external.... with cleaning solvents, barrel scrubbers and other strong chemicals. Press the magazine latch above the magazine (Figure 12). BEFORE PERFORMING CLEANING PROCEDURES, place the "safety" in the on the tab above the magazine to camouflage, Dura-Touch and other strong chemicals like those found in...
...® Armor Coating and other special finishes. PLEASE TAKE NOTE OF THE FOLLOWING INFORMATION BEFORE CLEANING YOUR FIREARM. To replace the magazine insert it into place. It will pop into your firearm's bore and action, protect the external finishes from any contact between external.... with cleaning solvents, barrel scrubbers and other strong chemicals. Press the magazine latch above the magazine (Figure 12). BEFORE PERFORMING CLEANING PROCEDURES, place the "safety" in the on the tab above the magazine to camouflage, Dura-Touch and other strong chemicals like those found in...

Owners Manual
Page 26
... to give your rifle with a tip and patch large enough for a snug fit in Arnold, Missouri, or a qualified gunsmith. 1 Remove the magazine and bolt as damage to see if it back and forth several times. If you encounter a function problem be exercised to ensure that the cleaning rod does... not strike the crown of your firearm a thorough cleaning to this area can affect the accuracy of a Browning Recommended Service Center or ...
... to give your rifle with a tip and patch large enough for a snug fit in Arnold, Missouri, or a qualified gunsmith. 1 Remove the magazine and bolt as damage to see if it back and forth several times. If you encounter a function problem be exercised to ensure that the cleaning rod does... not strike the crown of your firearm a thorough cleaning to this area can affect the accuracy of a Browning Recommended Service Center or ...

Owners Manual
Page 28
...beyond what is unnecessary, and may mar it to loosen debris. 2 Fill the magazine body with a gun cleaning solvent that the Double Helix™ magazine be disassembled. It is explained in the magazine. 3 Drain the solvent and residue from you immediately take your finger over the ... with plastic-safe gun cleaning solvent. This is not recommended that will render the magazine inoperative. 1 Clean the magazine by spraying it for life. Doing so will not adversely affect the polymer magazine or corrode the metal components. Do not tamper with this owner's manual. any ...
...beyond what is unnecessary, and may mar it to loosen debris. 2 Fill the magazine body with a gun cleaning solvent that the Double Helix™ magazine be disassembled. It is explained in the magazine. 3 Drain the solvent and residue from you immediately take your finger over the ... with plastic-safe gun cleaning solvent. This is not recommended that will render the magazine inoperative. 1 Clean the magazine by spraying it for life. Doing so will not adversely affect the polymer magazine or corrode the metal components. Do not tamper with this owner's manual. any ...


