
Digital Video Software (Macintosh) Ver.25 Instruction Manual
Page 3
Playing Back Movies 60 Exporting Images ...61 Changing the File Type and Save 61 Extracting Still Images from Movies (MovieFrame Task 64 Adding Still Images to the Memory Card in the Camcorder 66 Adding Still Images to the Memory Card 66 Using Various Functions 68 Attaching Images to E-mail Messages 68 Running a Slide Show 71 Adding Sound to a Still Image 72 Reviewing and Changing the Owner Name of the Camcorder 73 Uninstalling the Software 74 Uninstalling ImageBrowser 74 Troubleshooting ...75 Macintosh Contents 3
Playing Back Movies 60 Exporting Images ...61 Changing the File Type and Save 61 Extracting Still Images from Movies (MovieFrame Task 64 Adding Still Images to the Memory Card in the Camcorder 66 Adding Still Images to the Memory Card 66 Using Various Functions 68 Attaching Images to E-mail Messages 68 Running a Slide Show 71 Adding Sound to a Still Image 72 Reviewing and Changing the Owner Name of the Camcorder 73 Uninstalling the Software 74 Uninstalling ImageBrowser 74 Troubleshooting ...75 Macintosh Contents 3

Digital Video Software (Macintosh) Ver.25 Instruction Manual
Page 24
7 Review the installation settings and click [Next]. 8 When the "Installation has finished." When installation is complete, restart the computer as prompted. 9 Remove the DIGITAL VIDEO SOLUTION DISK from the CD-ROM drive. message appears, click [OK]. After the installation is complete, remove the DIGITAL VIDEO SOLUTION DISK before you connect the camcorder to the computer. 24 Installing the Digital Video Software
7 Review the installation settings and click [Next]. 8 When the "Installation has finished." When installation is complete, restart the computer as prompted. 9 Remove the DIGITAL VIDEO SOLUTION DISK from the CD-ROM drive. message appears, click [OK]. After the installation is complete, remove the DIGITAL VIDEO SOLUTION DISK before you connect the camcorder to the computer. 24 Installing the Digital Video Software

Digital Video Software (Macintosh) Ver.25 Instruction Manual
Page 73
Input a camcorder owner name here (up to Camera] tab and click [Confirms/changes camera settings] in the Camera Control window. 2 Enter the camcorder's owner name and click [OK]. Reviewing and Changing the Owner Name of the Camcorder You can change and confirm the owner name of the camcorder. 1 Click the [Set to 31 characters). Macintosh Using Various Functions 73
Input a camcorder owner name here (up to Camera] tab and click [Confirms/changes camera settings] in the Camera Control window. 2 Enter the camcorder's owner name and click [OK]. Reviewing and Changing the Owner Name of the Camcorder You can change and confirm the owner name of the camcorder. 1 Click the [Set to 31 characters). Macintosh Using Various Functions 73
DC220 DC230 Instruction Manual
Page 35
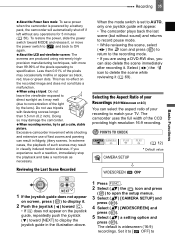
... switch is set to AUTO, only one joystick guide will automatically shut off if left without sound) and returns to record pause mode. • While reviewing the scene, select ( ) the icon and press ( ) to return to match your TV. The default is widescreen (16:9) recordings. The camcorder uses the... the scene immediately after recording it , or move the power switch to and back to POINTS TO CHECK CAMERA SETUP ( 12) Default value Reviewing the Last Scene Recorded WIDESCREEN ON NEXT 1 If the joystick guide does not appear on screen, press ( ) to display it may melt (...
... switch is set to AUTO, only one joystick guide will automatically shut off if left without sound) and returns to record pause mode. • While reviewing the scene, select ( ) the icon and press ( ) to return to match your TV. The default is widescreen (16:9) recordings. The camcorder uses the... the scene immediately after recording it , or move the power switch to and back to POINTS TO CHECK CAMERA SETUP ( 12) Default value Reviewing the Last Scene Recorded WIDESCREEN ON NEXT 1 If the joystick guide does not appear on screen, press ( ) to display it may melt (...

DC220 DC230 Instruction Manual
Page 47
REVIEW Mode switch: P [ AUTO], [ OFF ] The camcorder automatically reduces the background sound of wind. You can verify the details regarding the disc. The ND filter cannot ... includes the disc title, the disc type (DVD-R, DVD-R DL or DVD-RW), the disc specification (VIDEO mode or VR mode), and icons that are reviewing it (or immediately after it , if set to AUTO. When recording in surroundings that indicate if the disc is set to AUTO. Menu Options Lists...
REVIEW Mode switch: P [ AUTO], [ OFF ] The camcorder automatically reduces the background sound of wind. You can verify the details regarding the disc. The ND filter cannot ... includes the disc title, the disc type (DVD-R, DVD-R DL or DVD-RW), the disc specification (VIDEO mode or VR mode), and icons that are reviewing it (or immediately after it , if set to AUTO. When recording in surroundings that indicate if the disc is set to AUTO. Menu Options Lists...

DC220 DC230 Instruction Manual
Page 64
Selecting the Data Code You can use the built-in flash for the [REVIEW] option (or immediately after recording it within the time set to [ OFF]). The area to the left side represents shadows. Shadows Highlights NOTES The histogram ... CODE FUNC. 64 Other Functions 1 However, the level marker, the disc type icon and the and icons will appear also after recording a still image, while reviewing it , if [REVIEW] is set for recording still images in the following section.
Selecting the Data Code You can use the built-in flash for the [REVIEW] option (or immediately after recording it within the time set to [ OFF]). The area to the left side represents shadows. Shadows Highlights NOTES The histogram ... CODE FUNC. 64 Other Functions 1 However, the level marker, the disc type icon and the and icons will appear also after recording a still image, while reviewing it , if [REVIEW] is set for recording still images in the following section.
DC220 DC230 Instruction Manual
Page 69
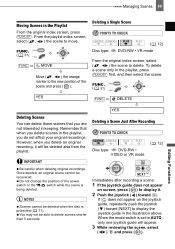
... Scenes in the playlist, press PLAYLIST first, and then select the scene. If does not appear on screen, press ( ) to display it will appear. 3 While reviewing the scene, select ( ) and press ( ). From the playlist index screen, select ( , ) the scene to delete. MOVE Move ( , ) the orange marker to the new position of...
... Scenes in the playlist, press PLAYLIST first, and then select the scene. If does not appear on screen, press ( ) to display it will appear. 3 While reviewing the scene, select ( ) and press ( ). From the playlist index screen, select ( , ) the scene to delete. MOVE Move ( , ) the orange marker to the new position of...

DC220 DC230 Instruction Manual
Page 73
...ERASE ALL IMAGES YES Editing Functions NOTES Protected images on the memory card and images on a protected disc cannot be recovered. While reviewing the image immediately after recording it, if [REVIEW] is set to display it. 2 Push the joystick ( ) toward . 2 Select ( ) [ERASE] and press ( )..... Managing Photos 73 Managing Photos Managing Photos POINTS TO CHECK Erasing Photos You can erase the still image recorded last while reviewing it within the time set for the [REVIEW] option (or immediately after recording: 1 Push the joystick ( ) toward . 3 Select ( ) [ERASE] and ...
...ERASE ALL IMAGES YES Editing Functions NOTES Protected images on the memory card and images on a protected disc cannot be recovered. While reviewing the image immediately after recording it, if [REVIEW] is set to display it. 2 Push the joystick ( ) toward . 2 Select ( ) [ERASE] and press ( )..... Managing Photos 73 Managing Photos Managing Photos POINTS TO CHECK Erasing Photos You can erase the still image recorded last while reviewing it within the time set for the [REVIEW] option (or immediately after recording: 1 Push the joystick ( ) toward . 3 Select ( ) [ERASE] and ...

DC220 DC230 Instruction Manual
Page 120
Movies (Record review) . . . 35 Reviewing - Still images 47 S Scene editing 68 Screen displays 20 Screen markers 49 Selecting the on-screen displays 63 Self timer 66 Serial number 15, 17 ... discs 6 Recording - Movies 34 Recording - Still images 36 Recording data 63 Recording mode 44 Recording programs 52 Recording reminder 21 Remote sensor 29 RESET 98 Reviewing - 120 General Information N ND filter 47, 114 Night (recording program 52 Normal TV (4:3 51 O Original recordings 68 P P (recording program 53 Photomovie scene 74 Playback - Movies...
Movies (Record review) . . . 35 Reviewing - Still images 47 S Scene editing 68 Screen displays 20 Screen markers 49 Selecting the on-screen displays 63 Self timer 66 Serial number 15, 17 ... discs 6 Recording - Movies 34 Recording - Still images 36 Recording data 63 Recording mode 44 Recording programs 52 Recording reminder 21 Remote sensor 29 RESET 98 Reviewing - 120 General Information N ND filter 47, 114 Night (recording program 52 Normal TV (4:3 51 O Original recordings 68 P P (recording program 53 Photomovie scene 74 Playback - Movies...


