
XA50 XA55 Instruction Manual
Page 2
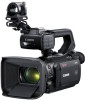
... adjust those functions with little noise even in low-light situations. The camcorder can also assign certain frequently used is not. Introduction Highlights of the Camcorder The Canon XA55 / XA50 4K Camcorder is detected (face-only AF), ensuring that important subjects are in focus (A 54). Manual ...SD card slots, allowing you focus manually most of 25.5 mm* (35 mm equivalent), offering superb wide-angle shooting capability. * Except when using infrared recording (A 88). Wide zoom lens The camcorder features a 15x optical zoom lens with an 8,290,000 effective pixel count, and the ...
... adjust those functions with little noise even in low-light situations. The camcorder can also assign certain frequently used is not. Introduction Highlights of the Camcorder The Canon XA55 / XA50 4K Camcorder is detected (face-only AF), ensuring that important subjects are in focus (A 54). Manual ...SD card slots, allowing you focus manually most of 25.5 mm* (35 mm equivalent), offering superb wide-angle shooting capability. * Except when using infrared recording (A 88). Wide zoom lens The camcorder features a 15x optical zoom lens with an 8,290,000 effective pixel count, and the ...

XA50 XA55 Instruction Manual
Page 3
... computer, play back the clips and organize them. You can adjust various aspects of the preset looks offered. Looks (A 73) You can also use one of the picture, such as the color depth, sharpness and brightness, to create a desired "look applies a gamma curve with the clips ...Expression Special recording modes When you make recordings, you join MP4 clips that lets you can use the Canon XF plugins to achieve a fast or slow motion effect (A 46). Software for aiding production workflow Canon XF Utility (A 113) lets you copy the clips you recorded from Avid non-linear ...
... computer, play back the clips and organize them. You can adjust various aspects of the preset looks offered. Looks (A 73) You can also use one of the picture, such as the color depth, sharpness and brightness, to create a desired "look applies a gamma curve with the clips ...Expression Special recording modes When you make recordings, you join MP4 clips that lets you can use the Canon XF plugins to achieve a fast or slow motion effect (A 46). Software for aiding production workflow Canon XF Utility (A 113) lets you copy the clips you recorded from Avid non-linear ...

XA50 XA55 Instruction Manual
Page 5
... 17 Charging a Battery Pack 17 Preparing the Camcorder 20 Attaching the Handle Unit 20 Attaching the Lens Hood 21 Using the LCD Screen 22 Using the Viewfinder 22 Adjusting the Grip Belt and Using Straps 23 Wireless Controller 24 Basic Operation of the Camcorder 25 Turning the Camcorder On and Off 25 Changing..., Time and Language Settings 27 Setting the Date and Time 27 Changing the Language 28 Changing the Time Zone 28 Using the Menus 29 Setup Menus 29 FUNC Menu 30 Using SD Cards 32 Compatible SD Cards 32 Inserting and Removing an SD Card 33 Initializing an SD Card 33 Selecting the...
... 17 Charging a Battery Pack 17 Preparing the Camcorder 20 Attaching the Handle Unit 20 Attaching the Lens Hood 21 Using the LCD Screen 22 Using the Viewfinder 22 Adjusting the Grip Belt and Using Straps 23 Wireless Controller 24 Basic Operation of the Camcorder 25 Turning the Camcorder On and Off 25 Changing..., Time and Language Settings 27 Setting the Date and Time 27 Changing the Language 28 Changing the Time Zone 28 Using the Menus 29 Setup Menus 29 FUNC Menu 30 Using SD Cards 32 Compatible SD Cards 32 Inserting and Removing an SD Card 33 Initializing an SD Card 33 Selecting the...

XA50 XA55 Instruction Manual
Page 6
...to CH1/CH2 79 Recording Audio from the Built-In Microphone or MIC Terminal to an External Monitor 107 Connection Diagram 107 u Using the SDI OUT Terminal 107 Using the HDMI OUT Terminal 108 Selecting the Video Output's Scan Mode 109 Audio Output 110 Selecting the Audio Channels for Headphone or ...CUSTOM Dial and Button 93 Assignable Buttons 94 Assignable functions 95 Saving and Loading Menu Settings 96 Saving Menu Settings 96 Loading Menu Settings 96 5. 6 Using Looks 73 Setting the Time Code 74 Selecting the Time Code Mode 74 Selecting Drop Frame or Non-Drop Frame 75 Setting the User Bit...
...to CH1/CH2 79 Recording Audio from the Built-In Microphone or MIC Terminal to an External Monitor 107 Connection Diagram 107 u Using the SDI OUT Terminal 107 Using the HDMI OUT Terminal 108 Selecting the Video Output's Scan Mode 109 Audio Output 110 Selecting the Audio Channels for Headphone or ...CUSTOM Dial and Button 93 Assignable Buttons 94 Assignable functions 95 Saving and Loading Menu Settings 96 Saving Menu Settings 96 Loading Menu Settings 96 5. 6 Using Looks 73 Setting the Time Code 74 Selecting the Time Code Mode 74 Selecting Drop Frame or Non-Drop Frame 75 Setting the User Bit...
XA50 XA55 Instruction Manual
Page 7
...point when the REC button is pressed to start recording until it for purchasing the Canon XA55 / XA50. Please read . • Operating mode icons: A shaded icon (like ) indicates that the function described can be used in this manual: "Screen" refers to the LCD screen and the viewfinder screen.... 1 Introduction 7 About this Manual Thank you use the camcorder and retain it is pressed ...
...point when the REC button is pressed to start recording until it for purchasing the Canon XA55 / XA50. Please read . • Operating mode icons: A shaded icon (like ) indicates that the function described can be used in this manual: "Screen" refers to the LCD screen and the viewfinder screen.... 1 Introduction 7 About this Manual Thank you use the camcorder and retain it is pressed ...
XA50 XA55 Instruction Manual
Page 8
... style is given only for the desired SD card. > [3 " Recording Setup] > [Initialize 8] > [6 Mem. This has no effect on how to use to specification. Brackets [ ] indicate text as it appears on the rights of copyright owners and be contrary to copyright laws. • About the LCD and... viewfinder screens: The screens are produced using the video configuration(s) you plan to use the menus, refer to Using the Menus (A 29). Should the camcorder fail to operate correctly, refer to Menu Options (A 115). 8...
... style is given only for the desired SD card. > [3 " Recording Setup] > [Initialize 8] > [6 Mem. This has no effect on how to use to specification. Brackets [ ] indicate text as it appears on the rights of copyright owners and be contrary to copyright laws. • About the LCD and... viewfinder screens: The screens are produced using the video configuration(s) you plan to use the menus, refer to Using the Menus (A 29). Should the camcorder fail to operate correctly, refer to Menu Options (A 115). 8...

XA50 XA55 Instruction Manual
Page 14
Names of Parts 14 12 3 4 1 Socket for tripod's anti-rotation pin 2 Tripod socket For use with tripods with a mounting screw up to 6 mm (0.24 in.) long 3 BATTERY RELEASE switch (A 18) 4 Eye cup (A 22)
Names of Parts 14 12 3 4 1 Socket for tripod's anti-rotation pin 2 Tripod socket For use with tripods with a mounting screw up to 6 mm (0.24 in.) long 3 BATTERY RELEASE switch (A 18) 4 Eye cup (A 22)

XA50 XA55 Instruction Manual
Page 16
Names of Parts WL-D89 Wireless Controller 16 7 1 2 8 3 4 9 5 10 6 1 START/STOP button (A 37) Same as the REC button on the camcorder, used to start/stop recording video. 2 G (open the index selection screen) button (A 97) 3 MENU button (A 29) 4 DISP. (onscreen display) button (A 41) 5 SET button (A 29) 6 Ñ (stop) button (A 98) 7 PHOTO button (A 38) 8 Zoom buttons (A 57) 9 Navigation buttons 10 Ò (play/pause) button (A 98)
Names of Parts WL-D89 Wireless Controller 16 7 1 2 8 3 4 9 5 10 6 1 START/STOP button (A 37) Same as the REC button on the camcorder, used to start/stop recording video. 2 G (open the index selection screen) button (A 97) 3 MENU button (A 29) 4 DISP. (onscreen display) button (A 41) 5 SET button (A 29) 6 Ñ (stop) button (A 98) 7 PHOTO button (A 38) 8 Zoom buttons (A 57) 9 Navigation buttons 10 Ò (play/pause) button (A 98)

XA50 XA55 Instruction Manual
Page 17
...the power cord into a power outlet. 2 Attach the battery pack to the camcorder. For more accurate readings, when using a battery pack for the first time, charge it fully and then use the camcorder until it around the core (as shown in minutes) on the screen. 2 Preparations 17 Preparing the ...Power Supply You can power the camcorder using the supplied BP-820 Battery Pack or the optional BP-828 Battery Pack. Both battery packs are compatible with Intelligent System so you connect the...
...the power cord into a power outlet. 2 Attach the battery pack to the camcorder. For more accurate readings, when using a battery pack for the first time, charge it fully and then use the camcorder until it around the core (as shown in minutes) on the screen. 2 Preparations 17 Preparing the ...Power Supply You can power the camcorder using the supplied BP-820 Battery Pack or the optional BP-828 Battery Pack. Both battery packs are compatible with Intelligent System so you connect the...

XA50 XA55 Instruction Manual
Page 18
Be sure to wait until the green POWER/CHG indicator goes out. • When using the compact power adapter, do not connect the supplied compact power adapter to one place as those on the SD card. Preparing the Power Supply 3 ... charging the battery pack in red while the battery is charging 4 When the POWER/CHG indicator goes out, the battery is not expressly recommended for use with this may cause a malfunction. • To prevent equipment breakdowns and excessive heating, do not fix it out. ባ ቢ IMPORTANT • Do not connect...
Be sure to wait until the green POWER/CHG indicator goes out. • When using the compact power adapter, do not connect the supplied compact power adapter to one place as those on the SD card. Preparing the Power Supply 3 ... charging the battery pack in red while the battery is charging 4 When the POWER/CHG indicator goes out, the battery is not expressly recommended for use with this may cause a malfunction. • To prevent equipment breakdowns and excessive heating, do not fix it out. ባ ቢ IMPORTANT • Do not connect...

XA50 XA55 Instruction Manual
Page 19
... information screen may not appear. Checking the Remaining Battery Charge With the camcorder turned off, press the BATT. Therefore, charge them on the day of use, or the day before, to ensure a full charge. • We recommend that if the battery charge is an issue, you might need. 19... battery charge level. Note that you prepare battery packs to last 2 to 3 times longer than you think you can power the camcorder using the compact power adapter so the battery pack will not be consumed. • Charged battery packs continue to Safety Instructions and Handling Precautions (A 129)....
... information screen may not appear. Checking the Remaining Battery Charge With the camcorder turned off, press the BATT. Therefore, charge them on the day of use, or the day before, to ensure a full charge. • We recommend that if the battery charge is an issue, you might need. 19... battery charge level. Note that you prepare battery packs to last 2 to 3 times longer than you think you can power the camcorder using the compact power adapter so the battery pack will not be consumed. • Charged battery packs continue to Safety Instructions and Handling Precautions (A 129)....

XA50 XA55 Instruction Manual
Page 20
... or similar object. Attaching the Handle Unit The camcorder is recommended. Using a table or other stable surface is functional even if you can use the INPUT terminals (A 79), infrared light (A 88) and tally lamp (A 37), the handle unit must be correctly attached to the camcorder. 1 ... handle unit and lens hood, and adjusting the viewfinder and LCD screen. 20 IMPORTANT • Be careful not to the handle unit. • Use a commercially available Phillips head ("crosshead") screwdriver and the two supplied screws. 2 Align the handle unit with the handle attachment unit and then slide...
... or similar object. Attaching the Handle Unit The camcorder is recommended. Using a table or other stable surface is functional even if you can use the INPUT terminals (A 79), infrared light (A 88) and tally lamp (A 37), the handle unit must be correctly attached to the camcorder. 1 ... handle unit and lens hood, and adjusting the viewfinder and LCD screen. 20 IMPORTANT • Be careful not to the handle unit. • Use a commercially available Phillips head ("crosshead") screwdriver and the two supplied screws. 2 Align the handle unit with the handle attachment unit and then slide...

XA50 XA55 Instruction Manual
Page 21
... lens hood counterclockwise. 2 Place the lens cap back on the top of the lens (ቢ), and then turn the lens hood clockwise until it after use. • The lens cap and lens hood cannot be the cause of lens flare and ghost images. Preparing the Camcorder 21 ባ ቢ Lens ...hood release button NOTES About the lens cap: • Use the supplied lens cap when carrying the camcorder or storing it stops with a click (ባ). • Be careful not to deform the lens hood. •...
... lens hood counterclockwise. 2 Place the lens cap back on the top of the lens (ቢ), and then turn the lens hood clockwise until it after use. • The lens cap and lens hood cannot be the cause of lens flare and ghost images. Preparing the Camcorder 21 ባ ቢ Lens ...hood release button NOTES About the lens cap: • Use the supplied lens cap when carrying the camcorder or storing it stops with a click (ባ). • Be careful not to deform the lens hood. •...

XA50 XA55 Instruction Manual
Page 22
...] setting between bright and normal or from dim to normal. • Adjusting the brightness does not affect the brightness of recordings. • Using a brighter setting will shorten the effective usage time of the LCD screen, refer to Safety Instructions and Handling Precautions (A 129), Cleaning (A 133...). Preparing the Camcorder Using the LCD Screen Open the LCD panel 90 degrees and adjust the viewing 22 angle. ባ ቢ ባ NOTES • You...
...] setting between bright and normal or from dim to normal. • Adjusting the brightness does not affect the brightness of recordings. • Using a brighter setting will shorten the effective usage time of the LCD screen, refer to Safety Instructions and Handling Precautions (A 129), Cleaning (A 133...). Preparing the Camcorder Using the LCD Screen Open the LCD panel 90 degrees and adjust the viewing 22 angle. ባ ቢ ባ NOTES • You...

XA50 XA55 Instruction Manual
Page 23
... WS-20 Wrist Strap To attach an optional SS-600/SS-650 Shoulder Strap If you wear glasses, you may find the viewfinder easier to use the viewfinder, make sure to close the LCD panel and pull out the viewfinder. • You can reach the grip zoom rocker with your index... back the outer edge of the viewfinder with your thumb. Preparing the Camcorder NOTES • The viewfinder and LCD screen cannot be used simultaneously. Adjusting the Grip Belt and Using Straps Fasten the grip belt. • Adjust the grip belt so that you can adjust the brightness of the eye cup toward...
... WS-20 Wrist Strap To attach an optional SS-600/SS-650 Shoulder Strap If you wear glasses, you may find the viewfinder easier to use the viewfinder, make sure to close the LCD panel and pull out the viewfinder. • You can reach the grip zoom rocker with your index... back the outer edge of the viewfinder with your thumb. Preparing the Camcorder NOTES • The viewfinder and LCD screen cannot be used simultaneously. Adjusting the Grip Belt and Using Straps Fasten the grip belt. • Adjust the grip belt so that you can adjust the brightness of the eye cup toward...

XA50 XA55 Instruction Manual
Page 24
... controller Point the wireless controller at the camcorder's remote sensor when you press the buttons. • You can rotate the LCD panel 180 degrees to use the wireless controller from the front of the arrow (ቢ) and pull out the battery holder (ባ). 2 Place the lithium button battery with the wireless...
... controller Point the wireless controller at the camcorder's remote sensor when you press the buttons. • You can rotate the LCD panel 180 degrees to use the wireless controller from the front of the arrow (ቢ) and pull out the battery holder (ባ). 2 Place the lithium button battery with the wireless...

XA50 XA55 Instruction Manual
Page 25
...). NOTES • When you turn off the camcorder Set the power switch to [j Off] so the power indicator does not illuminate. Select the operating mode using the power switch. ) mode 25 To turn on the camcorder, the POWER/CHG indicator will illuminate in green.
...). NOTES • When you turn off the camcorder Set the power switch to [j Off] so the power indicator does not illuminate. Select the operating mode using the power switch. ) mode 25 To turn on the camcorder, the POWER/CHG indicator will illuminate in green.

XA50 XA55 Instruction Manual
Page 27
... displayed in backup battery (A 131) and set the time zone, date and time again. • Using the optional GP-E2 GPS Receiver, you can have the camcorder adjust settings automatically according to start using it unselected to use the camcorder for the rest of the steps in this procedure. • In some screens... the date and time of month names or only the day and month), but it will still follow the order you selected. 6 Touch [24H] to use 24-hour clock or leave it . In such case, recharge the built-in short form (numbers instead of the camcorder before you can start the...
... displayed in backup battery (A 131) and set the time zone, date and time again. • Using the optional GP-E2 GPS Receiver, you can have the camcorder adjust settings automatically according to start using it unselected to use the camcorder for the rest of the steps in this procedure. • In some screens... the date and time of month names or only the day and month), but it will still follow the order you selected. 6 Touch [24H] to use 24-hour clock or leave it . In such case, recharge the built-in short form (numbers instead of the camcorder before you can start the...
XA50 XA55 Instruction Manual
Page 29
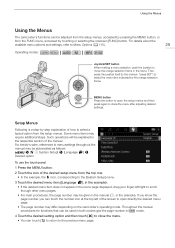
... manual. For brevity's sake, references to menu settings throughout the manual may require additional steps. System Setup] > [Language H] > Desired option To use the touch panel 1 Press the MENU button. 2 Touch the icon of how to select a typical option from the FUNC menu, accessed by the ...joystick itself (in the manual, "press SET") to select the menu item indicated by touching or selecting the onscreen [FUNC] button. Using the Menus Using the Menus The camcorder's functions can be explained in the respective section of the screen to open the setup menus and then press ...
... manual. For brevity's sake, references to menu settings throughout the manual may require additional steps. System Setup] > [Language H] > Desired option To use the touch panel 1 Press the MENU button. 2 Touch the icon of how to select a typical option from the FUNC menu, accessed by the ...joystick itself (in the manual, "press SET") to select the menu item indicated by touching or selecting the onscreen [FUNC] button. Using the Menus Using the Menus The camcorder's functions can be explained in the respective section of the screen to open the setup menus and then press ...

XA50 XA55 Instruction Manual
Page 30
... [X] to close the menu. • You can push the joystick to highlight the [L] button and press SET to return to the previous menu page. To use the joystick 1 On the shooting screen, push the joystick to select [FUNC] and then press SET. 2 Push the joystick (Ý) to select the desired...column. FUNC Menu In mode, the FUNC menu offers a quick way to control various shooting related functions such as white balance, exposure, focus, etc. Using the Menus To use the joystick 1 Press the MENU button. 2 Push the joystick (Þ) to select the icon of the desired setup menu. 30 • In the...
... [X] to close the menu. • You can push the joystick to highlight the [L] button and press SET to return to the previous menu page. To use the joystick 1 On the shooting screen, push the joystick to select [FUNC] and then press SET. 2 Push the joystick (Ý) to select the desired...column. FUNC Menu In mode, the FUNC menu offers a quick way to control various shooting related functions such as white balance, exposure, focus, etc. Using the Menus To use the joystick 1 Press the MENU button. 2 Push the joystick (Þ) to select the icon of the desired setup menu. 30 • In the...


