
XA50 XA55 Instruction Manual
Page 2
...-in infrared light on people's faces and track moving subjects while keeping them with all major non-linear (NLE) editing software. Introduction Highlights of the Camcorder The Canon XA55 / XA50 4K Camcorder is a high-performance camcorder whose compact size makes it ideal in a variety of situations in the field. With AF-boosted MF the...
...-in infrared light on people's faces and track moving subjects while keeping them with all major non-linear (NLE) editing software. Introduction Highlights of the Camcorder The Canon XA55 / XA50 4K Camcorder is a high-performance camcorder whose compact size makes it ideal in a variety of situations in the field. With AF-boosted MF the...

XA50 XA55 Instruction Manual
Page 5
Introduction 7 About this Manual 7 Conventions Used in this Manual 7 Before Using the Camcorder 8 Supplied Accessories 9 Names of the Camcorder 25 Turning the Camcorder On and Off 25 Changing the Camcorder's Operating Mode 26 Date, Time and Language Settings 27 Setting the Date and Time 27 Changing the Language 28...Recovering Clips 35 5 3. Preparations 17 Preparing the Power Supply 17 Attaching the Ferrite Core 17 Charging a Battery Pack 17 Preparing the Camcorder 20 Attaching the Handle Unit 20 Attaching the Lens Hood 21 Using the LCD Screen 22 Using the Viewfinder 22 Adjusting the Grip ...
Introduction 7 About this Manual 7 Conventions Used in this Manual 7 Before Using the Camcorder 8 Supplied Accessories 9 Names of the Camcorder 25 Turning the Camcorder On and Off 25 Changing the Camcorder's Operating Mode 26 Date, Time and Language Settings 27 Setting the Date and Time 27 Changing the Language 28...Recovering Clips 35 5 3. Preparations 17 Preparing the Power Supply 17 Attaching the Ferrite Core 17 Charging a Battery Pack 17 Preparing the Camcorder 20 Attaching the Handle Unit 20 Attaching the Lens Hood 21 Using the LCD Screen 22 Using the Viewfinder 22 Adjusting the Grip ...

XA50 XA55 Instruction Manual
Page 6
... Troubleshooting 123 List of MP4 Clips 77 Audio Settings and Recorded Audio Channels 78 Connecting an External Microphone or External Audio Input Source to the Camcorder 79 Recording Audio from the INPUT Terminals to CH1/CH2 79 Recording Audio from the Built-In Microphone or MIC Terminal to an External Monitor...
... Troubleshooting 123 List of MP4 Clips 77 Audio Settings and Recorded Audio Channels 78 Connecting an External Microphone or External Audio Input Source to the Camcorder 79 Recording Audio from the INPUT Terminals to CH1/CH2 79 Recording Audio from the Built-In Microphone or MIC Terminal to an External Monitor...
XA50 XA55 Instruction Manual
Page 7
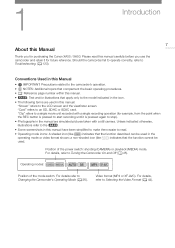
..., from the point when the REC button is pressed to start recording until it for purchasing the Canon XA55 / XA50. "Clip" refers to a single movie unit recorded with a still camera. "Card" refers to Turning the Camcorder On and Off (A 25). Position of the mode switch. For details, refer to the LCD screen and...
..., from the point when the REC button is pressed to start recording until it for purchasing the Canon XA55 / XA50. "Clip" refers to a single movie unit recorded with a still camera. "Card" refers to Turning the Camcorder On and Off (A 25). Position of the mode switch. For details, refer to the LCD screen and...
XA50 XA55 Instruction Manual
Page 8
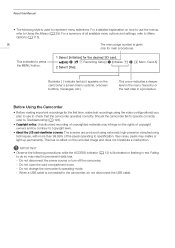
...given only for the desired SD card. > [3 " Recording Setup] > [Initialize 8] > [6 Mem. Do not disconnect the power source or turn off the camcorder. - When a USB cable is illuminated or flashing in red. Card A] 2 Select [Yes]. This arrow indicates a deeper level in the menu hierarchy or ... refer to Using the Menus (A 29). About this Manual • The following precautions while the ACCESS indicator (A 12) is connected to the camcorder, do so may result in permanent data loss. - For a detailed explanation on the recorded image and does not constitute a malfunction. This indicates...
...given only for the desired SD card. > [3 " Recording Setup] > [Initialize 8] > [6 Mem. Do not disconnect the power source or turn off the camcorder. - When a USB cable is illuminated or flashing in red. Card A] 2 Select [Yes]. This arrow indicates a deeper level in the menu hierarchy or ... refer to Using the Menus (A 29). About this Manual • The following precautions while the ACCESS indicator (A 12) is connected to the camcorder, do so may result in permanent data loss. - For a detailed explanation on the recorded image and does not constitute a malfunction. This indicates...

XA50 XA55 Instruction Manual
Page 9
screws) Lens hood with the camcorder: Supplied Accessories 9 CA-570 Compact Power Adapter (incl. screws) Microphone holder unit (incl. power cord) Ferrite Core BP-820 Battery Pack Handle unit (incl. CR2025 lithium button battery) Quick Guide Supplied Accessories The following accessories are supplied with lens barrier Lens cap WL-D89 Wireless Controller (incl.
screws) Lens hood with the camcorder: Supplied Accessories 9 CA-570 Compact Power Adapter (incl. screws) Microphone holder unit (incl. power cord) Ferrite Core BP-820 Battery Pack Handle unit (incl. CR2025 lithium button battery) Quick Guide Supplied Accessories The following accessories are supplied with lens barrier Lens cap WL-D89 Wireless Controller (incl.

XA50 XA55 Instruction Manual
Page 10
INFO (battery information) button (A 19) buttons (A 70) 2 PRE REC (pre-recording) button (A 87)/ Assignable button 3 (A 94) 3 u (review recording) button (A 39)/ Assignable button 4 (A 94) 4 Lens barrier switch (A 37) 5 Lens hood (A 21) 6 Focus/Zoom ring (A 47, 55) 7 CUSTOM (customizable) dial (A 93) 8 CUSTOM (customizable) button (A 93) 9 Focus/Zoom ring switch (A 47, 55) 10 INFRARED switch (A 88) 11 DISP (onscreen display) button (A 41)/ BATT. Names of Parts Names of Parts Camcorder 10 1 23 4 5 6 78 9 10 11 1 ND FILTER +/-
INFO (battery information) button (A 19) buttons (A 70) 2 PRE REC (pre-recording) button (A 87)/ Assignable button 3 (A 94) 3 u (review recording) button (A 39)/ Assignable button 4 (A 94) 4 Lens barrier switch (A 37) 5 Lens hood (A 21) 6 Focus/Zoom ring (A 47, 55) 7 CUSTOM (customizable) dial (A 93) 8 CUSTOM (customizable) button (A 93) 9 Focus/Zoom ring switch (A 47, 55) 10 INFRARED switch (A 88) 11 DISP (onscreen display) button (A 41)/ BATT. Names of Parts Names of Parts Camcorder 10 1 23 4 5 6 78 9 10 11 1 ND FILTER +/-

XA50 XA55 Instruction Manual
Page 16
Names of Parts WL-D89 Wireless Controller 16 7 1 2 8 3 4 9 5 10 6 1 START/STOP button (A 37) Same as the REC button on the camcorder, used to start/stop recording video. 2 G (open the index selection screen) button (A 97) 3 MENU button (A 29) 4 DISP. (onscreen display) button (A 41) 5 SET button (A 29) 6 Ñ (stop) button (A 98) 7 PHOTO button (A 38) 8 Zoom buttons (A 57) 9 Navigation buttons 10 Ò (play/pause) button (A 98)
Names of Parts WL-D89 Wireless Controller 16 7 1 2 8 3 4 9 5 10 6 1 START/STOP button (A 37) Same as the REC button on the camcorder, used to start/stop recording video. 2 G (open the index selection screen) button (A 97) 3 MENU button (A 29) 4 DISP. (onscreen display) button (A 41) 5 SET button (A 29) 6 Ñ (stop) button (A 98) 7 PHOTO button (A 38) 8 Zoom buttons (A 57) 9 Navigation buttons 10 Ò (play/pause) button (A 98)

XA50 XA55 Instruction Manual
Page 17
... supplied compact power adapter. For more accurate readings, when using a battery pack for the first time, charge it fully and then use the camcorder until it around the core (as shown in the illustration), then close the unit until the battery pack is necessary to suppress RF interference. ... optional BP-828 Battery Pack. Attaching the ferrite core to the compact power adapter cable is completely depleted. 1 Connect the compact power adapter to the camcorder and plug the power cord into a power outlet. 2 Attach the battery pack to the cable about 6 cm (2.4 in minutes) on the screen. ...
... supplied compact power adapter. For more accurate readings, when using a battery pack for the first time, charge it fully and then use the camcorder until it around the core (as shown in the illustration), then close the unit until the battery pack is necessary to suppress RF interference. ... optional BP-828 Battery Pack. Attaching the ferrite core to the compact power adapter cable is completely depleted. 1 Connect the compact power adapter to the camcorder and plug the power cord into a power outlet. 2 Attach the battery pack to the cable about 6 cm (2.4 in minutes) on the screen. ...

XA50 XA55 Instruction Manual
Page 18
... • Do not connect to the compact power adapter any product that is fully charged. • Disconnect the compact power adapter from the camcorder and unplug the power cord. To remove the battery pack 1 Slide the BATTERY RELEASE switch in red while the battery is charging 4 When the... POWER/CHG indicator goes out, the battery is not expressly recommended for overseas travels or special power sources such as this camcorder. • Turn off the camcorder, important data is updated on aircraft and ships, DC-AC inverters, etc. If either the ambient temperature or the battery pack...
... • Do not connect to the compact power adapter any product that is fully charged. • Disconnect the compact power adapter from the camcorder and unplug the power cord. To remove the battery pack 1 Slide the BATTERY RELEASE switch in red while the battery is charging 4 When the... POWER/CHG indicator goes out, the battery is not expressly recommended for overseas travels or special power sources such as this camcorder. • Turn off the camcorder, important data is updated on aircraft and ships, DC-AC inverters, etc. If either the ambient temperature or the battery pack...

XA50 XA55 Instruction Manual
Page 19
... BATT. INFO button to Reference Tables (A 139). Note that you prepare battery packs to last 2 to 3 times longer than you think you can power the camcorder using the compact power adapter so the battery pack will not be consumed. • Charged battery packs continue to Safety Instructions and Handling Precautions (A 129...
... BATT. INFO button to Reference Tables (A 139). Note that you prepare battery packs to last 2 to 3 times longer than you think you can power the camcorder using the compact power adapter so the battery pack will not be consumed. • Charged battery packs continue to Safety Instructions and Handling Precautions (A 129...

XA50 XA55 Instruction Manual
Page 20
Attaching the Handle Unit The camcorder is recommended. Preparing the Camcorder Preparing the Camcorder This section covers basic preparations for the camcorder such as attaching the handle unit and lens hood, and adjusting the viewfinder and LCD screen. 20 IMPORTANT • Be ... (A 79), infrared light (A 88) and tally lamp (A 37), the handle unit must be correctly attached to the camcorder. 1 Attach the microphone holder unit to drop the camcorder when attaching, removing or adjusting the various accessories. Using a table or other stable surface is functional even if you can...
Attaching the Handle Unit The camcorder is recommended. Preparing the Camcorder Preparing the Camcorder This section covers basic preparations for the camcorder such as attaching the handle unit and lens hood, and adjusting the viewfinder and LCD screen. 20 IMPORTANT • Be ... (A 79), infrared light (A 88) and tally lamp (A 37), the handle unit must be correctly attached to the camcorder. 1 Attach the microphone holder unit to drop the camcorder when attaching, removing or adjusting the various accessories. Using a table or other stable surface is functional even if you can...

XA50 XA55 Instruction Manual
Page 21
... light that the lens hood is aligned with the index mark on the lens. Additionally, closing the lens barrier can be used simultaneously. Preparing the Camcorder 21 ባ ቢ Lens hood release button NOTES About the lens cap: • Use the supplied lens cap when carrying the... camcorder or storing it stops with a click (ባ). • Be careful not to deform the lens hood. • Make sure that can help prevent fingerprints and ...
... light that the lens hood is aligned with the index mark on the lens. Additionally, closing the lens barrier can be used simultaneously. Preparing the Camcorder 21 ባ ቢ Lens hood release button NOTES About the lens cap: • Use the supplied lens cap when carrying the... camcorder or storing it stops with a click (ባ). • Be careful not to deform the lens hood. • Make sure that can help prevent fingerprints and ...

XA50 XA55 Instruction Manual
Page 22
... the Viewfinder Adjust the position of the LCD screen with the > [£ Display Setup] > [LCD Brightness] and [LCD Backlight] settings. Preparing the Camcorder Using the LCD Screen Open the LCD panel 90 degrees and adjust the viewing 22 angle. ባ ቢ ባ NOTES • You can use...mirror image of the subject. • For details about how to take care of the LCD screen, refer to a comfortable angle. When the camcorder is on the camcorder (A 25) and close the LCD panel. 2 Pull out the viewfinder and adjust the viewing angle. 3 Adjust the viewfinder using the dioptric ...
... the Viewfinder Adjust the position of the LCD screen with the > [£ Display Setup] > [LCD Brightness] and [LCD Backlight] settings. Preparing the Camcorder Using the LCD Screen Open the LCD panel 90 degrees and adjust the viewing 22 angle. ባ ቢ ባ NOTES • You can use...mirror image of the subject. • For details about how to take care of the LCD screen, refer to a comfortable angle. When the camcorder is on the camcorder (A 25) and close the LCD panel. 2 Pull out the viewfinder and adjust the viewing angle. 3 Adjust the viewfinder using the dioptric ...

XA50 XA55 Instruction Manual
Page 23
... with the > [£ Display Setup] > [Viewfinder 23 Backlight] setting. • Make sure you flip back the outer edge of the eye cup toward the camcorder body. If you wear glasses, you may find the viewfinder easier to close the LCD panel and pull out the viewfinder. • You can reach... the grip zoom rocker with your thumb. Preparing the Camcorder NOTES • The viewfinder and LCD screen cannot be used simultaneously. To use the viewfinder, make sure to use if you keep the eye ...
... with the > [£ Display Setup] > [Viewfinder 23 Backlight] setting. • Make sure you flip back the outer edge of the eye cup toward the camcorder body. If you wear glasses, you may find the viewfinder easier to close the LCD panel and pull out the viewfinder. • You can reach... the grip zoom rocker with your thumb. Preparing the Camcorder NOTES • The viewfinder and LCD screen cannot be used simultaneously. To use the viewfinder, make sure to use if you keep the eye ...

XA50 XA55 Instruction Manual
Page 24
... into the wireless controller. 24 1 Press the tab in the direction of the camcorder. ቤ ብ ባ ቢ NOTES • When the camcorder cannot be operated with the wireless controller, or when it can only be operated at the camcorder's remote sensor when you press the buttons. • You can rotate the LCD...
... into the wireless controller. 24 1 Press the tab in the direction of the camcorder. ቤ ብ ባ ቢ NOTES • When the camcorder cannot be operated with the wireless controller, or when it can only be operated at the camcorder's remote sensor when you press the buttons. • You can rotate the LCD...

XA50 XA55 Instruction Manual
Page 25
... the power switch to [j Off] so the power indicator does not illuminate. Basic Operation of the Camcorder Basic Operation of the Camcorder Turning the Camcorder On and Off The camcorder has two operating modes: CAMERA ( ) mode for making recordings or MEDIA ( for mode (A 97). Select the operating mode using the power switch. ) mode 25...
... the power switch to [j Off] so the power indicator does not illuminate. Basic Operation of the Camcorder Basic Operation of the Camcorder Turning the Camcorder On and Off The camcorder has two operating modes: CAMERA ( ) mode for making recordings or MEDIA ( for mode (A 97). Select the operating mode using the power switch. ) mode 25...

XA50 XA55 Instruction Manual
Page 26
This operating mode is suitable if you just prefer not to bother with detailed camcorder settings. (Manual) mode Set the mode switch to N. With this mode, the camcorder takes care of the Camcorder Changing the Camcorder's Operating Mode When making recordings, you can enjoy full access to menus, settings and advanced functions. Basic Operation of all the settings while you concentrate on recording. With this mode, you can change the camera mode to match your shooting style (A 37). 26 (Auto) mode Set the mode switch to n.
This operating mode is suitable if you just prefer not to bother with detailed camcorder settings. (Manual) mode Set the mode switch to N. With this mode, the camcorder takes care of the Camcorder Changing the Camcorder's Operating Mode When making recordings, you can enjoy full access to menus, settings and advanced functions. Basic Operation of all the settings while you concentrate on recording. With this mode, you can change the camera mode to match your shooting style (A 37). 26 (Auto) mode Set the mode switch to n.

XA50 XA55 Instruction Manual
Page 27
... - > [ System Setup] > [Date/Time] • When you do not use 12-hour clock (AM/PM). 7 Touch [OK] to start using it unselected to use the camcorder for the rest of the steps in this procedure. • In some screens, the date will be lost. NOTES • With the following settings, you... the order you selected. 6 Touch [24H] to use 24-hour clock or leave it . Date, Time and Language Settings 27 Operating modes: 1 Turn on the camcorder. • The [Date/Time] screen will appear. 2 Touch a field you want to change (year, month, day, hours or minutes). • You can also push the...
... - > [ System Setup] > [Date/Time] • When you do not use 12-hour clock (AM/PM). 7 Touch [OK] to start using it unselected to use the camcorder for the rest of the steps in this procedure. • In some screens, the date will be lost. NOTES • With the following settings, you... the order you selected. 6 Touch [24H] to use 24-hour clock or leave it . Date, Time and Language Settings 27 Operating modes: 1 Turn on the camcorder. • The [Date/Time] screen will appear. 2 Touch a field you want to change (year, month, day, hours or minutes). • You can also push the...

XA50 XA55 Instruction Manual
Page 28
... travel so that you are traveling. 3 Select [Ï] or [Ð] to retain the date and time of an additional location. In addition, the camcorder is New York. Operating modes: 1 Select [Time Zone/DST]. > [B ! The default setting is able to set the desired time zone. This is... for details on how to navigate the menu to close the menu. Date, Time and Language Settings Changing the Language The default language of the camcorder is convenient when you travel destination. Refer to Setup Menus (A 29) for daylight saving time. 4 Select [X] to complete this procedure. 28 ...
... travel so that you are traveling. 3 Select [Ï] or [Ð] to retain the date and time of an additional location. In addition, the camcorder is New York. Operating modes: 1 Select [Time Zone/DST]. > [B ! The default setting is able to set the desired time zone. This is... for details on how to navigate the menu to close the menu. Date, Time and Language Settings Changing the Language The default language of the camcorder is convenient when you travel destination. Refer to Setup Menus (A 29) for daylight saving time. 4 Select [X] to complete this procedure. 28 ...


