
Owners Manual
Page 1
E Digital Camera User's Guide K860PCM1DMX Thank you for purchasing this CASIO product. • Before using it, be sure to read the precautions contained in this User's Guide. • Keep the User's Guide in a safe place for future reference. • For the most up-to-date information about this product, visit the official EXILIM Website at http://www.exilim.com/
E Digital Camera User's Guide K860PCM1DMX Thank you for purchasing this CASIO product. • Before using it, be sure to read the precautions contained in this User's Guide. • Keep the User's Guide in a safe place for future reference. • For the most up-to-date information about this product, visit the official EXILIM Website at http://www.exilim.com/
Owners Manual
Page 2
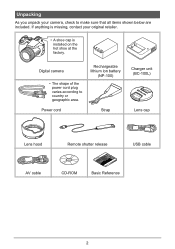
Digital camera • The shape of the power cord plug varies according to make sure that all items shown below are included. Power cord Rechargeable lithium ion battery (NP-100) Strap Charger unit (BC-100L) Lens cap Lens hood Remote shutter release USB cable AV cable CD-ROM Basic Reference 2 Unpacking As you unpack your original retailer. • A shoe cap is missing, contact your camera, check to country or geographic area. If anything is installed on the hot shoe at the factory.
Digital camera • The shape of the power cord plug varies according to make sure that all items shown below are included. Power cord Rechargeable lithium ion battery (NP-100) Strap Charger unit (BC-100L) Lens cap Lens hood Remote shutter release USB cable AV cable CD-ROM Basic Reference 2 Unpacking As you unpack your original retailer. • A shoe cap is missing, contact your camera, check to country or geographic area. If anything is installed on the hot shoe at the factory.

Owners Manual
Page 3
...the characteristics of the liquid crystal panel, and does not indicate malfunction. This is due to ensure that the camera is forbidden. This means that is forbidden under copyright laws. • CASIO COMPUTER CO., LTD. is questionable, erroneous, etc. • Any copying of the contents of this User's ... your own personal use, any other reason. • Note that provides a pixel yield of 99.99%. shall not be held liable for CASIO. • CASIO COMPUTER CO., LTD. Read this first! • The contents of this manual are subject to malfunction, repair, or any other use of...
...the characteristics of the liquid crystal panel, and does not indicate malfunction. This is due to ensure that the camera is forbidden. This means that is forbidden under copyright laws. • CASIO COMPUTER CO., LTD. is questionable, erroneous, etc. • Any copying of the contents of this User's ... your own personal use, any other reason. • Note that provides a pixel yield of 99.99%. shall not be held liable for CASIO. • CASIO COMPUTER CO., LTD. Read this first! • The contents of this manual are subject to malfunction, repair, or any other use of...
Owners Manual
Page 4
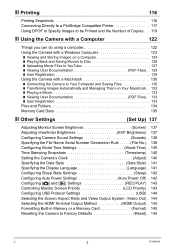
... ❚❙ Quick Start Basics 9 What is a digital camera 9 What you can do with your CASIO camera 10 Attaching the Lens Cap and Strap 11 First, charge ...the battery prior to use 11 ❚ To charge the battery 11 ❚ To load the battery 13 Configuring the Display Language the First Time You Turn On the Camera... ❚ To format (initialize) a new memory card 17 To shoot a snapshot 18 Holding the Camera Correctly 20 Viewing Snapshots 21 Deleting Images 22 ❚ To delete a single file 22 ❚ ...
... ❚❙ Quick Start Basics 9 What is a digital camera 9 What you can do with your CASIO camera 10 Attaching the Lens Cap and Strap 11 First, charge ...the battery prior to use 11 ❚ To charge the battery 11 ❚ To load the battery 13 Configuring the Display Language the First Time You Turn On the Camera... ❚ To format (initialize) a new memory card 17 To shoot a snapshot 18 Holding the Camera Correctly 20 Viewing Snapshots 21 Deleting Images 22 ❚ To delete a single file 22 ❚ ...

Owners Manual
Page 5
... 67 To shoot with BEST SHOT 67 ❚ Creating Your Own BEST SHOT Setups 69 Shooting with Digital Anti Shake Digital Anti Shake) . . 70 Shooting with Digital Panning Digital Panning) . . 71 Shooting an Image in Accordance with Subject Movement Move Out CS/Move In CS...❚ Using the Self-timer Self-timer) . . . 79 ❚ Using the Auto Focus Assist Light AF Assist Light) . . . 80 ❚ Reducing the Effects of Camera and Subject Movement . . . . (Anti Shake) . . . 81 ❚ Shooting with Face Detection Face Detection) . . . 82 ❚ Shooting with Continuous Auto Focus ...
... 67 To shoot with BEST SHOT 67 ❚ Creating Your Own BEST SHOT Setups 69 Shooting with Digital Anti Shake Digital Anti Shake) . . 70 Shooting with Digital Panning Digital Panning) . . 71 Shooting an Image in Accordance with Subject Movement Move Out CS/Move In CS...❚ Using the Self-timer Self-timer) . . . 79 ❚ Using the Auto Focus Assist Light AF Assist Light) . . . 80 ❚ Reducing the Effects of Camera and Subject Movement . . . . (Anti Shake) . . . 81 ❚ Shooting with Face Detection Face Detection) . . . 82 ❚ Shooting with Continuous Auto Focus ...
Owners Manual
Page 6
...-quality Movies on a Hi-Vision Television 104 ❚❙ Other Playback Functions (PLAY) 106 Playing a Slideshow on the Camera Slideshow) . 106 Creating a Snapshot of Movie Frames MOTION PRINT) . 107 Editing a Movie on the Camera Movie Editing) . 108 Adjusting White Balance White Balance) . 110 Adjusting the Brightness of an Existing Snapshot Brightness) . .111...
...-quality Movies on a Hi-Vision Television 104 ❚❙ Other Playback Functions (PLAY) 106 Playing a Slideshow on the Camera Slideshow) . 106 Creating a Snapshot of Movie Frames MOTION PRINT) . 107 Editing a Movie on the Camera Movie Editing) . 108 Adjusting White Balance White Balance) . 110 Adjusting the Brightness of an Existing Snapshot Brightness) . .111...
Owners Manual
Page 7
...135 ❚❙ Other Settings (Set Up) 137 Adjusting Monitor Screen Brightness Screen) . 137 Adjusting Viewfinder Brightness EVF Brightness) . 137 Configuring Camera Sound Settings Sounds) . 138 Specifying the File Name Serial Number Generation Rule . . . . . (File No.) . 138 Configuring World... Time Settings World Time) . 139 Time Stamping Snapshots Timestamp) . 140 Setting the Camera's Clock Adjust) . 140 Specifying the Date Style Date Style) . 141 Specifying the Display Language Language) . 141 Configuring Sleep State Settings Sleep)...
...135 ❚❙ Other Settings (Set Up) 137 Adjusting Monitor Screen Brightness Screen) . 137 Adjusting Viewfinder Brightness EVF Brightness) . 137 Configuring Camera Sound Settings Sounds) . 138 Specifying the File Name Serial Number Generation Rule . . . . . (File No.) . 138 Configuring World... Time Settings World Time) . 139 Time Stamping Snapshots Timestamp) . 140 Setting the Camera's Clock Adjust) . 140 Specifying the Date Style Date Style) . 141 Specifying the Display Language Language) . 141 Configuring Sleep State Settings Sleep)...

Owners Manual
Page 8
...; Appendix 149 Precautions during Use 149 Power Supply 157 ❚ Charging 157 ❚ To replace the battery 158 ❚ Battery Precautions 158 ❚ Using the Camera in another Country 159 ❚ Using Household Power 159 Using a Memory Card 160 ❚ To replace the memory card 160 Computer System Requirements for Bundled...
...; Appendix 149 Precautions during Use 149 Power Supply 157 ❚ Charging 157 ❚ To replace the battery 158 ❚ Battery Precautions 158 ❚ Using the Camera in another Country 159 ❚ Using Household Power 159 Using a Memory Card 160 ❚ To replace the memory card 160 Computer System Requirements for Bundled...

Owners Manual
Page 9
Quick Start Basics What is a digital camera? A digital camera stores images on your computer. Attach images to e-mail. 9 Quick Start Basics Store images on a memory card, so you record in a variety of times. Print images. Record Delete Play You can use the images you can record and delete images a countless number of different ways.
Quick Start Basics What is a digital camera? A digital camera stores images on your computer. Attach images to e-mail. 9 Quick Start Basics Store images on a memory card, so you record in a variety of times. Print images. Record Delete Play You can use the images you can record and delete images a countless number of different ways.

Owners Manual
Page 10
... back on a Hi-Vision TV. (1920x1080 pixels 60 fields/s) See page 64 for more information. What you can do with your CASIO camera Your CASIO camera is packed with the shutter button. Prerecord (Still image) pre-records images to 1200 frames per second. High-speed Movies Movies can ...be recorded at the amazing speed of digital images easier, including the following three main functions. See page 64 for more information. High-speed ...
... back on a Hi-Vision TV. (1920x1080 pixels 60 fields/s) See page 64 for more information. What you can do with your CASIO camera Your CASIO camera is packed with the shutter button. Prerecord (Still image) pre-records images to 1200 frames per second. High-speed Movies Movies can ...be recorded at the amazing speed of digital images easier, including the following three main functions. See page 64 for more information. High-speed ...
Owners Manual
Page 11
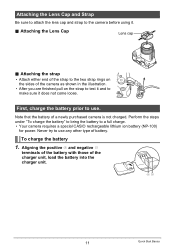
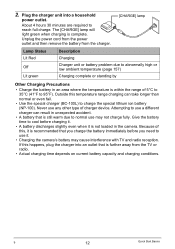
...the two strap rings on the sides of battery. Never try to use any other type of the camera as shown in the illustration. • After you are finished pull on the strap to test it ...and to make sure it . . terminals of the battery with those of a newly purchased camera is not charged. Aligning the positive + and negative - First, charge the battery prior to use . Attaching ...the Lens Cap and Strap Be sure to attach the lens cap and strap to the camera before using it does not come loose. Perform the steps under "To charge the battery" to bring the ...
...the two strap rings on the sides of battery. Never try to use any other type of the camera as shown in the illustration. • After you are finished pull on the strap to test it ...and to make sure it . . terminals of the battery with those of a newly purchased camera is not charged. Aligning the positive + and negative - First, charge the battery prior to use . Attaching ...the Lens Cap and Strap Be sure to attach the lens cap and strap to the camera before using it does not come loose. Perform the steps under "To charge the battery" to bring the ...
Owners Manual
Page 12
... time to 95°F). Because of charger device. B 12 Quick Start Basics Plug the charger unit into an outlet that is not loaded in the camera. Unplug the power cord from the power outlet and then remove the battery from the TV or radio. • Actual charging time depends on current... before charging it. • A battery discharges slightly even when it is still warm due to use any other type of this, it . • Charging the camera's battery may not charge fully.
... time to 95°F). Because of charger device. B 12 Quick Start Basics Plug the charger unit into an outlet that is not loaded in the camera. Unplug the power cord from the power outlet and then remove the battery from the TV or radio. • Actual charging time depends on current... before charging it. • A battery discharges slightly even when it is still warm due to use any other type of this, it . • Charging the camera's battery may not charge fully.

Owners Manual
Page 13
Lock 2 1 2. Stopper 3. Load the battery. Press the battery in until the stopper secures it in the direction indicated by the arrow, slide the battery into the camera, terminals end first. While holding the stopper to replace the battery, see page 158. Close the battery cover. • For information about how to the side in the direction indicated by the arrow and the battery cover will open. Terminals 13 Quick Start Basics Slide the lock in place. Open the battery cover. To load the battery 1.
Lock 2 1 2. Stopper 3. Load the battery. Press the battery in until the stopper secures it in the direction indicated by the arrow, slide the battery into the camera, terminals end first. While holding the stopper to replace the battery, see page 158. Close the battery cover. • For information about how to the side in the direction indicated by the arrow and the battery cover will open. Terminals 13 Quick Start Basics Slide the lock in place. Open the battery cover. To load the battery 1.

Owners Manual
Page 14
...battery immediately. • The level shown by the battery indicator may change when you switch between the REC mode and PLAY mode. • Leaving the camera for the flash setting (page 31). • Enable the Auto Power Off and the Sleep features to protect against wasting battery power when you do... not need to use the flash, select ? (flash off the camera (pages 142, 142). 14 Quick Start Basics Battery Power Conservation Tips • When you forget to be cleared. You will cause its date and ...
...battery immediately. • The level shown by the battery indicator may change when you switch between the REC mode and PLAY mode. • Leaving the camera for the flash setting (page 31). • Enable the Auto Power Off and the Sleep features to protect against wasting battery power when you do... not need to use the flash, select ? (flash off the camera (pages 142, 142). 14 Quick Start Basics Battery Power Conservation Tips • When you forget to be cleared. You will cause its date and ...
Owners Manual
Page 15
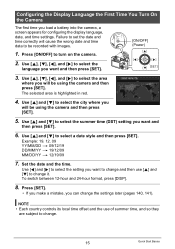
... language, date, and time settings. Use [8], [2], [4], and [6] to select the city where you will cause the wrong date and time data to turn on the camera. 2. Use [8] and [2] to select the language you want and then press [SET]. [ON/OFF] (Power) =8? =4? =6? =2? [SET] 3. Configuring the Display Language ...the First Time You Turn On the Camera The first time you can change the settings later (pages 140, 141). Set the date and the time. Failure to set the date and time...
... language, date, and time settings. Use [8], [2], [4], and [6] to select the city where you will cause the wrong date and time data to turn on the camera. 2. Use [8] and [2] to select the language you want and then press [SET]. [ON/OFF] (Power) =8? =4? =6? =2? [SET] 3. Configuring the Display Language ...the First Time You Turn On the Camera The first time you can change the settings later (pages 140, 141). Set the date and the time. Failure to set the date and time...

Owners Manual
Page 16
...of a memory card with a memory card. Load a memory card. Supported Memory Cards - To load a memory card 1. Use of certain types of the camera, slide it into place. Front Back 3. When no memory card is recommended. MMC (MultiMediaCard) - MMCplus (MultiMediaCardplus) Use one of the above types of .... Positioning the memory card so its front is loaded are saved to the memory card. Pressing the memory card slot cover against the camera, slide it takes to record movies, which can slow down processing speeds. Press [ON/OFF] to purchase a commercially available memory card...
...of a memory card with a memory card. Load a memory card. Supported Memory Cards - To load a memory card 1. Use of certain types of the camera, slide it into place. Front Back 3. When no memory card is recommended. MMC (MultiMediaCard) - MMCplus (MultiMediaCardplus) Use one of the above types of .... Positioning the memory card so its front is loaded are saved to the memory card. Pressing the memory card slot cover against the camera, slide it takes to record movies, which can slow down processing speeds. Press [ON/OFF] to purchase a commercially available memory card...

Owners Manual
Page 17
...already has snapshots or other abnormality, re-format the card. • Be sure to use the camera to format a memory card. Formatting a memory card on a computer and then using it for...) a new memory card You need to a card has slowed down data processing by the camera. Turn on it in the camera can result in non-conformity with the SD format, causing problems with compatibility, operation, etc... card (page 16) into the memory card slot. • Should water or any other files on the camera and press [MENU]. 2. Use [8] and [2] to format a new memory card before using it , will...
...already has snapshots or other abnormality, re-format the card. • Be sure to use the camera to format a memory card. Formatting a memory card on a computer and then using it for...) a new memory card You need to a card has slowed down data processing by the camera. Turn on it in the camera can result in non-conformity with the SD format, causing problems with compatibility, operation, etc... card (page 16) into the memory card slot. • Should water or any other files on the camera and press [MENU]. 2. Use [8] and [2] to format a new memory card before using it , will...
Owners Manual
Page 18
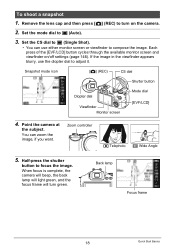
... can use the diopter dial to turn green. Each press of the [EVF/LCD] button cycles through the available monitor screen and viewfinder on the camera. 2. To shoot a snapshot 1. Half-press the shutter button to t (Auto). 3. Back lamp Focus frame 18 Quick Start Basics When focus is complete, ...the camera will beep, the back lamp will light green, and the focus frame will turn on /off settings (page 146). Snapshot mode icon [r] (REC) CS ...
... can use the diopter dial to turn green. Each press of the [EVF/LCD] button cycles through the available monitor screen and viewfinder on the camera. 2. To shoot a snapshot 1. Half-press the shutter button to t (Auto). 3. Back lamp Focus frame 18 Quick Start Basics When focus is complete, ...the camera will beep, the back lamp will light green, and the focus frame will turn on /off settings (page 146). Snapshot mode icon [r] (REC) CS ...

Owners Manual
Page 19
... technique for details. Mastering how much pressure is required for a half-press and a full-press of the shutter button is too close, etc.) Point the camera at . See page 62 for goodlooking images. 6. This is used. • Whenever possible, take a little extra time to focus again. 19 Quick Start... and try to half-press the shutter button in focus.) When you can capture quick moving action more easily. Press [0] again to keep the camera still, press the shutter button the rest of focus when Quick Shutter is normal and does not indicate malfunction (page 81). . If the image...
... technique for details. Mastering how much pressure is required for a half-press and a full-press of the shutter button is too close, etc.) Point the camera at . See page 62 for goodlooking images. 6. This is used. • Whenever possible, take a little extra time to focus again. 19 Quick Start... and try to half-press the shutter button in focus.) When you can capture quick moving action more easily. Press [0] again to keep the camera still, press the shutter button the rest of focus when Quick Shutter is normal and does not indicate malfunction (page 81). . If the image...

Owners Manual
Page 20
.... • To protect against your fingers and the strap do not cover any other purpose. Holding the Camera Correctly Your images will not come out clearly if you move the camera when you shoot. This is especially important when available lighting is the name of the frame... Never use ... the shutter speed. NOTE • Take care that your sides as the shutter releases and for a few moments after it for use with this camera only. Microphones Strap Front lamp Lens Flash 20 Quick Start Basics "Focus lock" (page 44) is low, which the subject to be sure to...
.... • To protect against your fingers and the strap do not cover any other purpose. Holding the Camera Correctly Your images will not come out clearly if you move the camera when you shoot. This is especially important when available lighting is the name of the frame... Never use ... the shutter speed. NOTE • Take care that your sides as the shutter releases and for a few moments after it for use with this camera only. Microphones Strap Front lamp Lens Flash 20 Quick Start Basics "Focus lock" (page 44) is low, which the subject to be sure to...


