Owners Manual
Page 2
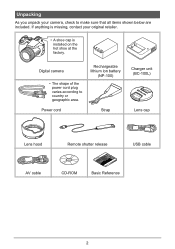
Power cord Rechargeable lithium ion battery (NP-100) Strap Charger unit (BC-100L) Lens cap Lens hood Remote shutter release USB cable AV cable CD-ROM Basic Reference 2 Unpacking As you unpack your original retailer. • A shoe cap is installed on the hot shoe at the factory. Digital camera • The shape of the power cord plug varies according to make sure that all items shown below are included. If anything is missing, contact your camera, check to country or geographic area.
Power cord Rechargeable lithium ion battery (NP-100) Strap Charger unit (BC-100L) Lens cap Lens hood Remote shutter release USB cable AV cable CD-ROM Basic Reference 2 Unpacking As you unpack your original retailer. • A shoe cap is installed on the hot shoe at the factory. Digital camera • The shape of the power cord plug varies according to make sure that all items shown below are included. If anything is missing, contact your camera, check to country or geographic area.

Owners Manual
Page 102
... port TV Video Audio AUDIO IN jack (red) AUDIO IN jack (white) VIDEO IN jack (yellow) Making sure that you insert the cable connector into the USB/AV port until you normally do. 102 Viewing Snapshots and Movies This will cause an image to appear on the TV screen, without anything ... images, be able to insert the connector fully can change the aspect ratio of the connector as you feel it to the camera. • Make sure that the 6 mark on the camera while the AV cable is connected. • You also can result in poor communication or malfunction. • Note that the...
... port TV Video Audio AUDIO IN jack (red) AUDIO IN jack (white) VIDEO IN jack (yellow) Making sure that you insert the cable connector into the USB/AV port until you normally do. 102 Viewing Snapshots and Movies This will cause an image to appear on the TV screen, without anything ... images, be able to insert the connector fully can change the aspect ratio of the connector as you feel it to the camera. • Make sure that the 6 mark on the camera while the AV cable is connected. • You also can result in poor communication or malfunction. • Note that the...

Owners Manual
Page 103
...all indicators from the monitor screen (page 146). When recording images to an external device, use [DISP] to the VIDEO IN and AUDIO IN terminals. - Camera: USB/AV port You can record movies by selecting "» Only" for the slideshow "Images" setting (page 106). For information about connecting a monitor to the ...recording device and about how to record, see the user documentation that comes with the recording device you are using the camera's bundled AV cable. - Recording Camera Images to a DVD Recorder or Video Deck Use one of snapshots and movies on the...
...all indicators from the monitor screen (page 146). When recording images to an external device, use [DISP] to the VIDEO IN and AUDIO IN terminals. - Camera: USB/AV port You can record movies by selecting "» Only" for the slideshow "Images" setting (page 106). For information about connecting a monitor to the ...recording device and about how to record, see the user documentation that comes with the recording device you are using the camera's bundled AV cable. - Recording Camera Images to a DVD Recorder or Video Deck Use one of snapshots and movies on the...

Owners Manual
Page 104
...Movies Check the user documentation that comes with your TV's HDMI connector on the camera's monitor screen while it is outputting to a TV. • Disconnect the HDMI cable when you are connected to both the USB/AV port and the HDMI output connector, the HDMI output connector connection is ...given priority. • Movie recording is marked with some devices. • Connecting the camera to the HDMI connector of another device can...
...Movies Check the user documentation that comes with your TV's HDMI connector on the camera's monitor screen while it is outputting to a TV. • Disconnect the HDMI cable when you are connected to both the USB/AV port and the HDMI output connector, the HDMI output connector connection is ...given priority. • Movie recording is marked with some devices. • Connecting the camera to the HDMI connector of another device can...

Owners Manual
Page 117
... [8] and [2] to a printer 1. On the "Set Up" tab, select "USB" and then press [6]. 3. To set up the camera before plugging into place. Connecting the Camera to a Printer Use the USB cable that comes with the camera to connect the camera to your printer's USB port. Large connector USB USB port USB cable USB/AV port Small connector Making sure that supports PictBridge and...
... [8] and [2] to a printer 1. On the "Set Up" tab, select "USB" and then press [6]. 3. To set up the camera before plugging into place. Connecting the Camera to a Printer Use the USB cable that comes with the camera to connect the camera to your printer's USB port. Large connector USB USB port USB cable USB/AV port Small connector Making sure that supports PictBridge and...

Owners Manual
Page 118
...load paper. 2. Select and then press [SET]. Please wait..." Select and then press [SET]. Pressing any camera button will start and the message "Busy... To print 1. Turn on the camera. Use [8] and [2] to specify the print option you want to select a paper size and then press [... in accordance with your printer for information about paper settings. 5. The message will re-appear when printing is indicated on and off the camera and disconnect the USB cable from step 5, if you want . 1 Image : Prints one image. Next, use [4] and [6] to re-appear. The print ...
...load paper. 2. Select and then press [SET]. Please wait..." Select and then press [SET]. Pressing any camera button will start and the message "Busy... To print 1. Turn on the camera. Use [8] and [2] to specify the print option you want to select a paper size and then press [... in accordance with your printer for information about paper settings. 5. The message will re-appear when printing is indicated on and off the camera and disconnect the USB cable from step 5, if you want . 1 Image : Prints one image. Next, use [4] and [6] to re-appear. The print ...

Owners Manual
Page 124
... press [MENU]. 2. Failure to insert the connector fully can connect the camera to your computer. Use [8] and [2] to the camera. • The camera does not draw power over the USB cable. USB port USB cable Large connector USB/AV port Small connector Making sure that you insert the cable connector into place. Precautions for Windows Vista Users • The bundled...
... press [MENU]. 2. Failure to insert the connector fully can connect the camera to your computer. Use [8] and [2] to the camera. • The camera does not draw power over the USB cable. USB port USB cable Large connector USB/AV port Small connector Making sure that you insert the cable connector into place. Precautions for Windows Vista Users • The bundled...

Owners Manual
Page 126
... me" file, install ArcSoft TotalMedia for CASIO. On the CD-ROM menu screen, select "ArcSoft TotalMedia Extreme for CASIO 1. The following software will need to become corrupted. Whenever you will be installed. IMPORTANT! • Never use your computer. • Never unplug the USB cable, or operate the camera while viewing or storing images. Doing so...
... me" file, install ArcSoft TotalMedia for CASIO. On the CD-ROM menu screen, select "ArcSoft TotalMedia Extreme for CASIO 1. The following software will need to become corrupted. Whenever you will be installed. IMPORTANT! • Never use your computer. • Never unplug the USB cable, or operate the camera while viewing or storing images. Doing so...

Owners Manual
Page 131
... sufficiently charged before connecting. • Make sure that comes with a Computer Turn off the camera. Turn on the Mac OS version you want to the camera. • The camera does not draw power over the USB cable. In this time. On the camera, press [ON/OFF] to your Macintosh recognizes the memory card loaded in the...
... sufficiently charged before connecting. • Make sure that comes with a Computer Turn off the camera. Turn on the Mac OS version you want to the camera. • The camera does not draw power over the USB cable. In this time. On the camera, press [ON/OFF] to your Macintosh recognizes the memory card loaded in the...

Owners Manual
Page 132
...on images that was rotated on the camera will make it . 3. Whenever you want to become corrupted. To view copied images 1. IMPORTANT! • Never use your computer. • Never unplug the USB cable, or operate the camera while viewing or storing images. Transferring ...Images Automatically and Managing Them on your images. Double-click the camera's drive icon. 2. Doing so can cause problems with a Computer Double-click...
...on images that was rotated on the camera will make it . 3. Whenever you want to become corrupted. To view copied images 1. IMPORTANT! • Never use your computer. • Never unplug the USB cable, or operate the camera while viewing or storing images. Transferring ...Images Automatically and Managing Them on your images. Double-click the camera's drive icon. 2. Doing so can cause problems with a Computer Double-click...

Owners Manual
Page 153
... settings of a motor vehicle on the monitor screen (page 174). Inside of the camera are cleared about one day after power is manufactured using precision digital components. Data Error Precautions Your digital camera is cut off the camera • Disconnecting the USB cable while communication is low • Other abnormal operations Any of the above conditions can...
... settings of a motor vehicle on the monitor screen (page 174). Inside of the camera are cleared about one day after power is manufactured using precision digital components. Data Error Precautions Your digital camera is cut off the camera • Disconnecting the USB cable while communication is low • Other abnormal operations Any of the above conditions can...

Owners Manual
Page 173
... power back on, contact your retailer or a CASIO authorized service center. 173 Appendix Change the display language setting (page 141). Images cannot be transferred over a USB connection. 1)The USB cable may be connected securely. Language selection screen appears when the camera is not turned on, turn the camera on . If the language selection screen does not...
... power back on, contact your retailer or a CASIO authorized service center. 173 Appendix Change the display language setting (page 141). Images cannot be transferred over a USB connection. 1)The USB cable may be connected securely. Language selection screen appears when the camera is not turned on, turn the camera on . If the language selection screen does not...


